How to Adjust the Belt-Driven System on Your Redcat RC Car?
So you just got your Redcat RC car up and running, and everything feels great at first. Then you start to notice something off. Your car doesn’t accelerate the same way it did last week, the belt sounds weird, or maybe your vehicle just feels sluggish on the track. Don’t panic. The issue probably sits right in front of you: your belt-driven system needs some attention.
The good news? You can absolutely handle this yourself. You don’t need to be a mechanic or spend hours watching videos. This guide breaks down everything you need to know about tuning and adjusting your RC car’s belt system. Let’s jump in.
What Exactly Is a Belt-Driven System?
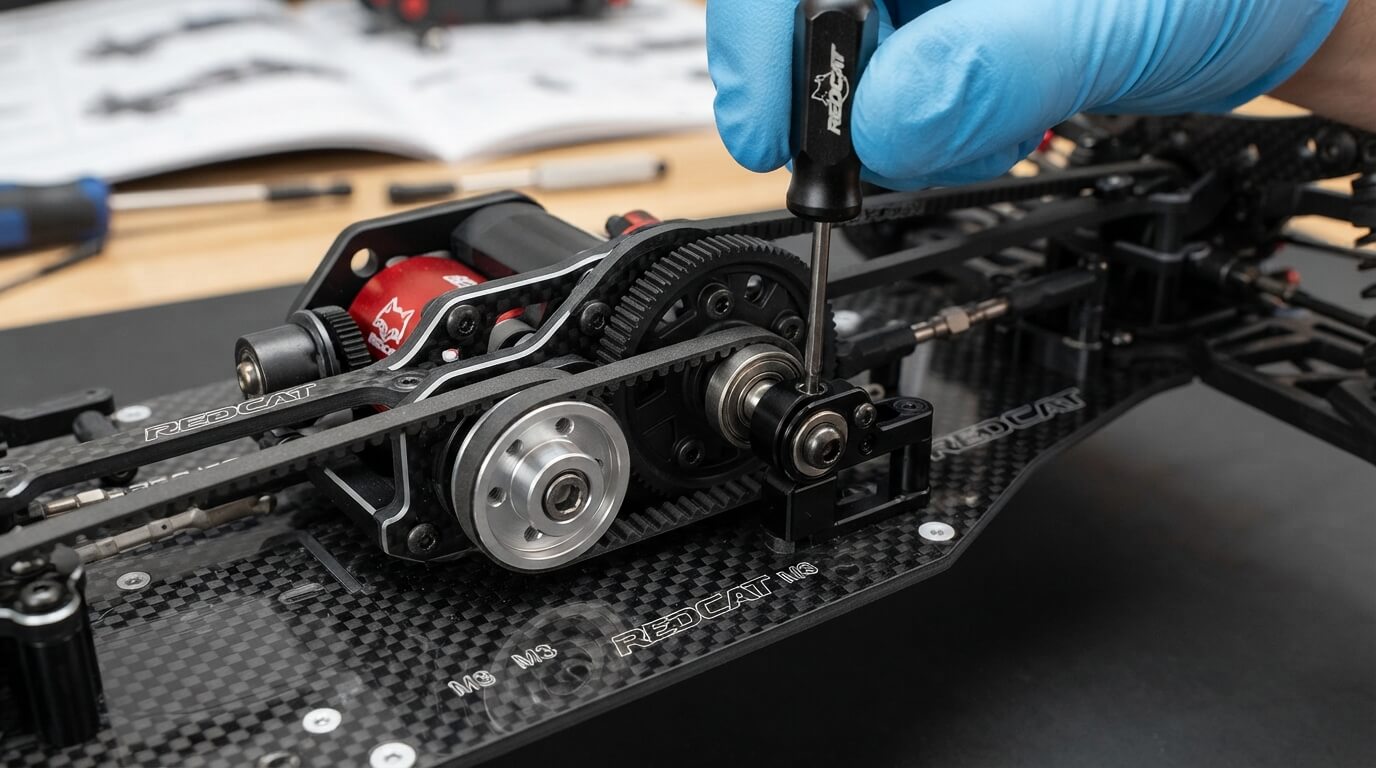
Before we get into the adjusting part, let’s talk about what you’re actually working with. A belt-driven system in your Redcat RC car transfers power from your motor to the wheels. Think of it like the chain on a bicycle, except it uses a rubber belt instead.
The belt wraps around two pulleys. One pulley connects to your motor (that’s the driving pulley), and the other connects to your transmission or wheels (that’s the driven pulley). When your motor spins, it makes the belt move, which spins the other pulley and gets your car rolling.
This system exists in lots of RC vehicles. You’ll find it on buggies, trucks, and many other Redcat models. The beauty of belt drive systems is that they’re reliable and relatively simple to maintain once you understand how they work.
Why Does Your Belt System Need Adjustment?
Your Redcat belt-driven vehicle needs adjustment for several reasons. First, belts can wear out over time. They lose their grip and start to slip. You’ll notice this because your car won’t respond as quickly when you hit the throttle.
Second, the belt tension might be off. Too tight, and your belt wears out faster while putting extra stress on your motor. Too loose, and your belt slips around the pulleys, which means power doesn’t transfer efficiently to your wheels. Getting the tension just right is absolutely crucial.
Third, the pulleys themselves can shift or get knocked out of alignment. When that happens, your belt doesn’t run straight anymore. It rubs against the sides of the pulleys, which damages the belt and causes poor performance.
Sometimes your belt just gets dirty. Dust and debris stick to it, and suddenly your belt can’t grip the pulleys properly. A quick cleaning can work wonders for your RC car’s performance.
Gather Your Tools Before You Start
You don’t need an expensive toolkit for this job. In fact, most people already have what you need lying around at home. Here’s what you should grab:
A set of hex wrenches (also called Allen keys) helps you loosen the bolts holding your pulleys in place. Your Redcat kit probably came with these, but a basic set works just fine.
Get yourself a small flathead screwdriver. You’ll use it for various adjustments and to pry things loose if they’re stuck.
A tension gauge or ruler helps you check if your belt tension is right. The ruler method works great for beginners and costs nothing.
Grab some clean rags or paper towels. You’ll want to wipe down your belt and pulleys to remove any dirt or grime that’s built up.
Some folks like to keep a small container of rubbing alcohol nearby for cleaning. It evaporates quickly and won’t leave residue on your parts.
Finally, get your Redcat RC car manual or find the specs online. Your specific model might have slightly different measurements or requirements, so having that info handy saves you time and frustration.
Step-by-Step: How to Adjust Your Belt Tension
Step One: Clean Everything First
Before you start turning wrenches, clean your belt and pulleys. Take a rag and wipe down the belt to remove dirt and dust. Check the pulleys too. If they have grease or grime built up, gently clean them with your rag. A dirty belt can’t grip properly, no matter how well you adjust the tension.
Step Two: Inspect Your Belt for Damage
Look closely at your belt while you have it exposed. Belts wear in different ways. You might see cracks, fraying on the edges, or shiny spots where the rubber has worn thin. If your belt looks seriously damaged, it’s time to replace it. A worn belt won’t perform well no matter how perfectly you tension it.
Step Three: Locate Your Motor Mount
On your Redcat RC vehicle, the motor mounts to a plate or bracket. This mount can slide back and forth. That’s your secret tool for adjusting belt tension. The closer your motor sits to the center of the car, the looser your belt becomes. The farther it moves away, the tighter your belt gets.
Step Four: Find the Right Tension
Here comes the part that stops most beginners: how tight should your belt be? Not too tight, not too loose. Perfect tension means your belt deflects about a quarter inch when you press on it with your thumb using light to medium pressure. If you’re using a ruler, you want around 5 to 7 millimeters of movement when you push gently on the belt between the two pulleys.
Some people use the finger test. Press on the belt with your index and middle finger. You should feel some give, but not tons of movement. Practice this a few times and you’ll develop a feel for it.
Step Five: Adjust the Motor Mount
Loosen the bolts holding your motor mount to the chassis. Don’t remove them completely, just make them loose enough that the mount can slide. Now you’ll slide the motor forward or backward. Move it back slightly to add tension, forward to reduce tension.
As you make small adjustments, keep checking your belt. Press on it and feel for that perfect quarter-inch deflection. Make tiny changes at first. You can always tighten more, but overshooting makes you have to back up and start over.
Step Six: Secure Everything
Once you’ve got the tension feeling right, tighten those motor mount bolts back down. Don’t crank on them with all your strength though. Use moderate pressure. You want them secure, not stripped.
Fixing Alignment Issues
Sometimes your belt doesn’t run straight on the pulleys. You’ll notice it creeping to one side. This happens when your pulleys aren’t perfectly aligned with each other. Misaligned pulleys cause your belt to rub and wear unevenly.
Check your pulley alignment by spinning your motor by hand and watching the belt. It should sit perfectly centered on both pulleys. If it’s drifting left or right, one of your pulleys needs to shift.
Loosen the bolt holding the pulley that’s out of position. Gently tap it with a hammer or adjust its position slightly. Spin the motor again and check the belt position. Keep making small adjustments until your belt tracks perfectly straight.
When Your Belt Keeps Slipping
A slipping belt means power isn’t getting through to your wheels. You’ll hear a chirping sound or feel your car losing acceleration. Before you assume your belt is dead, check these things.
First, verify your belt tension again. A loose belt slips every time. Adjust your motor mount and increase the tension slightly.
Second, look at your belt condition. Is it glazed and shiny? That means the rubber has hardened from heat and age. Worn belts can’t grip no matter what tension you apply. Time for a replacement.
Third, check if your pulleys are clean. Grease and dirt on the pulley surfaces reduce grip. Clean them thoroughly with your rag and a bit of rubbing alcohol.
Fourth, inspect your pulley grooves. Run your finger along the inside of each pulley. You should feel a smooth surface. If the grooves are cracked, stripped, or uneven, your pulleys need replacement. Damaged pulleys won’t hold a belt properly.
When Your Belt Breaks or Wears Out
Eventually, even the best-maintained belt reaches the end of its life. You’ll know when the time has come. Your belt might snap, fray significantly, or develop large cracks.
Replacing your belt is straightforward. Remove your motor and slide the old belt off the pulleys. Before you install the new one, check those pulleys one more time. Make sure they’re clean and not damaged.
Slip the new belt onto the pulleys. Push your motor toward the center of the car to give yourself slack. Once the belt is in place on both pulleys, you’re ready to tension it using the process we already covered.
New belts feel stiff at first. That’s normal. They’ll break in after a few runs and feel more natural. Just make sure your tension is set correctly from the start.
Maintenance Tips to Keep Your Belt Happy
You can extend your belt’s life significantly with basic maintenance. After each run, wipe down your belt with a dry rag. Dirt and dust are your belt’s enemies.
Store your RC car somewhere cool and dry. Heat breaks down rubber, and moisture causes corrosion on the metal pulleys. A hobby shelf inside your house works great.
Check your belt tension before each session. This only takes thirty seconds and catches problems early. A belt that’s about to slip shows warning signs if you’re paying attention.
Don’t run your Redcat in extreme conditions if you can help it. Wet grass, sand, and mud all stress your belt drive system. If you do run in tough terrain, take extra time to clean everything afterward.
Replace your belt on a schedule, even if it still looks okay. Think of it like changing your car’s oil. Just because it still works doesn’t mean it won’t fail at the worst possible moment. Most enthusiasts replace belts every few months of regular running.
Common Questions About Belt Adjustment
Should I tension my belt the same on all terrain?
Mostly yes, but some folks adjust slightly for conditions. Sand increases friction on the belt, so some racers loosen it just a hair. Most of the time, your standard tension works fine everywhere.
Can I use a different belt on my Redcat?
Not really. Your Redcat needs the specific belt for your model. Using the wrong size or type causes slipping and poor performance. Stick with factory replacements or known aftermarket brands designed for your vehicle.
How often should I check my belt?
Once a week if you’re running your car regularly. Before each session is even better. Checking takes literal seconds and prevents bigger problems.
What causes my belt to slip constantly?
Usually it’s tension, but it could be pulley damage, a worn-out belt, or dirty pulleys. Check each of these in order. Nine times out of ten, it’s either tension or a worn belt.
Can I use WD-40 on my belt?
No. WD-40 makes rubber slippery and breaks it down over time. Stick to plain water for light cleaning, or just use a dry rag.
The Bottom Line
Adjusting your Redcat RC car’s belt-driven system isn’t rocket science. You need to understand how belt tension works, know where to make adjustments, and keep your belt clean. Most of the time, your belt runs perfectly fine. Sometimes it needs a small tweak.
Start with the tension. Check it regularly. Keep things clean. Replace your belt when it’s time. Follow these simple rules, and your RC car’s belt drive system will reward you with reliable performance and years of fun on the track or trail.
Your Redcat deserves good care, and your belt system deserves regular attention. Now you know exactly how to give it that attention. Get out there, adjust your belt, and enjoy some solid RC action. Your car will thank you with smooth power delivery and consistent performance every time you hit the throttle.