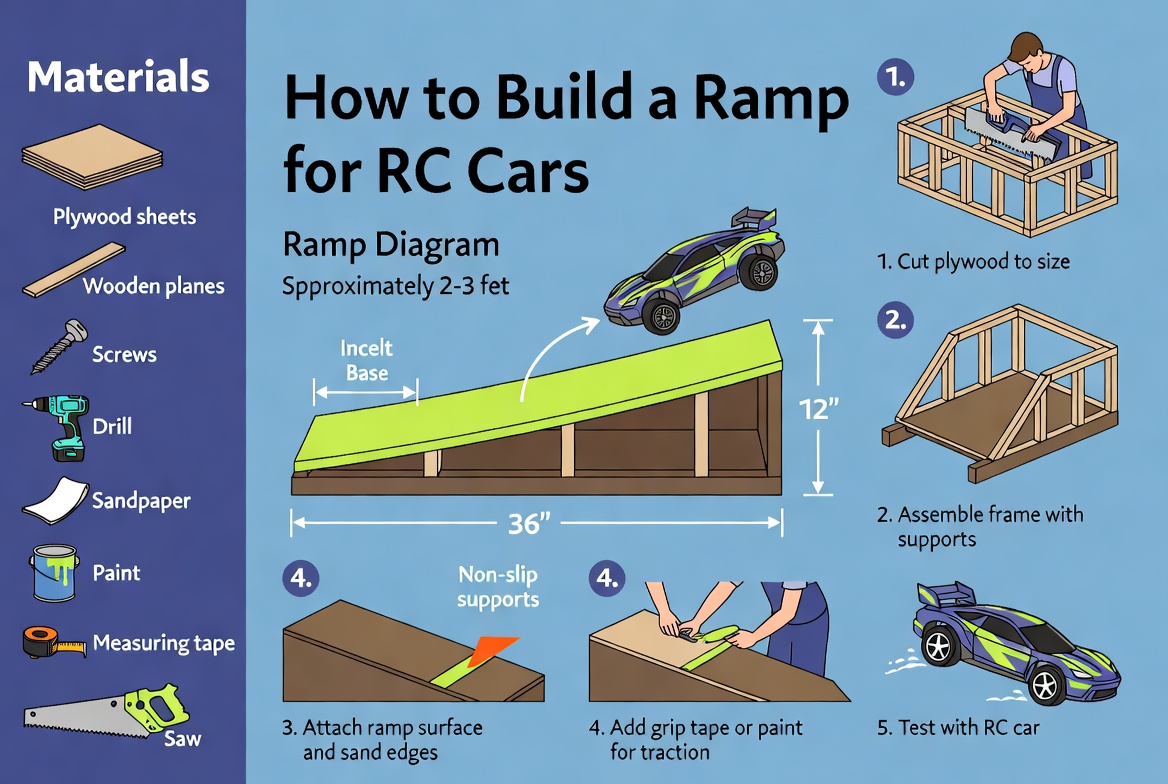
How to Build a Ramp for RC Cars?
Want to take your RC car racing to the next level? Building your own ramp is one of the best ways to do it. A homemade ramp opens up crazy stunts, jumps, and tricks that make RC car driving way more fun. The good news? You don’t need to be a expert builder to make one. This guide walks you through every step of building an awesome RC ramp right in your backyard or garage.
Why You Need an RC Ramp
RC cars are already awesome by themselves, but a ramp changes everything. When you have a jump ramp set up, your little car can fly through the air, land stunts, and create moments that feel genuinely exciting. Kids and adults both love watching their remote control cars launch off a ramp.
Beyond the fun factor, building a ramp teaches you about angles, materials, and design. You get to be creative and make something with your hands. Plus, a homemade ramp costs way less than buying one from a store. You probably already have many of the supplies lying around your house.
Materials You’ll Need to Gather
Before you start building your jump ramp, grab everything you need. Having all your supplies ready saves time and frustration later on.
For the Basic Structure:
- One sheet of plywood (3/4 inch thickness works great)
- Wood boards for framing (2x4s or 2x6s)
- Wood screws (2.5 inch length)
- A power drill with bits
- A saw to cut wood
- Measuring tape
- A pencil for marking
For the Surface:
- Sandpaper (medium and fine grit)
- Wood stain or paint (optional but makes it look nice)
- Rubber grip tape or skateboard grip tape (keeps cars from sliding)
For Support:
- Wood glue
- Additional blocks for bracing
- A level to check if your ramp is straight
Don’t stress if you don’t have a power drill or saw. You can ask a parent, friend, or neighbor to help with cutting and drilling. Many hardware stores will cut wood for free or for a tiny fee if you buy it from them.
Understanding the Basic Ramp Design
A simple RC ramp doesn’t need to be complicated. The easiest ramp design uses basic shapes that any beginner can handle. Think of it like a skateboard ramp, but smaller and built for tiny cars.
The most common design has a flat base, angled sides for support, and a smooth top surface where your car will zoom across and fly off. The angle matters because it affects how fast your car goes and how high it jumps. A steeper angle creates more air, while a gentler angle gives you better control.
Most beginner ramps work best at an angle between 30 and 45 degrees. This sweet spot gives you plenty of air without making your car flip out of control.
Step-by-Step Instructions for Building Your RC Jump Ramp
Step 1: Cut Your Wood Pieces
Start by cutting your plywood to size. A great beginner ramp measures about 24 inches long, 18 inches wide, and stands 12 inches tall at the high end. These measurements work perfectly for most RC cars.
Use your saw to cut:
- One piece of plywood for the top surface (this is the part your car drives on)
- Two triangular support pieces for the sides
- Four boards for the frame base
Take your time with these cuts. Straight cuts make a ramp that looks good and works better.
Step 2: Build the Frame Base
Lay out your four frame boards in a rectangle shape on the ground. This base needs to be sturdy because everything else sits on top of it. Apply wood glue to the corners where the boards meet, then drive screws through the joints to lock them together tight.
Check that all corners are square using a level tool. A crooked base leads to a crooked ramp, and that makes your cars behave unpredictably. Spend a few extra minutes getting this right and you’ll love the results later.
Step 3: Attach the Side Support Pieces
Your triangular support pieces go on the sides of the base. These hold up the angled top surface and give your ramp strength. Apply wood glue to the edges, then screw them down securely.
These side supports are super important. They carry all the weight of the plywood top plus your RC car zooming across. Use at least four screws on each side to keep everything locked in place.
Step 4: Add the Top Surface
Now for the part your car actually drives on. Place your plywood sheet on top of the support pieces. This top piece should angle from one end (low) to the other (high). Screw it down firmly from underneath so the top stays smooth and clean.
Once this is attached, take a moment to appreciate what you’ve built. You have an actual ramp!
Step 5: Sand and Smooth Everything
Grab your sandpaper and get to work smoothing out the top surface. You want it really smooth so your RC car doesn’t bounce or catch on rough spots. Sand in the direction of the grain first with medium-grit paper, then finish with fine-grit paper.
Pay extra attention to the launching edge, which is the far end where your car takes off. Any bumps or splinters there will mess up your jumps.
Step 6: Add Grip for Traction
Your RC car needs grip to zoom up the ramp without sliding backwards. Skateboard grip tape or rubber grip tape works perfectly. Cut strips and stick them to the top surface. Space them out so your car’s wheels have plenty of contact with the tape.
Don’t cover the very top launching edge with grip tape. That part needs to be smooth so your car launches cleanly without losing speed.
Different RC Ramp Designs You Can Build
The Simple Straight Ramp
This is the easiest design and a perfect starting point. It’s just a flat board at an angle. Straight ramps are great for learning and building your skills before you try fancier designs. Many people keep a straight ramp in their collection forever because it never gets old.
The Curved Ramp
A curved jump ramp is like the straight ramp’s cooler cousin. Instead of a sharp angle, the curve is smooth and gradual. This design sends your car higher and smoother. Building a curved ramp takes more skill because you need to bend or build up layers of wood to create the curve. Start with a straight ramp first, then try curves once you feel confident.
The Double Jump Setup
This design has two ramps with a gap in the middle. Your car launches off the first ramp, flies through the air, and lands on the second ramp. Double jumps look incredible and feel amazing to land perfectly. Build two separate ramps and place them with space between them. The gap size depends on how powerful your RC car is.
The Spine Ramp
This ramp has two curved sides that meet at the top, like a skateboard spine or an upside-down V. It’s trickier to build but super fun for tricks. Your car can ride up one side, hit the top, and ride down the other side. Some people try to balance their car on the spine itself.
Tips for Smooth Ramp Operation
A finished ramp still needs care to work perfectly. Keep the top surface clean from dirt and debris. Dust buildup kills your car’s grip and ruins launches. A quick wipe-down with a damp cloth before each session keeps everything running smooth.
If your car starts sliding on the ramp after a while, the grip tape might need refreshing. You can add new layers on top of the old ones, or carefully peel off the old tape and stick new tape down. This simple maintenance keeps your ramp performing great.
Safety Considerations for Your RC Ramp Area
Build your ramp in an open space away from people, pets, and stuff that could break. Flying RC cars can surprise you sometimes. A garage corner or backyard area works great. Make sure the ground underneath is level so your ramp doesn’t wobble.
Keep your ramp out of harsh weather when you’re not using it. Rain and sun fade wood and weaken grip tape. A tarp or lightweight covering keeps your ramp protected between sessions.
Never stand directly in front of the launching end of your ramp. Even tiny cars moving fast can sting if they hit you. Keep your face and hands clear of the launch zone when testing.
Common Mistakes to Avoid
Building your first ramp is a learning experience. Here are problems people hit and how to skip them.
Angle Too Steep: A ramp steeper than 45 degrees launches your car dangerously high and makes control almost impossible. Stick with the 30 to 45-degree sweet spot, especially at first.
Weak Side Supports: If your side supports aren’t beefy enough, your ramp will wobble or even break when your car drives on it. Use thick wood and attach it with plenty of screws.
Rough, Splintery Surface: A bumpy top ruins launches. Take time sanding. Your car deserves a smooth ride.
Grip Tape Doesn’t Stick: Cheap grip tape peels up fast. Buy decent quality stuff and clean the plywood before sticking it down. Rough surfaces help tape stick better.
Launching Edge is Rounded: Keep that edge sharp and clean so your car launches straight without catching and flipping. Sand it carefully.
Adding Custom Features to Your Ramp
Once you nail the basics, get creative. Paint your ramp awesome colors. Add a launch gate that your car breaks through at takeoff. Build in an adjustable angle system so you can change the slope without rebuilding everything.
Some people add LED lights underneath their ramp for night driving. Others paint designs or stickers on the sides. The ramp is your creation, so make it match your style.
Designing Multiple Ramps for More Tricks
Owning just one ramp is great, but multiple ramps open wild possibilities. A low straight ramp and a high ramp work together great. Your car can launch from one, possibly chain into tricks, and land on the second one.
Build ramps with different angles and heights. Test which combos work best with your specific RC car. Some cars fly high and far. Others need gentler angles. Experimenting teaches you tons about your car’s performance.
Maintenance and Repair Tips
Over time, your ramp gets wear and tear. The good news is fixing it is super easy.
Grip tape wears down after lots of driving. When your car starts sliding up the ramp like it’s on ice, grip tape refresh time has come. This takes 15 minutes and costs almost nothing.
Wood can get small cracks from weather or impacts. Fill these with wood filler, sand smooth, and paint over them. Your ramp looks fresh again.
If screws loosen up, tighten them back down. Loose screws cause wobbling and make your ramp feel unsafe. Check all the connections every few months.
The launching edge gets rounded over time from your car’s impact. Sand it sharp again when you notice this. It makes launching work better.
Taking Your Skills to the Next Level
Once you’ve built one ramp and landed tons of jumps, you’re ready for bigger challenges. Build ramps with loops, banked turns, or spiral designs. Join RC car clubs where people share ramp designs and tricks.
Watch videos of other builders’ ramps. You’ll get ideas for new designs. The RC community loves sharing building tips and celebrating jumps online.
Keep building. Every new ramp teaches you something. Your tenth ramp will be way cooler than your first because you know way more by then.
Conclusion: Your RC Ramp Adventure Starts Now
Building an RC car ramp is an awesome project that pays off immediately. You get a functional piece of gear that multiplies your driving fun, learn practical building skills, and create something you made with your own hands.
Start simple with a basic straight ramp. Get comfortable with the building process. Once you’ve nailed that, branch out into curved ramps, double jumps, and wild custom designs. The world of RC ramp building is wide open.
Gather your materials this week. Grab your tools. Cut that wood and build your ramp. Then take your RC car outside and feel that rush when it launches perfectly off your creation. This is just the beginning. Happy ramp building!