How to Paint an RC Car Body?
Painting an RC car body can feel intimidating at first, but I promise you can do this. Thousands of hobbyists transform plain plastic shells into stunning works of art every single day. The best part? You don’t need expensive equipment or years of experience. With the right approach and a little patience, you’ll end up with a custom paint job that makes your RC car stand out.
Let me walk you through the entire process step by step so you actually feel confident when you pick up that paint can.
Why Paint Your RC Car Body?
Before we dive into the how, let’s talk about the why. Your RC car comes in basic colors straight from the factory. Nothing wrong with that. But a fresh paint job gives your car personality. It becomes yours. You can create anything from a sleek racing stripe to a full custom design that turns heads at the track or wherever you take your vehicle.
Plus, painting teaches you real skills. You learn how surfaces react to paint, how to use tools properly, and how to handle small details. These skills help you get better at everything you do, not just RC cars.
What You’ll Need Before Starting
Let’s gather your supplies first. You don’t need to buy everything at once, but these items make the job much easier.
Paint supplies:
- Primer spray or airbrush primer
- Base coat paint (acrylic or RC paint)
- Clear coat for protection
- Masking tape
- Painter’s tape
- Newspaper or plastic sheeting
Tools and prep materials:
- Sandpaper (150-grit and 400-grit)
- Tack cloth
- Cleaning supplies (soap, water, isopropyl alcohol)
- Spray gun or airbrush (optional but helpful)
- Brushes (for detail work)
- Drop cloth or cardboard for the work area
- Well-ventilated space
Safety gear:
- Respirator or dust mask
- Safety glasses
- Gloves
You can start with spray cans if you don’t want to invest in an airbrush yet. Spray cans work great for beginners and give solid results. An airbrush gives you more control once you’re ready to level up.
Preparing Your RC Car Body
This step matters more than anything else. I know preparation sounds boring, but a properly prepped surface transforms your entire paint job from decent to incredible.
Step 1: Clean the body thoroughly
Wash your RC car body with soap and warm water. Use a soft cloth and get rid of all dust, dirt, and oils. Dry it completely with a clean towel. Now spray it with isopropyl alcohol and let it dry. This removes any remaining residue that could interfere with paint adhesion.
Step 2: Sand the surface
Start with 150-grit sandpaper. Sand the entire body with light pressure. You’re not trying to remove material aggressively. You just want to roughen the shiny factory finish so paint can grip it. Sand in circular motions and cover every area evenly.
After you finish with 150-grit, move to 400-grit sandpaper. This finer grit smooths out the scratches from the coarser paper. Sand the whole body again with the same gentle approach. Take your time here.
Step 3: Wipe down with a tack cloth
This might seem strange, but trust me. A tack cloth pulls up all the tiny dust particles created by sanding. Run it over your entire body. It’s sticky, so particles stick to it instead of staying on your car. This prevents dust from getting trapped under your paint.
Step 4: Mask off areas you don’t want painted
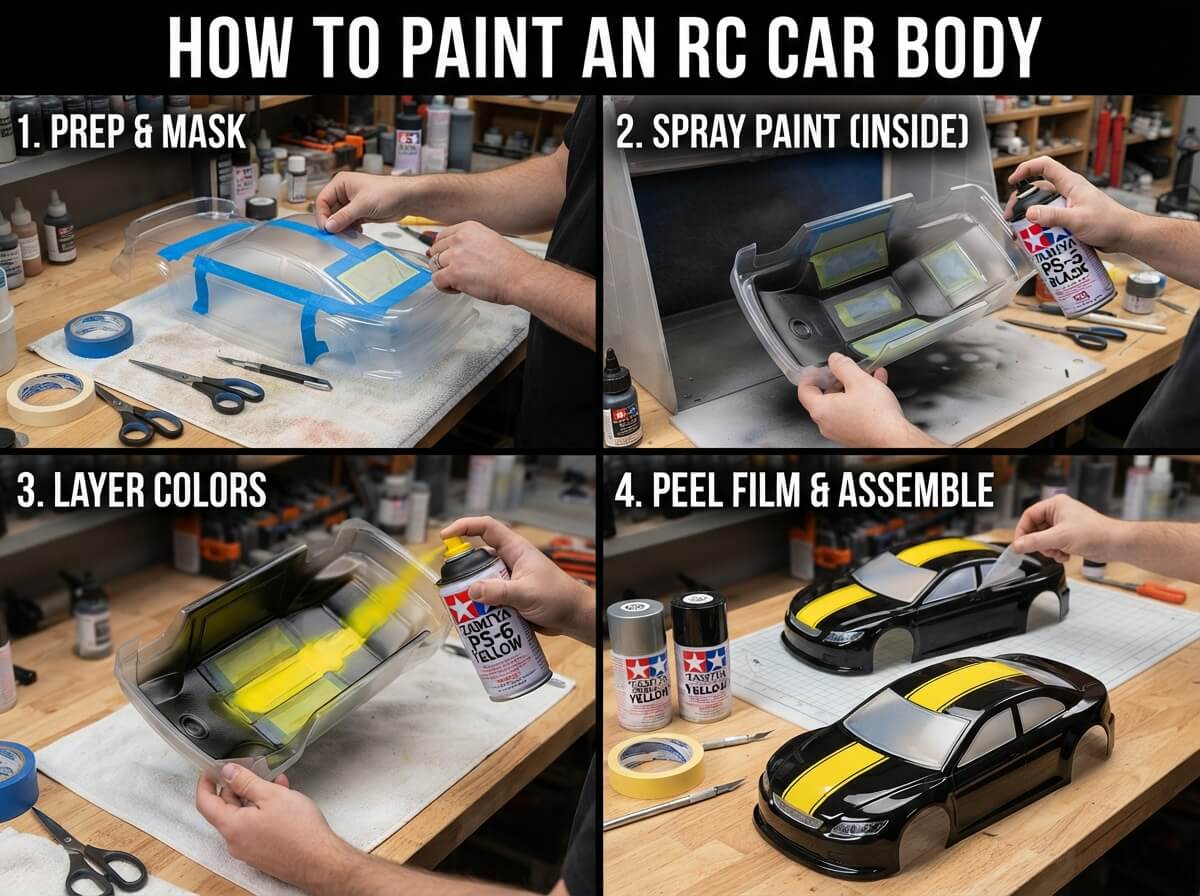
Use masking tape and painter’s tape to cover windows, trim pieces, and any areas that should stay unpainted. Press the tape edges down firmly so paint can’t seep underneath. Take your time with this. A careful masking job shows in the final product.
Applying Primer
Primer creates a base layer that helps paint stick better and gives you a smoother finish. Think of it as the foundation of a house. You won’t see it in the end, but everything depends on it.
Applying primer correctly:
Shake your primer can or airbrush bottle for a good minute. This ensures the color particles mix evenly. In a well-ventilated area, hold the can about eight inches from your body. Squeeze the trigger steadily, moving the can in smooth strokes across the body.
Apply thin coats rather than one thick coat. Thin coats dry faster and won’t drip or sag. Let each coat dry for the time recommended on the can. Usually that’s twenty to thirty minutes. Apply two to three coats total. Each coat should cover slightly more area than the previous one, building up even coverage.
The primer should look smooth and uniform when you finish. If you see any rough spots, you can lightly sand them with 400-grit paper and apply another coat.
Applying Your Base Color Coat
Now comes the exciting part. This is where your RC car starts looking finished.
Mixing and preparing paint:
If you’re using spray cans, shake them well. If you’re using an airbrush with bottled paint, shake the paint bottle and pour a small amount into your airbrush cup. Never fill the cup all the way because you’ll waste paint.
Spraying technique:
Hold your paint can the same distance from the body as you did with primer. About eight inches works well. Move in smooth, steady motions. Don’t jab or poke at the body. Sweep the can across, keeping your wrist steady and your arm relaxed.
Apply your base color in light, even coats. You’ll usually need at least two coats to achieve solid color coverage. Let paint dry between coats. More thin coats always beat one thick coat. Thick paint runs and sags and looks messy.
Fixing mistakes:
If you mess up and drip paint, don’t panic. Let it dry completely. Then very gently sand that spot with fine-grit sandpaper and spray over it.
Creating Custom Designs and Patterns
Want racing stripes or two-tone paint effects? This is where custom designs happen.
For stripes and simple designs:
Use painter’s tape to mark where your stripes go. Press it down firmly. Spray your stripe color, let it dry, and peel off the tape. The edge should be clean and sharp. If paint bled under the tape, use a fine brush with matching paint to clean up the line.
Two-tone paint effects:
Mask off the area where your two colors will meet. Apply your first color completely. Once it dries, remove that tape and apply new tape on the opposite side. Spray your second color. This creates a clean line between the two shades.
Freehand details:
For more complex designs, use a small brush with acrylic paint or thin your paint with the proper thinner. Practice on paper first. Then carefully paint details onto your body. A steady hand and patience win here.
Applying Clear Coat
Clear coat protects all your hard work and gives your paint job that professional shine.
Why you need clear coat:
Paint alone wears fast. Every bump, scratch, and drive in the dirt affects it. Clear coat acts like armor. It protects your color coat and gives you a lasting finish that looks great.
How to apply clear coat:
Use the same spraying technique you used for your paint. Apply thin coats, letting each one dry before adding the next. Usually two to three coats work well. Clear coat dries faster than paint, often in ten to fifteen minutes per coat.
Your body now has that glossy, protected appearance. The clear coat should look smooth and consistent across the entire surface.
Wet Sanding and Polishing
Once everything is totally dry, you can take your paint job to the next level through wet sanding and polishing.
Wet sanding process:
Use 1000-grit or 2000-grit sandpaper for this step. Wet the sandpaper and the body surface with water. The water acts as a lubricant. Sand very gently, checking your progress often. You’re smoothing out any texture or imperfections in the clear coat.
The body will look slightly dull after wet sanding. That’s normal.
Polishing:
Use a fine polishing compound and a soft cloth. Rub in circular motions across your body. The polish fills micro-scratches and brings back the shine. Work in sections and buff thoroughly with a clean cloth.
Your paint job now looks absolutely beautiful and has serious depth to it.
Removing Masking Tape
Peel off all your masking tape carefully after everything is completely dry. Pull at a slight angle so paint doesn’t tear or chip. Take your time here. Rushing ruins the clean lines you worked so hard to create.
If paint sealed over your tape edges, use a craft knife to gently cut along the line before peeling.
Common Mistakes to Avoid
Learning what not to do saves you tons of frustration.
Spraying too thick:
Thick paint coats drip, sag, and crack as they dry. You end up with a messy finish. Multiple thin coats always win.
Skipping primer:
I get it. You want to paint now. But primer gives you better results. It’s worth the extra time.
Not letting paint dry:
Patience matters here. Don’t rush to apply your next coat. Follow the drying time on your paint can.
Painting in wrong conditions:
Cold or humid conditions make paint dry slowly and unevenly. Paint in a warm, dry space between fifty and eighty-five degrees if possible.
Poor ventilation:
Open windows and run fans. Fumes from paint aren’t good for you, and fresh air helps paint dry properly.
Inconsistent technique:
Keep your spray distance the same. Keep your movements smooth. Changing your technique mid-job creates uneven coverage.
Troubleshooting Paint Problems
Sometimes things go sideways. Here’s how to handle it.
Paint runs or drips:
Let it dry completely. Use fine sandpaper to gently sand the drip. Spray another thin coat over the area.
Uneven color:
This usually means your coats were too thin or too far apart. Apply another coat of base color, making sure you’re at the right distance and moving smoothly.
Paint not sticking:
Your surface probably wasn’t clean enough or wasn’t sanded. Let your paint dry, sand the area, and spray again.
Orange peel texture:
This happens when paint dries too fast or humidity is wrong. Wet sand the area and polish it smooth.
Dust particles in paint:
A tack cloth before painting prevents this. If it happens, sand smooth after drying and apply another coat.
Different Paint Methods Explained
You have options for how you apply paint.
Spray cans:
Cheapest option and easiest for beginners. No equipment needed. Works for most RC car bodies.
Airbrush:
Gives more control and looks professional. Requires practice and air compressor. Worth learning if you paint multiple cars.
Brush application:
Good for detail work and touch-ups. Not ideal for solid base coats.
HVLP spray gun:
Professional-grade equipment. Overkill for most hobbyists but creates flawless results.
Start with spray cans. Once you get comfortable, experiment with other methods.
Protecting Your Finished Paint Job
Your shiny new paint job needs care.
Storage:
Keep your painted body in a clean, dust-free place. A shelf in a closet works great.
Handling:
Avoid touching the paint when your hands are dirty or wet. Oils from your skin can mark the finish.
Washing:
Use mild soap and water. Dry gently with a soft cloth. Avoid harsh chemicals.
Repairs:
Small scratches can be touched up with a brush and matching paint. Bigger damage might need another coat or full repaint.
Final Thoughts
Painting an RC car body teaches patience, precision, and creativity. Your first attempt might not be perfect, and that’s completely fine. Every painter in the hobby started exactly where you are. The more bodies you paint, the better you get.
Your RC car deserves to look awesome, and now you know exactly how to make that happen. Start simple with solid colors or basic stripes. Once you nail those, push yourself with more complex designs.
Go get that paint can. Your custom RC car awaits.