How to Charge Your DJI Mini 3 Pro RC Controller?
If you just got a DJI Mini 3 Pro, you’ve made a great choice for your first drone. But before you can take to the skies, you need to know how to charge that remote controller battery properly. This guide will walk you through everything about keeping your RC remote powered up and ready for action.
What Exactly Is the RC Controller?
Let me start with the basics. The RC controller, also called the remote control or simply the remote, is the device you hold in your hands to fly your drone. It connects wirelessly to your DJI Mini 3 Pro and sends all your commands to the aircraft. Think of it as the brain that controls every movement your drone makes.
The remote controller battery inside this device powers all the electronics that make this magic happen. Without a fully charged remote control battery, you can’t fly your drone. So learning how to charge it properly is step one in your drone journey.
Understanding Your DJI Mini 3 Pro Remote Controller Battery
The DJI Mini 3 Pro comes with an intelligent remote controller battery. This isn’t just any regular battery you’d throw in a toy. It’s a lithium-ion battery that stores and manages power intelligently.
Your remote battery has a capacity of around 2250 mAh. This technical number simply means how much power your battery can hold. A higher number means longer flight time and more stable control. The battery inside your remote controller is built to last hundreds of charge cycles if you treat it right.
The remote controller battery also has built-in safety features. The battery itself monitors its own health and temperature. If something goes wrong, it will alert you through the remote’s screen or through the DJI app on your phone.
The Three Main Ways to Charge Your Remote Controller
Your DJI Mini 3 Pro remote has several charging options. You can pick the method that works best for your lifestyle and where you’ll be flying.
Option One: Using the USB-C Cable
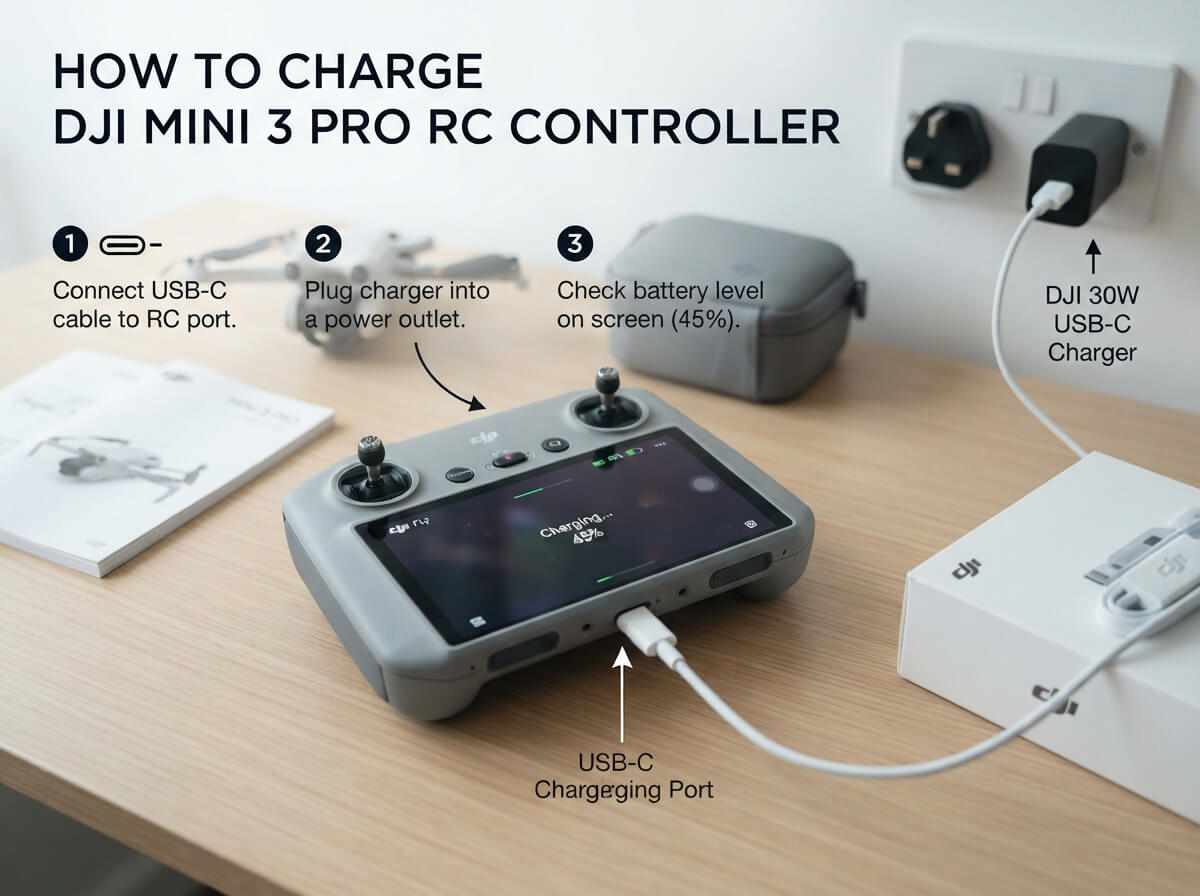
The easiest and most common way to charge your remote controller is through USB-C. Your DJI Mini 3 Pro comes with a USB Type-C cable in the box. One end plugs into your remote controller, and the other end goes into a power adapter or any USB power source.
Here’s how to do it:
First, locate the USB-C port on the back of your remote controller. It’s usually at the bottom. Take your USB-C cable and insert it gently into this port. You’ll know it’s in the right way when it slides in smoothly without forcing it.
Next, plug the other end of the USB-C cable into a power adapter. Any standard USB-C power adapter works fine. You can use a phone charger, laptop charger, or any USB-C charger you already have at home. The charging will start immediately.
Your remote controller battery will take about 45 to 60 minutes to charge completely using this method. You’ll see a charging indicator on your remote’s screen. The indicator will show you roughly how much power you have left.
Option Two: Using a Multi-Charger Hub
DJI also sells a charging hub that can charge multiple batteries at once. If you buy extra remote controller batteries, this hub becomes really handy. The multi-charger hub is a small dock that holds your batteries and charges them through USB-C power input.
To use the charging hub, slide your battery into one of the slots on the hub. The hub has multiple slots, so you can charge several DJI batteries at the same time. Plug the hub into power using USB-C, and all your batteries will start charging together.
This method is great if you have more than one remote controller battery. You can keep charging one while you use another.
Option Three: Car Charging
For pilots who fly in different locations, car charging can be super helpful. You can get a car charger adapter that plugs into your vehicle’s 12V cigarette lighter socket or USB outlet. Then you attach your USB-C cable to this adapter and charge your remote on the road.
Car chargers are especially useful if you take your drone to remote flying spots. You can top up your batteries while traveling to your next location.
Step-by-Step Charging Instructions
Let me walk you through the whole charging process so you get it right every time.
Step One: Find Your Charging Cable
Your DJI Mini 3 Pro package includes a USB Type-C cable. This is your main charging tool. Keep it in a safe place where you won’t lose it.
Step Two: Prepare Your Remote Controller
Before you plug anything in, make sure your remote is turned off. You don’t need to turn it off to charge it, but it’s a good habit. Make sure the remote is clean and dry.
Step Three: Locate the Charging Port
Look at the bottom of your remote controller. You’ll see a small USB-C port. This is where your charging cable goes. It’s small but easy to spot once you know what you’re looking for.
Step Four: Connect the Cable
Hold the USB-C cable connector in your hand. The correct way to insert it is marked on the port. Gently push the connector straight in until you hear a small click. Don’t force it or twist it.
Step Five: Attach to Power Source
Now take the other end of the cable and plug it into your power adapter. Make sure your power adapter is connected to a working wall outlet or other power source. You should see your remote controller’s screen light up with charging information.
Step Six: Wait for Full Charge
Your remote controller battery needs about 45 to 60 minutes to charge completely. You’ll see a battery indicator on your screen that fills up as the charge increases. When the indicator shows 100 percent, your battery is ready to go.
Step Seven: Disconnect and Store
Once fully charged, unplug the cable from your remote controller. Disconnect the power adapter from the outlet. Store your cable somewhere safe and organized.
Best Practices for Remote Controller Battery Health
Your remote control battery will last much longer if you follow some basic rules. These tips help you keep your battery in great shape for years of flying.
Charge Your Battery Before It Dies Completely
Don’t wait until your remote is completely dead before charging it. Lithium batteries like the one in your remote controller live longer when you charge them regularly. Try to charge your battery when it drops to about 20 percent power. This habit keeps your battery much healthier over time.
Avoid Extreme Temperatures
Never charge your remote controller battery in freezing cold or extreme heat. The ideal charging temperature is between 68 and 86 degrees Fahrenheit. Cold temperatures slow down the charging process and can damage the battery. Heat can also harm the internal battery cells.
Use Official DJI Cables
Stick with the USB-C cable that came with your remote controller or get an official DJI replacement. Third-party cables might seem cheaper, but they can damage your battery or charge it slowly. The official cable is worth the investment.
Don’t Leave It Charging Overnight
Modern remote controller batteries have safety features, but leaving them plugged in for days isn’t a good idea. Charge your battery for the time it needs and then unplug it. Most people charge their remotes overnight by accident and that’s okay once in a while, but make it a habit to unplug once fully charged.
Keep Your Charging Port Clean
The USB-C port on your remote controller can collect dust and dirt. Before plugging in your cable, take a quick look at the port. If you see dust, use a clean, dry cloth or a small brush to gently clean it out. A clean port charges faster and more safely.
Store Your Battery Properly
When you’re not flying for a while, store your remote controller battery in a cool, dry place. Don’t leave it sitting in direct sunlight or in a hot car. If you’re storing it for more than a few weeks, charge it back to about 40 or 50 percent before putting it away. This storage level keeps the battery healthiest during long periods without use.
How to Read Your Battery Status
Your remote controller has ways to tell you exactly what’s happening with your battery. Learning to read these signals helps you never run out of power while flying.
The Screen Indicator
When you turn on your remote controller, the screen shows a battery percentage in the top corner. This number tells you exactly how much charge you have left. If you see 50 percent, you have half a battery left.
The LED Light
Your remote controller has LED lights that glow different colors. These lights tell you about your battery status without looking at the screen. A green light usually means healthy battery. An orange light means your battery is getting low. A red light is a warning that your battery is very low and needs charging soon.
The App Display
If you have your phone connected to your drone through the DJI Fly app, you can see your remote controller battery level on your phone screen too. This double-check helps you never get caught without power.
Troubleshooting Common Charging Issues
Sometimes things don’t go as planned. Here are the most common charging problems and how to fix them.
Your Remote Won’t Charge
If your remote isn’t charging, try a different USB-C cable first. The cable might be damaged. Then try a different power adapter. If you still have trouble, check the charging port for dirt or debris and clean it gently. If your remote still won’t charge, it might be a hardware problem, and you should contact DJI support.
Charging Takes Too Long
If your battery takes much longer than 60 minutes to charge, you might be using a weak power adapter. Phone chargers are often low power. Try using a more powerful adapter like one from a laptop. Always use at least a 10-watt power adapter for best results. Weak power adapters will charge your battery slowly.
Battery Gets Hot During Charging
It’s normal for your battery to get slightly warm while charging. But if it gets very hot to the touch, unplug it immediately. Hot batteries can be dangerous. Let your battery cool down, then try charging again in a cooler environment.
Remote Dies Quickly After Charging
If your battery drains fast even after a full charge, the battery might be getting old. Lithium batteries gradually lose their ability to hold a charge over time. After several hundred charge cycles, expect longer charging times and shorter flight times. At this point, you might need a replacement battery.
What You Should Know About Battery Cycles
Battery cycles are important to understand. One cycle means you charge your battery from empty to full one time. Every battery has a limited number of cycles it can handle before it starts failing.
Your DJI Mini 3 Pro remote controller battery can handle roughly 500 to 1000 charge cycles. This sounds like a lot, but it matters. Each time you charge, you use up one small part of your battery’s total life.
Charging your battery regularly when it’s at 20 percent is much better than letting it die completely. This habit stretches out how many total cycles your battery can give you. You’ll get years and years of use if you treat your battery right.
Creating a Good Charging Routine
The best pilots develop a good charging routine. Here’s what works well for most drone flyers.
Charge your remote controller battery at the end of every flying session. By the time you’re done flying and packing up your gear, your remote has lost some power. Plug it in as you’re packing. By the time you’re ready to fly again, it’s fully charged and ready to go.
Keep a charging cable with your drone gear so you always have it when you need it. Don’t leave it at home. Get a backup cable too so you have options.
At home, set up a dedicated charging station. Pick one spot where you always charge your batteries. This keeps your cables organized and helps you remember where everything is.
Flying Tips to Extend Your Battery Life Between Charges
While we’re talking about keeping your remote powered up, here are some tips to make your battery last longer while you’re flying.
Avoid using extreme stick movements. Smooth, gentle control uses less power than fast, jerky movements. Your remote transmitter works harder when you’re making sudden changes.
Reduce the screen brightness on your remote controller if the sun is bright. A dimmer screen uses less power. You can usually adjust this in the settings.
Turn off any features you’re not using, like the second screen if your remote has one. Every feature that runs drains battery power.
Plan your flights so you’re not constantly fighting wind or going very fast. Aggressive flying drains your remote battery faster. Calm, steady flights use less power.
Emergency Tips If Your Battery Dies
Despite your best efforts, sometimes your battery might die while you’re flying. Here’s what you should know.
Your drone doesn’t just fall from the sky if your remote dies. Your drone has Return to Home features built in. If you lose connection with your remote, your drone will automatically return to where it took off and land safely.
Always fly in open areas away from people and obstacles. This safety measure protects everyone if something goes wrong with your remote battery.
Keep your flying area clear. If your drone has to return home, it needs a clear path to get there safely.
Seasonal Charging Considerations
Different seasons bring different challenges for your remote controller battery.
In winter, batteries charge more slowly and lose power faster. Keep your remote indoors until you’re ready to fly. Let it warm up to room temperature before charging.
In summer, don’t leave your remote in hot cars. Heat degrades your battery quickly. Keep it in a cool bag or shade when you’re traveling.
During humid seasons, protect your remote from moisture. Keep it in a bag with silica gel packets to absorb moisture.
When to Replace Your Remote Controller Battery
Eventually, your remote controller battery will need replacing. Here’s how to know when.
If your battery doesn’t hold a charge like it used to, replacement time is coming. If your battery goes from fully charged to dead in half the time it used to, the battery cells are failing.
If you notice your battery takes forever to charge, this is another sign it’s getting old. Batteries that charge slowly usually die soon after.
If your battery feels puffy or swollen, stop using it immediately and replace it right away. Swelling is a safety issue.
Conclusion
Charging your DJI Mini 3 Pro remote controller is simple once you know the basics. Use your USB-C cable, plug into power, wait about an hour, and you’re done. The key is developing good habits with your battery.
Charge your battery regularly before it gets too low. Use official cables and proper chargers. Keep your battery in good temperature conditions. Store it properly when you’re not flying for a while. Follow these simple rules and your remote controller battery will power your flying adventures for years to come.
Your DJI Mini 3 Pro is an amazing drone, and a well-maintained remote controller is what keeps it flying. Take good care of your battery, and your battery will take care of you. Happy flying!