How to Remove Paint From Polycarbonate RC Body?
If you’ve been into remote control cars for a while, you know that eventually you’ll want to refresh your ride. Maybe the paint is chipped, faded, or you just want to try a totally new look. The good news? Removing paint from a polycarbonate RC body isn’t as hard as it sounds.
When you first look at your painted RC shell, you might think you’re stuck with it forever. Don’t worry. With the right approach and some patience, you can strip that paint right off without damaging the polycarbonate underneath. This guide walks you through everything you need to know.
Why People Paint RC Bodies in the First Place
Before we talk about removing paint, let’s understand why people paint polycarbonate RC bodies at all. A fresh coat of paint makes your RC car look amazing. It shows off your style, makes your rig stand out at the track, and honestly, it just feels good to drive something that looks sharp.
But here’s the thing about paint on plastic shells. Polycarbonate is durable for racing and bashing, but it’s also a bit picky about what you put on it. Over time, paint can chip from impacts, sun exposure can fade it, or you might just get sick of the color. That’s where paint removal comes in handy.
Understanding Your Polycarbonate RC Shell
Your RC body shell is made from polycarbonate, which is a strong plastic material. It’s not like regular plastic. Polycarbonate can handle impacts, UV rays, and general wear pretty well. This is exactly why it’s perfect for RC bodies.
Now here’s what you need to know before you strip that paint off: polycarbonate is sensitive to certain chemicals. Some solvents and strippers can damage it if you’re not careful. That’s why knowing what you’re doing matters.
The paint on your shell is usually acrylic or polyurethane. These paints sit on top of the polycarbonate without bonding to it permanently. This is actually good news for you, because it means the paint isn’t super hard to remove.
Method 1: Using Paint Stripper
This is the most popular way to remove paint from polycarbonate RC bodies, and for good reason. It works fast and handles most paint types.
What You’ll Need
Get yourself a safe paint stripper made for polycarbonate. Look for products specifically labeled as safe for plastic. You also need warm water, soft brushes, old newspaper, gloves, safety glasses, and a well-ventilated space. A drop cloth or plastic sheeting helps keep your workspace clean.
Step-by-Step Process
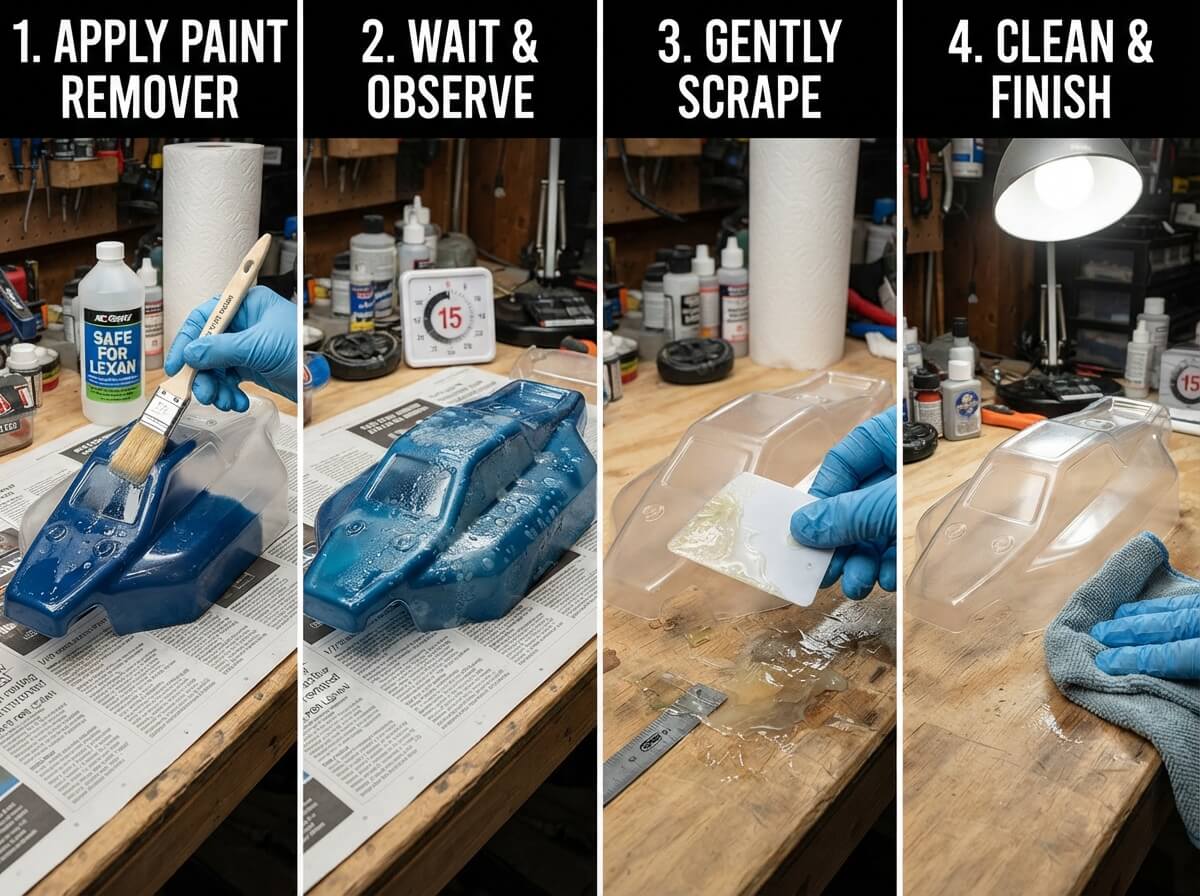
Start by laying out your newspaper or drop cloth. Set your RC body on top of it where you’ve got good ventilation. Open windows, turn on a fan, or work outside if possible. Paint stripper fumes aren’t pleasant.
Put on your gloves and safety glasses. These protect your skin and eyes from splashes. Now pour some stripper into a container. Brush it on generously over the painted areas. Work in small sections so the stripper doesn’t dry out before you finish removing the paint.
Let the stripper sit for the time the bottle recommends. Usually this takes between 10 and 30 minutes. You’ll see the paint start to bubble and peel as you wait. Don’t rush this step.
After the wait time, use a soft brush to gently scrub away the bubbling paint. Work slowly and carefully. You want to scrape the paint off without gouging the polycarbonate underneath. If paint seems stuck, apply more stripper and wait a bit longer.
Once you’ve loosened all the paint, rinse everything with warm water. Use a soft cloth to wipe away any remaining stripper or paint bits. Keep rinsing until the water runs clear and you don’t smell the stripper anymore.
Method 2: Acetone Soaking
Acetone is a strong solvent that works well on many paint types. This method takes longer than stripping, but it’s gentle and controlled.
Getting Started with Acetone
Acetone is found in some nail polish removers, but pure acetone works better. You can find it at hardware stores or online. You’ll also need a container big enough to soak your RC shell, gloves, and that same ventilation setup.
Pour acetone into your container until it’s deep enough to fully submerge your RC body. Place your shell in the acetone and let it soak. The paint will gradually soften and come loose. This can take anywhere from one hour to several hours depending on how thick the paint is.
Check on your shell every 30 minutes or so. As the paint loosens, gently rub it away with a soft brush or cloth. You’re not scrubbing hard here. Just light contact is enough to remove the softening paint.
Keep adding acetone as needed to keep the shell fully soaked. Once most of the paint is off, take the shell out and rinse it thoroughly with water. Make sure you get all the acetone off, since it can damage polycarbonate if left sitting on it.
Why This Method Works Well
Acetone doesn’t scrape. There’s no risk of gouging your shell while you work. For beginners who are nervous about accidentally damaging their body, this is a solid choice. The downside is it takes more time than stripping.
Method 3: Rubbing Compound and Elbow Grease
If you only have light paint or just want to try something gentler first, this method might surprise you.
What You Need
A rubbing compound made for plastic (not for car paint), microfiber cloths, water, and patience. That’s it. No harsh chemicals needed.
How to Do It
Dampen a microfiber cloth with a little water. Apply some rubbing compound to the cloth. Now start rubbing the painted areas in circular motions. Push fairly hard, but not so hard that you’re straining.
The rubbing compound will gradually wear away the paint. Keep working until the paint starts to lift. This works best on thin paint or if the paint is already starting to fail. On thick or well-adhered paint, you’ll be here all day.
Switch cloths when yours gets loaded with paint and compound. Keep going until you’re happy with the results. Rinse everything well when done.
Method 4: Sanding (The Nuclear Option)
Sanding works, but we recommend this only if you’re comfortable with it or other methods haven’t worked.
Sanding Basics
Use fine grit sandpaper, around 220 to 400 grit. Never go lower than that with polycarbonate, as it can scratch the shell too badly. Wet sanding is better than dry sanding here, since it reduces dust and heat buildup.
Wet your sandpaper and the RC shell. Sand in gentle circular motions. The goal is to dull the paint and help it flake away, not to gouge the shell. This takes a while and requires a light touch.
Keep checking your progress. Stop as soon as the paint is off. Oversanding leads to a cloudy, dull shell finish that’s hard to fix.
The downside? You’ll need to polish the shell after sanding to restore some shine. It’s doable, but it adds extra steps.
Protecting Your Work Afterward
Once your shell is paint-free, you’ve got a clean slate. Before you paint again, make sure your shell is perfectly clean and dry.
Wipe it down with a tack cloth to remove any dust or debris. If you used acetone or solvent strippers, make sure every trace is gone. Any leftover chemical can cause paint adhesion problems or bubbling later.
Let your shell dry completely in a warm, dry place for at least 24 hours before painting. This matters more than you might think.
Avoiding Common Mistakes
Don’t rush the process. Patience pays off. You’re trying to remove paint safely, not set a speed record.
Avoid using harsh chemicals that aren’t rated safe for polycarbonate. Regular paint thinner, brake cleaner, or super-strong industrial strippers can damage your shell permanently. Check the label first.
Never sand with rough grit sandpaper. You’ll create scratches that are harder to fix than just stripping paint.
Don’t leave acetone or solvent sitting on the polycarbonate for days. Use it, then rinse it off. Extended exposure can cause the plastic to become brittle or discolored.
Wear protection every single time. Gloves, glasses, and good ventilation aren’t suggestions. They’re requirements. These chemicals can hurt you if you’re careless.
Working in Different Temperatures
Cold weather makes this job harder. Strippers and solvents work more slowly in cold temperatures. If possible, work indoors where it’s warmer, or wait for warmer conditions.
Heat speeds things up. Working on a warm day means your acetone or stripper will work faster. Just make sure you still have good ventilation. Heat and fumes together can make you feel worse than working in cool conditions.
Dealing with Stubborn Paint
Sometimes you get paint that just doesn’t want to come off. This usually means it’s either really thick or it was applied over something that made it stick super well.
Try letting your stripper sit longer. An extra 10 or 15 minutes sometimes makes all the difference. Brush it on again and wait longer if it’s still stuck.
If you’re using acetone, maybe soak it overnight. Check it in the morning and you’ll probably find the paint much easier to remove.
As a last resort, combine methods. Strip the bulk of the paint off, then use acetone on what’s left. Or use rubbing compound to finish what stripping started.
Tools That Make Life Easier
A dedicated brush for stripper makes things faster. Get one that’s soft but sturdy enough not to fall apart in chemical.
An old toothbrush works great for getting into small crevices and details on your RC shell. Real handy for vents, lines, and other features.
A spray bottle filled with water lets you easily rinse your shell without dunking it repeatedly. This saves time and uses less water.
Microfiber cloths are worth buying. They don’t scratch plastic like paper towels can, and they’re reusable. Good investment for RC work.
Environmental Considerations
Think about how you dispose of these chemicals. Don’t pour stripper or acetone down the drain. Many communities have hazardous waste collection days where you can drop this stuff off safely.
If you use water-based strippers, you can usually dispose of them more easily. They’re still chemicals though, so don’t just toss them anywhere.
Used cloths and sandpaper are usually fine to throw away with regular trash once they’ve dried. Just use common sense.
FAQs About Paint Removal
Can I remove paint without any chemicals? Technically yes, but it’s slow. Sanding and rubbing compound work, but you’ll invest serious time.
Will my RC shell look perfect after stripping? Probably not perfectly like new. You might see minor scuffs or marks from racing. That’s normal. A fresh paint job will cover these right up.
How long does this process take? It depends on the method and how thick your paint is. Plan on 30 minutes to several hours. Acetone soaking might take even longer.
Can I strip and repaint the same day? Wait at least overnight before repainting. Your shell needs to dry completely, and any leftover residue needs to evaporate.
Is it cheaper to buy a new shell than strip and repaint? Usually no. Stripping and repainting costs way less than a new shell, plus you keep your current shell.
Getting Professional Help
Some hobby shops offer paint removal services. If you’re nervous about doing this yourself, it might be worth asking. Prices are usually reasonable.
If you go this route, you still learn nothing, but you get a perfectly stripped shell ready for paint. It’s a valid option if you’re worried about messing up.
Final Thoughts
Removing paint from your polycarbonate RC body is totally doable. You don’t need special skills or expensive equipment. A little bit of care, the right supplies, and some patience gets the job done.
Start with a method that feels comfortable to you. Stripper is fastest. Acetone is gentlest. Rubbing compound is safest. Sanding works but requires skill.
Once your shell is stripped clean, you’ve got a blank canvas. Paint it whatever color you want. Your RC car will look fresh and new, and you’ll know exactly what’s under that paint.
The hobby is about having fun and making your RC car yours. Paint removal is just another tool in your toolkit. Master it, and you’ll never feel stuck with a color you don’t love again.