How to Reinforce Your RC Car Body?
Your RC car takes a beating. Every crash, every jump, and every rough terrain collision wears down that plastic shell. But here’s the good news: you don’t need expensive replacements or advanced tools to keep your car looking good and performing well. With a few smart reinforcement techniques, you’ll extend the life of your RC body and save money in the process.
Let’s dive into the practical ways you can strengthen your RC car body and make it last through countless hours of fun.
Why Your RC Car Body Needs Reinforcement
Think about what your RC vehicle goes through. It hits walls at full speed. It flips over rough surfaces. The shell flexes and bends with every bump. Factory plastic bodies are built for durability, but they’re not invincible. Over time, stress cracks develop, joints weaken, and pieces break off.
Body reinforcement isn’t just about preventing damage. It improves how your car handles too. A stiffer chassis feels tighter and more responsive. Your RC car body will track better through turns and stay more stable at high speeds. You get better performance along with extra protection.
Reinforcing your RC body is one of the smartest investments you can make. It costs very little, takes minimal time, and the benefits show up immediately. Every enthusiast should know these techniques.
The Best Materials for RC Body Armor
You have several options when it comes to reinforcement materials. Each one has its strengths and works best for different situations.
Tape Is Your First Line of Defense
Carbon fiber tape is the MVP of body reinforcement. This stuff is incredible. It sticks directly to your plastic shell and creates a protective layer that handles impacts like a champ. The tape is thin, so it adds almost no weight to your RC car body. You can wrap it around stress areas, joints, and edges where cracks tend to start.
The best part is how simple it is to use. Just peel and stick. No special tools needed. Carbon fiber tape works on curved surfaces, flat panels, and tricky corners. It looks professional too, which is a bonus if you care about aesthetics.
Epoxy Resin for Deep Reinforcement
When you need serious strength, epoxy resin steps in. This two-part liquid hardens into a rock-solid shell that bonds with plastic perfectly. You mix it, apply it, and let it cure. The result is a shell that’s noticeably stiffer and more resistant to cracks.
Epoxy works best for reinforcing the inside of your RC body. You paint a coat or two on the interior surface, and suddenly your shell handles punishment way better. The inside reinforcement keeps your body from flexing and bending under stress. It’s like giving your car a suit of armor from the inside out.
The downside is that epoxy takes time to dry. You’ll need to wait before driving your RC car body again. But the wait pays off with dramatically improved durability.
Fiberglass Tape for Extra Toughness
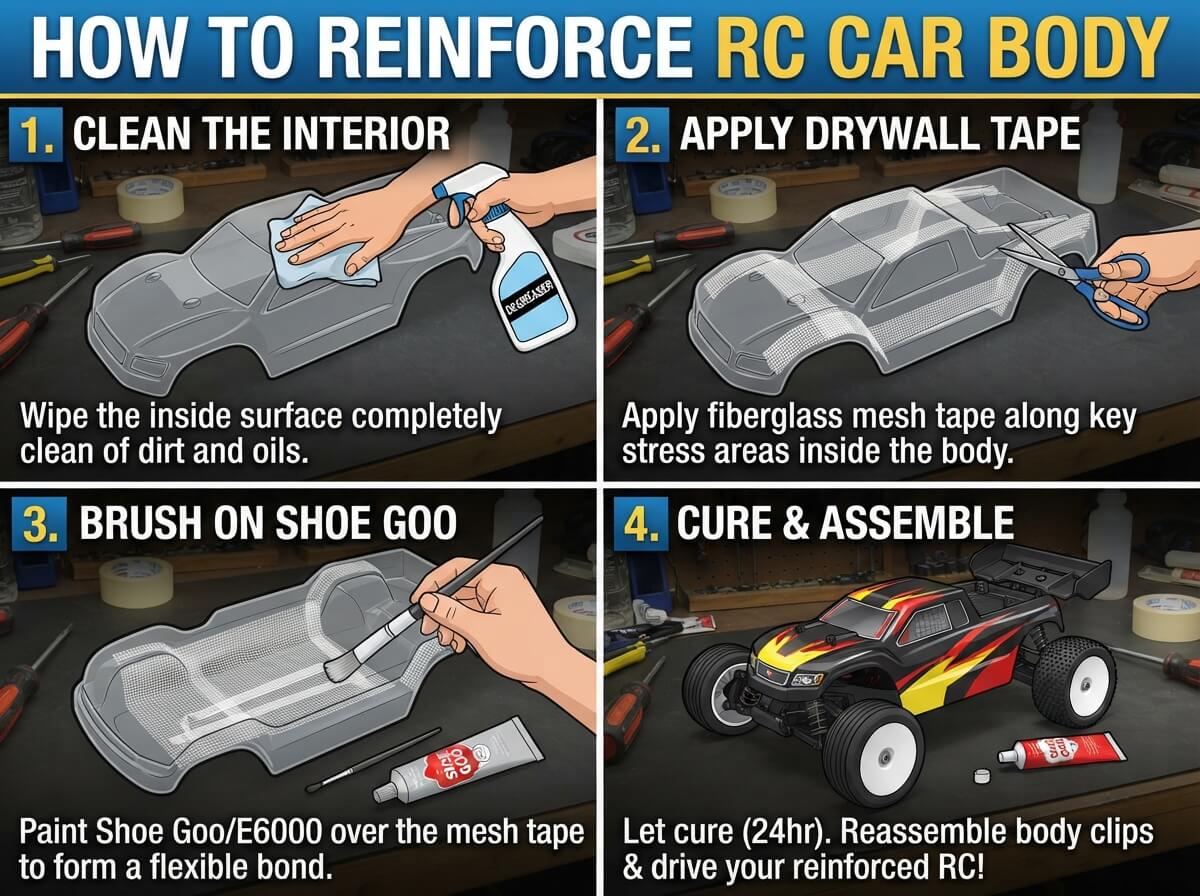
Fiberglass reinforced tape combines the ease of application with serious holding power. It’s slightly thicker than carbon fiber tape but still lightweight. The fiberglass strands create a mesh that reinforces weak spots and joints.
This material shines at the seams and edges of your RC body. These joints take a lot of stress during crashes. Wrap fiberglass tape around door frames, antenna mounts, and body posts, and those areas become nearly indestructible.
Plastic Welding for Permanent Repairs
Plastic welding joins broken pieces back together permanently. A plastic welding pen uses heat to meld two pieces of plastic into one solid part. This works amazingly well for cracks and breaks in your RC car body. Once welded, that joint is stronger than the original plastic.
You’ll need a plastic welding tool, which costs more than tape, but it’s worth it if you plan to do repairs regularly. The technique is straightforward and even beginners pick it up quickly.
The Top Stress Points That Need Reinforcement
Not every part of your RC body needs the same level of protection. Some areas take way more punishment than others. Focus your reinforcement efforts on these critical zones.
Antenna Mounts Take the First Hit
Your antenna sticks straight up, making it a target for every low branch and ceiling. The mount is usually just a small piece of plastic attached to the shell. Reinforce this area immediately. Wrap carbon fiber tape around the base where the antenna connects. Add tape around the socket too. This simple step prevents your antenna from snapping off mid-drive.
Door and Body Clips Hold Everything Together
Doors and removable body panels depend on clips to stay in place. These clips flex with every impact. Over time, they crack or break. When they fail, your body panels come flying off, leaving your car exposed. Reinforce around every clip location. Use carbon fiber tape to wrap the clip area on both the body and the panel. This distributes stress better and keeps everything locked tight.
Corner Impacts Are Nearly Guaranteed
The corners of your RC body take serious abuse. They’re the first things to hit walls, curbs, and obstacles. Reinforce the top corners and bottom corners with multiple layers of carbon fiber tape. You can even bevel the edges with tape to absorb impacts better. A well-protected corner can take crashes that would destroy an unprotected shell.
The Chassis Mounting Points Flex Under Load
Where your body connects to the chassis, stress concentrates. The mounts flex with every landing and acceleration. Reinforce these points on both the inside and outside of your RC car body. Epoxy resin on the inside plus carbon fiber tape on the outside creates a super-strong joint that handles abuse.
Roof Panels Collapse When Flipped
If your RC car regularly flips over, the roof takes a beating. The panel flexes inward when the car lands upside down. Apply a coat of epoxy resin to the inside of the roof to prevent it from collapsing. This keeps your body shape perfect, even after lots of flips.
Step-by-Step RC Body Reinforcement Process
Here’s how to reinforce your RC car body like a pro. The process is simple and takes less than an hour for a complete job.
Step One: Remove the Body
Take your RC car body off the chassis. You’ll want clean access to the plastic. Set the chassis aside somewhere safe where you won’t trip over it. The shell is now your workspace.
Step Two: Clean the Surface
Use soap and water to clean the body thoroughly. Let it dry completely. Any dirt or dust prevents tape from sticking properly, and it ruins epoxy adhesion. A clean shell is the foundation for great reinforcement. Give it a good wash and wipe it down.
Step Three: Identify Your Problem Areas
Look at your body carefully. Run your hands over it. Feel for thin spots, flexing areas, and previous damage. These are your target zones. Mark them with a dry erase marker or just remember where they are.
Step Four: Apply Carbon Fiber Tape
Start with tape on the outside. Cut pieces to size and apply them to stress areas, joints, and edges. Press down firmly so the tape bonds well. Smooth out any bubbles or wrinkles. Tape goes down quick, and you can see results immediately.
Step Five: Apply Epoxy Resin to the Interior
Mix a small batch of two-part epoxy according to the instructions. Paint a thin coat on the inside of your RC body, focusing on the roof, doors, and areas you identified as problem zones. One or two coats is usually enough. Let each coat dry fully before adding another.
Step Six: Reinforce Mounting Points
Pay special attention to where the body connects to the chassis. Apply tape on both the outside body surface and the interior. Consider adding extra layers here since these points take so much stress.
Step Seven: Let Everything Cure
Wait for all epoxy to dry completely before using your RC car body. Check the instructions, but usually overnight is plenty. Your patience now means your shell will last months longer than one that didn’t get proper curing time.
Step Eight: Reassemble and Test
Once everything is dry, put your body back on your chassis. Do a gentle test drive to make sure everything fits right and feels good. Your car should feel stiffer and more responsive.
Advanced Techniques for Serious RC Enthusiasts
Once you master basic reinforcement, you can level up your game.
Double-Layer Reinforcement Strategy
Apply tape on the outside, then epoxy resin on the inside, then another layer of tape on top of the epoxy. This creates multiple layers of protection. It adds almost no weight but transforms weak spots into fortress-like areas.
Strategic Weighting
Add small weight pieces inside your reinforced areas. This doesn’t compromise durability, but it improves handling. More weight at the lower points of your RC body helps with stability. Experiment to find the sweet spot for your specific driving style.
Hybrid Material Combinations
Mix different reinforcement materials in the same repair. Use carbon fiber tape for edges, fiberglass tape for broad areas, and epoxy resin for deep reinforcement. Each material excels at different jobs, so combining them gets you the best results.
Protective Bumper Strips
Add bumper strips to the front and rear edges of your body. These are just reinforced tape sections that stick out slightly, absorbing impacts before they reach the main body. They’re simple to make and incredibly effective.
Maintenance and Long-Term Care
Reinforcement isn’t a one-time thing. Maintaining your work keeps your RC body looking good and performing well.
Inspect Regularly
After every few driving sessions, inspect your reinforcement work. Look for tape that’s peeling up or epoxy that’s cracking. Catch small problems before they turn into big ones. A quick inspection takes thirty seconds and saves you later.
Reapply Tape as Needed
Carbon fiber and fiberglass tape eventually wears. The edges peel up, or the material gets damaged. When you notice this, just clean that area and apply new tape. It’s cheaper and faster than replacing your whole body.
Touch Up Epoxy Coatings
If your epoxy starts to crack or chip, clean the area and apply a fresh coat. This prevents moisture from getting under the coating, which could cause bigger problems.
Repair Damage Immediately
Don’t wait when your RC car body takes damage. A small crack today becomes a major break tomorrow if you ignore it. Patch it right away, and you’ll keep your body strong.
Common Mistakes to Avoid
Learning from others’ errors saves you time and frustration.
Applying Tape Over Dirty Surfaces
Dust and dirt reduce adhesion dramatically. Always clean thoroughly before taping. Thirty seconds of cleaning prevents tape failure later. It’s worth the effort.
Skipping the Interior Reinforcement
The outside looks impressive, but inside reinforcement does the real heavy lifting. Don’t skip epoxy resin application on the interior. That’s where the strength comes from.
Using Too Much Epoxy
More epoxy doesn’t mean more strength. Thick coats take forever to cure and add unnecessary weight. Thin, even coats work better. You want coverage, not layers of gunk.
Forgetting the Mounting Points
Many people reinforce the visible body panels but forget where the body actually connects to the chassis. Those mounting points take massive stress. They need the most reinforcement. Make them your priority.
Driving Too Soon After Application
Patience is essential. Epoxy needs full cure time before your RC body is ready for action. Driving too soon breaks the bond before it fully hardens. Wait the full recommended time. Your patience pays off with a stronger body.
Reinforcement for Different RC Car Types
Different cars need different approaches.
On-Road RC Cars
Road cars focus on speed and handling. Reinforce the body seams and joints to maintain aerodynamic shape. Stiff sides and roof keep your car tracking straight at high speeds.
Off-Road RC Trucks
Off-road vehicles take brutal punishment. Reinforce the bottom of your body and the areas around wheel wells. Corner impacts are guaranteed in off-road driving. Make those corners bullet-proof with extra tape and epoxy.
Drift Cars
Drift cars stress the sides and rear body sections during aggressive turns. Reinforce the side panels and rear bumper area. A stiff body helps your car maintain shape during intense drifting.
Rock Crawlers
Rock crawlers experience impacts from every direction. Reinforce your entire RC body uniformly. Use heavy epoxy coatings and multiple tape layers all over. These cars need full-body armor.
The Money-Saving Reality
Here’s what really matters: reinforcing your RC car body costs almost nothing compared to replacing it. A roll of carbon fiber tape runs maybe ten to fifteen dollars. Epoxy resin is similarly cheap. You’re spending a few dollars to add months of life to a body that costs thirty to a hundred dollars.
Even if you reinforce three bodies, your total cost is still less than one replacement shell. It’s one of the smartest financial moves in the RC hobby. Do it every time you need to extend your body’s life.
Your RC Body Reinforcement Plan
Start simple. Get some carbon fiber tape and wrap the corners and antenna mount. See how much better it works. Once you’re comfortable, apply epoxy resin to the interior. Then add fiberglass tape to the seams.
Your RC car body will feel tighter and handle crashes better than ever. You’ll notice the difference immediately. Cracks that would have happened now won’t. Your chassis stays cleaner because the body holds together better. Everything works better when your body is strong.
Reinforcing your RC car body is one of the most rewarding upgrades you can do. It’s easy, cheap, and the results are obvious. Every RC enthusiast should know how to do this. Start today, and you’ll wonder why you didn’t do it sooner.
Your favorite RC car will last longer, look better, and perform better. That’s what reinforcement delivers. Get your materials, grab your car, and give it the protection it deserves. Your RC car body will thank you every single time it crashes into a wall and bounces back like nothing happened.