How to Measure RC Car Motors?
If you love RC cars, you already know the motor is the heart of the whole build. It decides how fast you go, how much power you have, and how long your runs last. But a lot of hobbyists never learn how to measure their RC car motors the right way. They just guess, or they trust the number printed on the box. That’s not the best way to do it.
This guide breaks down every step in plain, easy language. By the end, you’ll know exactly how to check size, kV rating, resistance, RPM, current draw, and more. No fancy jargon, no confusing charts. Just a clear path from start to finish.
Why Measuring Your RC Car Motor Actually Matters
Before we jump into the “how,” let’s talk about the “why.” Some beginners think measuring a motor is only for racers or engineers. That’s not true at all.
Here’s what proper measurement gives you:
- You know if the motor matches your battery and ESC (electronic speed controller).
- You avoid burning out your motor from too much current.
- You can compare two motors fairly, even if they’re from different brands.
- You get better runtime because your setup is balanced.
- You can spot a worn-out or damaged motor early, before it fails on the track.
Think of it like checking the oil in a car engine. You don’t have to do it, but skipping it can cost you a lot down the road.
Types of RC Car Motors You’ll Run Into
Before measuring anything, it helps to know what kind of motor sits inside your car. There are two main types.
Brushed Motors
These are the classic, simple motors. They use small carbon brushes that touch a spinning part called the commutator. Brushed motors are cheaper, easier to fix, and great for beginners. They lose a bit of power over time because the brushes wear down.
Brushless Motors
These skip the brushes entirely. Instead, they use magnets and electronic signals to spin the shaft. Brushless motors run cooler, last longer, and give more power for the same size. They cost more, and they pair with a brushless ESC.
Knowing which type you have changes how you measure a few things, so keep this in mind as we go.
Tools You’ll Need Before You Start
You don’t need a full workshop to measure an RC car motor. Here’s a simple list of tools that cover almost everything:
- A digital multimeter (for resistance, voltage, and current)
- A tachometer or an RPM meter (for speed measurement)
- A wattmeter (for power draw during a run)
- A small ruler or caliper (for physical size)
- A fully charged battery pack that matches your setup
- A notebook or spreadsheet to log your numbers
Most of these tools are cheap and easy to find online or at any hobby shop. A basic multimeter alone can already tell you a lot.
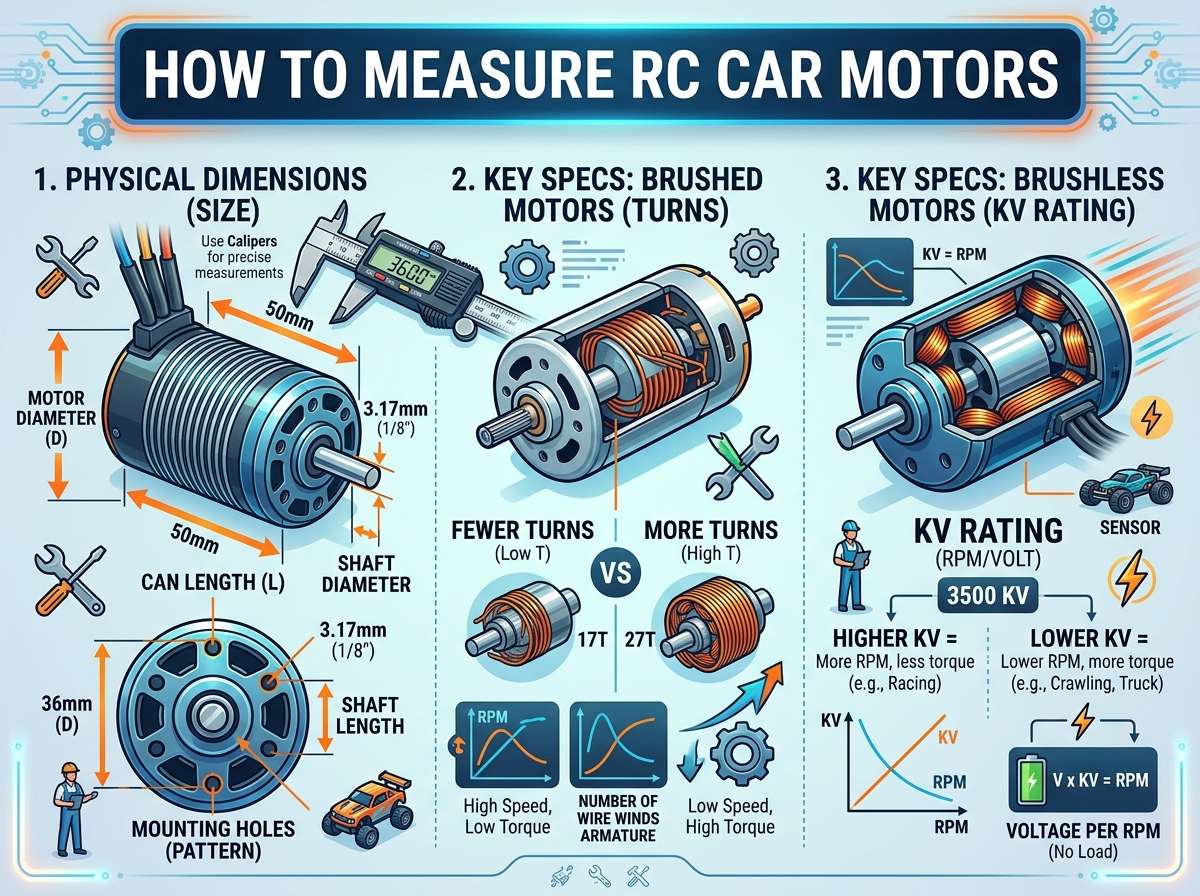
Step 1: Check the Motor Size and Physical Dimensions
Size matters more than people think. RC motors come in different can sizes, and this affects how much torque and speed they can handle.
Use your ruler or caliper to measure:
- Diameter of the motor can (the round body)
- Length of the can, not counting the shaft
- Shaft diameter, since this needs to match your pinion gear
Most brushless motors also list a size code like 3650 or 2435. The first two numbers show the diameter in millimeters, and the last two show the length. If your motor doesn’t have a label, just measure it yourself and compare the numbers to a size chart online.
This step is quick, but it saves you from buying the wrong gear or ESC later.
Step 2: Find the kV Rating
The kV rating tells you how many RPM the motor spins for every volt you feed it, with no load attached. A higher kV number means a faster, lower-torque motor. A lower kV number means a slower, higher-torque motor.
Some motors print the kV rating right on the label. If yours doesn’t, or if you want to confirm it, follow these steps:
- Connect the motor to a power source with a known, stable voltage.
- Let the motor spin freely with nothing attached to the shaft.
- Use a tachometer to read the RPM.
- Divide the RPM by the voltage you supplied.
For example, if the motor spins at 21,000 RPM on 6 volts, the kV rating is 21,000 divided by 6, which equals 3,500 kV.
This number is one of the most useful specs you’ll ever measure because it tells you right away if a motor fits a crawler build (low kV) or a speed build (high kV).
Step 3: Measure Resistance With a Multimeter
Resistance measurement is one of the easiest checks you can do, and it tells you a lot about motor health.
Here’s how:
- Set your multimeter to the resistance mode, often shown as the Ω symbol.
- Make sure the motor is disconnected from any power source.
- Touch one probe to one motor wire and the other probe to a second wire.
- Write down the reading.
- Repeat this for each pair of wires if your motor has three leads, which is common on brushless types.
Healthy motors show low, steady resistance across all wire pairs. If one reading is much higher than the others, that could mean a damaged winding inside the motor. This quick check can save you from running a bad motor on the track and frying your ESC.
Step 4: Test RPM Under Real Load
The free-spin RPM you measured earlier for the kV rating is useful, but it doesn’t tell the full story. Once you add a battery, gears, wheels, and the weight of the car, RPM drops. This is called load RPM, and it’s closer to real-world performance.
To test this:
- Mount the motor in the car with the gearing you plan to use.
- Attach the tachometer sensor near the motor shaft or the spinning wheel, depending on your tool.
- Power on the setup and let the wheels spin freely off the ground, or run the car on a stand.
- Record the RPM reading.
Compare this number to your free-spin RPM. A big gap between the two usually means your gearing is too aggressive, or your battery can’t keep up with the demand.
Step 5: Measure Current Draw (Amps)
Current draw tells you how hard the motor pulls power from the battery. Pulling too much current can overheat the motor, drain your battery fast, or damage your ESC.
Here’s a simple way to check it:
- Connect a wattmeter or an inline ammeter between the battery and the ESC.
- Power up the car and let it run under normal conditions, either on a stand or on flat ground.
- Watch the current reading as the throttle goes up.
- Note the peak number during hard acceleration and the average number during steady cruising.
Compare these numbers to what your motor and ESC are rated for. If your peak current gets close to or passes the ESC’s max rating, you risk burning it out. This is a common mistake beginners make when they upgrade to a bigger motor without checking the numbers first.
Step 6: Check Voltage and Power Output
Voltage measurement pairs closely with current draw, and together they give you the total power number in watts.
- Set your multimeter to voltage mode.
- Touch the probes to the battery terminals while the motor runs.
- Record the voltage under load, since it usually drops a bit from the resting voltage.
- Multiply the voltage by the current you measured earlier to get watts.
For example, 7.4 volts multiplied by 20 amps equals about 148 watts. This is the real power your motor pulls during a run, and it’s a great number to track over time, especially if you swap batteries or motors later.
Step 7: Watch the Motor Temperature
Heat is one of the biggest motor killers in the RC hobby. A motor that runs too hot loses efficiency and can suffer permanent damage.
Use an infrared thermometer, or even a simple touch test after a run, though a proper thermometer gives far more accurate numbers.
- Run the car for a normal session, maybe five to ten minutes.
- Immediately point the thermometer at the motor can.
- Record the temperature.
Brushed motors usually run hotter than brushless ones under the same load. As a general rule, anything above 160°F (about 71°C) deserves attention. If your motor runs hotter than that regularly, you may need better cooling, lower gearing, or a motor with a higher kV rating to reduce strain.
Step 8: Test Torque (Advanced but Useful)
Torque measurement is trickier without lab equipment, but there’s a simple hobby-level method using a torque arm or a fish scale.
- Attach a small arm of a known length to the motor shaft.
- Hold the motor steady and power it up against light resistance.
- Use a fish scale or spring scale to measure the force needed to stop the arm from turning.
- Multiply the force by the arm’s length to estimate torque.
This method isn’t lab-grade precise, but it gives you a rough comparison between motors, which is often all a hobbyist really needs.
Putting It All Together: Building a Motor Profile
Once you measure all these values, write them down in one place. A simple table works great:
- Motor size (can diameter x length)
- kV rating
- Resistance (ohms)
- Free-spin RPM
- Load RPM
- Peak current (amps)
- Average current (amps)
- Voltage under load
- Power output (watts)
- Running temperature
- Estimated torque
This motor profile becomes your reference point every time you tune your car, swap a battery, or try new gearing. Over time, you’ll notice patterns, like how a certain pinion gear pushes current too high, or how a battery with more capacity keeps voltage steadier under load.
Common Mistakes to Avoid
A few small errors trip up a lot of beginners, so keep an eye out for these:
- Testing with a low or partially charged battery. This skews every reading, especially voltage and RPM.
- Ignoring wire pair differences on brushless motors. Always check all three combinations, not just one.
- Skipping the cool-down period between tests. Heat builds up fast and can throw off resistance readings.
- Comparing kV ratings without comparing size. A high kV motor in a small can behaves very differently from a high kV motor in a large can.
- Forgetting to match ESC ratings with motor current draw. This is one of the fastest ways to fry electronics.
Simple Tips for Getting Accurate Results
Getting clean, trustworthy numbers doesn’t take much extra effort. Try these habits:
- Always test on a stable, level surface.
- Let the motor cool to room temperature before starting resistance tests.
- Use fresh or fully charged batteries for consistency.
- Take three readings for each test and use the average.
- Keep your multimeter probes clean and free of corrosion.
- Label your notes clearly, since it’s easy to mix up numbers between different motors.
Final Thoughts
Measuring an RC car motor isn’t complicated once you break it into small steps. Size, kV rating, resistance, RPM, current, voltage, temperature, and torque each tell a piece of the story. Put them together, and you get a full picture of how your motor performs and how healthy it is.
Beginners often skip this process because it sounds technical, but with a basic multimeter and a bit of patience, anyone can do it at home. Over time, this habit turns you into a smarter builder, someone who tunes with real numbers instead of guesswork. Your motors will last longer, your runs will feel smoother, and you’ll catch problems long before they turn into costly repairs.
So next time you unbox a new motor, don’t just bolt it in and hope for the best. Grab your tools, run through these steps, and build a profile you can trust. Your RC car, and your wallet, will thank you.
Peterson is an RC hobby enthusiast and product reviewer with a passion for remote-controlled cars, trucks, boats, drones, and accessories. He enjoys testing the latest RC products, comparing features, and sharing practical buying guides to help beginners and experienced hobbyists make informed decisions. Through RCThing.com, Peterson provides honest reviews, maintenance tips, and expert advice to help readers get the most from their RC adventures.