How RC Transmitters Work?
You’re holding a controller in your hands. Your RC car zooms across the yard. Your drone lifts into the sky. Your airplane banks smoothly through the air. But have you ever stopped to think about the magic happening between your fingers and that machine?
RC transmitters are the brains behind remote control fun. They’re not as complicated as you might think. Let’s break down exactly how these devices work so you can understand what’s going on every time you flip a switch or move a stick.
What Exactly Is an RC Transmitter?
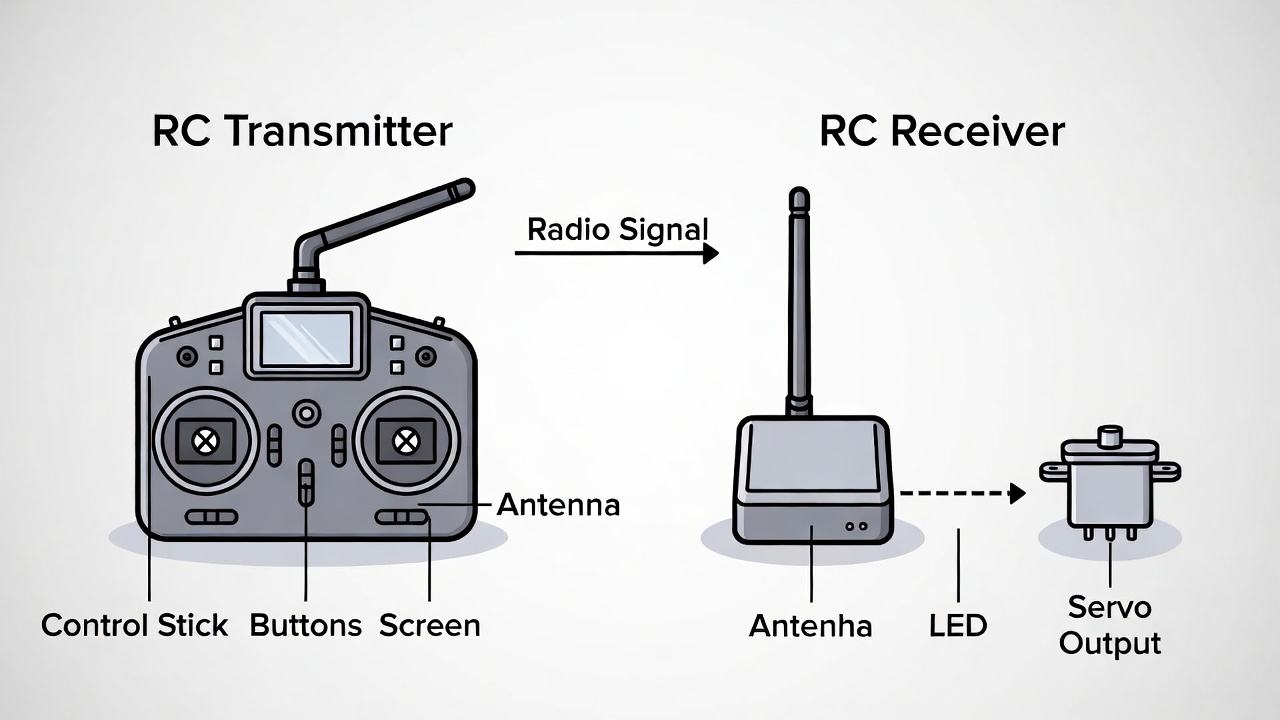
An RC transmitter is basically a remote control that sends signals to your vehicle or aircraft. Think of it like a walkie-talkie, but instead of sending your voice, it sends commands.
When you push a stick forward, the transmitter converts that physical movement into a radio signal. That signal flies through the air to a receiver in your RC vehicle. The receiver then tells the motors and servos what to do.
Simple, right? But there’s a lot more happening under the hood.
The Basic Parts of Every Transmitter
Every RC transmitter has a few key components working together. You’ve got the physical controls you touch. You’ve got the electronic brain that processes everything. And you’ve got the antenna that broadcasts your commands.
The controls include sticks, switches, knobs, and buttons. These are your direct connection to the action. Each one has a specific job.
The circuit board is where the real work happens. This is the computer inside your transmitter. It reads all your inputs and converts them into data.
The antenna sends that data out as radio waves. Most modern transmitters have internal antennas you can’t even see. Older ones had long whip antennas sticking out.
The power source keeps everything running. Usually, this is a rechargeable battery pack or regular AA batteries.
How Your Inputs Become Signals
When you move a control stick, you’re actually moving a potentiometer. This is just a fancy word for a variable resistor. As the stick moves, the resistance changes. The transmitter’s circuit board measures this change.
Let’s say you push the throttle stick forward. The potentiometer’s resistance shifts from one value to another. The circuit board sees this change and says, “Oh, the pilot wants more power.”
The board then creates a digital signal that represents this command. This signal is basically a bunch of ones and zeros that mean “increase throttle to 75 percent.”
Modern transmitters use something called pulse width modulation, or PWM. Don’t let the technical term scare you. It’s just a way of encoding information into timed pulses.
Think of it like Morse code. Short pulses and long pulses combine to create different messages. In PWM, the width of each pulse tells the receiver what position a servo should be in.
Radio Frequencies and Channels
Your transmitter needs to broadcast on a specific radio frequency. This is like a radio station having its own spot on the dial. If everyone used the same frequency, all the signals would crash into each other.
Old RC systems used frequencies in the 27 MHz and 72 MHz bands. Pilots had to use frequency pins or flags to make sure two people didn’t fly on the same channel at once. That was a real hassle.
Modern systems use the 2.4 GHz band. This frequency range is much better for RC because it can handle more data and has less interference. Plus, modern transmitters automatically pick a clear channel.
The 2.4 GHz systems use something called frequency hopping spread spectrum, or FHSS. The transmitter rapidly jumps between different frequencies dozens of times per second. This makes the connection super reliable and lets hundreds of pilots fly at the same place without conflicts.
Some systems use direct sequence spread spectrum, or DSSS. This spreads the signal across a wider frequency range. Both methods work great and keep your connection solid.
Channels: Not What You Think
When RC folks talk about channels, they’re not talking about radio frequencies. They’re talking about how many different controls you can use at once.
A 4-channel transmitter can control four different things. Maybe that’s throttle, steering, and two extra functions. An 8-channel transmitter can control eight different servos or motors.
Each channel is like a separate conversation between your transmitter and receiver. Channel 1 might be aileron control. Channel 2 might be elevator. Channel 3 could be throttle. And so on.
The more channels you have, the more complex your aircraft or vehicle can be. A simple RC car only needs two channels. A scale airplane with lights, flaps, retracts, and other features might need ten or more.
Binding: Making the Connection
Before your transmitter can talk to a receiver, they need to be introduced. This process is called binding.
Binding is like pairing a Bluetooth device. You’re telling the transmitter and receiver to recognize each other and ignore everyone else.
The exact process varies by brand, but it usually goes like this. You put the receiver into bind mode. Then you put the transmitter into bind mode. They do a digital handshake and exchange ID codes. Now they’re married.
Once bound, your transmitter and receiver will only talk to each other. Even if a hundred other pilots are flying nearby, your receiver ignores their signals.
Some systems use a physical bind plug. You insert this little jumper into the receiver, power it on, then activate bind mode on the transmitter. Once binding is complete, you remove the plug.
Other systems let you bind wirelessly with just button presses. Much easier.
Digital vs Analog: The Big Divide
Older RC systems were analog. They sent continuous wave signals that directly controlled servo positions. These systems worked fine but had limitations.
Digital systems converted everything to data packets. Instead of sending a continuous wave, they send bursts of digital information many times per second.
Digital systems are faster, more accurate, and more reliable. They can also send more information in less time. That’s why all modern hobby-grade transmitters are digital.
The digital approach also enables cool features like telemetry. Your receiver can send data back to the transmitter. You might see battery voltage, signal strength, altitude, speed, and more right on your transmitter’s screen.
The Magic of Modern Protocols
Different manufacturers use different protocols. A protocol is just the language the transmitter and receiver speak.
FrSky uses protocols like ACCST and ACCESS. Spektrum uses DSM2 and DSMX. FlySky has AFHDS and AFHDS 2A. Futaba has FASST and T-FHSS. Each brand has its own system.
These protocols determine how the data is packaged and sent. They also control features like telemetry, range, and latency.
Latency is the delay between when you move a stick and when the aircraft responds. Lower latency is better. Modern systems have latency measured in milliseconds. You won’t even notice it.
Some protocols are proprietary, meaning only that brand’s receivers work with their transmitters. Others are more open, letting third-party companies make compatible receivers.
Sticks, Modes, and Mixing
Most transmitters have two main control sticks. Each stick moves in two directions, giving you four basic channels.
But here’s the confusing part. Different parts of the world use different stick modes.
In Mode 2 (common in the US), the right stick controls aileron and elevator. The left stick controls throttle and rudder. Throttle is on the left vertical axis.
In Mode 1 (common in Europe and Asia), the right stick has elevator and throttle. The left stick has aileron and rudder.
You can usually change modes by swapping the ratchets and springs inside the transmitter. Some transmitters let you do this with software settings.
Then there’s mixing. This is where things get interesting. Mixing lets you combine multiple channels to create new behaviors.
Elevon mixing is common on flying wings. Since these aircraft don’t have separate elevator and aileron controls, the transmitter mixes those inputs and sends them to two wing servos. Pull back on the elevator, and both servos move up. Move the aileron stick, and one servo goes up while the other goes down.
V-tail mixing works the same way for V-tail aircraft. Delta mixing helps with delta-wing planes. The list goes on.
Most transmitters have built-in mixing options. You just activate the type you need and let the transmitter do the math.
Programming and Customization
Basic transmitters are plug-and-play. You charge them up and fly. But serious transmitters are incredibly customizable.
You can adjust the throw of each control. Throw is how far a servo moves. If your ailerons are moving too much, you can dial it back with dual rates.
Expo curves change how the stick feels around the center. With expo, small stick movements near center produce smaller control movements. This makes the aircraft easier to fly smoothly. Large stick movements still give you full control authority.
You can set up flight modes or conditions. Maybe you want different control sensitivity for takeoff, cruising, and aerobatics. Just flip a switch to change between them.
Timers help you track flight time. Alarms can warn you about low battery or weak signal. Voice alerts can tell you what’s happening without looking at the screen.
Some transmitters let you save dozens of different aircraft models. Each model has its own settings, mixes, and trims. You can fly a helicopter in the morning and a plane in the afternoon, all with the same transmitter.
Telemetry: The Return Journey
Basic transmitters only send signals one way. Your commands go to the receiver, and that’s it. But modern systems with telemetry create a two-way conversation.
The receiver can send data back to your transmitter. This opens up amazing possibilities.
You can monitor battery voltage in real time. When the pack gets low, an alarm sounds. No more guessing if you have enough juice for another flight.
Signal strength indicators show you how good your connection is. If the signal weakens, you know it’s time to bring the aircraft closer.
GPS telemetry can show your speed, altitude, distance from home, and exact position. Some systems even draw your flight path on a map.
Variometer sensors measure climb rate. Great for glider pilots who need to find thermals.
Current sensors track how many amps you’re pulling. Combined with voltage, you get real-time power consumption.
Temperature sensors watch your motor or ESC. If things get too hot, you’ll know before damage occurs.
All this data appears on your transmitter screen or is announced through voice alerts. It’s like having an entire instrument panel in your hands.
Range and Antenna Placement
How far can you fly? That depends on your transmitter’s power and your receiver’s sensitivity.
Most 2.4 GHz systems work well up to about a mile. Some high-end systems with better antennas and more power can go several miles.
But range isn’t just about the transmitter. The receiver’s antenna placement matters enormously.
The antenna should be straight, not coiled up. It should be at a right angle to the transmitter when possible. Many people mount their receiver antennas along the fuselage or diagonally through the aircraft.
Carbon fiber blocks radio signals. If your plane or drone has a carbon fiber frame, keep the antennas away from it. Use antenna tubes or position them outside the frame.
Range testing is smart before your first flight. Most systems have a range check mode that reduces power. Walk away from your aircraft while watching the signal. If you lose connection during a range test, you’ll definitely lose it in the air.
Power Management
Transmitters need power to work. Most use lithium-ion or lithium-polymer battery packs these days. These hold a lot of energy and last a long time.
A typical transmitter battery lasts anywhere from 4 to 12 hours on a charge. That’s usually enough for several flying sessions.
Some transmitters use AA batteries instead. This is convenient because you can swap in fresh batteries anywhere. But it also means buying batteries regularly.
Always charge your transmitter the night before you fly. There’s nothing worse than showing up at the field with a dead transmitter.
Most modern transmitters warn you when battery power gets low. Some even refuse to turn on if the voltage is too low. This prevents you from taking off with insufficient power.
Firmware and Updates
Your transmitter runs software called firmware. This is the operating system that makes everything work.
Manufacturers release firmware updates to fix bugs, add features, and improve performance. Updating firmware usually involves connecting your transmitter to a computer via USB.
You download the latest firmware file from the manufacturer’s website. Then you run their update software. The process takes a few minutes.
Always read the update notes before installing new firmware. Sometimes updates change how things work. You want to know what’s coming.
Back up your model settings before updating. Most update software does this automatically, but it’s worth checking. You don’t want to lose hours of setup work.
OpenTX and EdgeTX: The Open Source Option
Some transmitters run open source firmware called OpenTX or its successor, EdgeTX. These systems are incredibly powerful and totally free.
OpenTX runs on transmitters from FrSky, Radiomaster, Jumper, and others. It gives you almost unlimited customization.
You can create complex mixes, custom screens, Lua scripts, and more. The learning curve is steeper than proprietary systems, but the flexibility is amazing.
The open source community constantly improves the firmware. New features appear regularly. And if you know how to code, you can add your own.
Many pilots consider OpenTX/EdgeTX transmitters the best value in the hobby. You get high-end features at mid-range prices.
Module Bays and Multi-Protocol
Higher-end transmitters often have a module bay on the back. This is a slot where you can plug in different RF modules.
Why would you want this? Because it lets you use different protocols without buying different transmitters.
Install a FrSky module, and you can fly FrSky receivers. Swap in a Spektrum module for Spektrum gear. Use a multi-protocol module and you can fly almost anything.
Multi-protocol modules are incredibly popular. A single module supports dozens of different protocols. You can fly old toy-grade quads, hobby-grade planes, micro helicopters, and more.
This flexibility means one transmitter works with your entire fleet. No matter what receiver your aircraft has, you can fly it.
Simulators and Training
Most transmitters can connect to flight simulators on your computer. This is one of the best ways to learn.
You plug your transmitter into a USB port. The simulator software reads your stick inputs. You get to practice flying without risking a real aircraft.
Simulators save you a ton of money and frustration. You can crash a virtual plane a hundred times while you learn. Once you’re comfortable, you move to the real thing with confidence.
Many simulators are incredibly realistic. The physics match real flight. The graphics look great. And you can fly in any weather condition without leaving your house.
Practicing on a simulator builds muscle memory. Your fingers learn what movements create what responses. When you fly for real, it feels natural.
Taking Care of Your Transmitter
Transmitters are pretty tough, but they still need care. Keep them clean and dry. Don’t leave them in hot cars or freezing garages.
Clean the sticks and switches occasionally with electronic contact cleaner. This removes dirt and oil that can cause problems.
Protect the screen if your transmitter has one. Scratches are annoying and can make it hard to read.
Check the gimbal screws periodically. These can loosen over time. If your sticks feel sloppy, a quick tightening usually fixes it.
Store your transmitter with the battery at about 50 percent charge. This is healthiest for lithium batteries during long-term storage.
The Future of RC Transmitters
Transmitters keep getting better. We’re seeing more features, better screens, longer range, and lower latency.
Touch screens are becoming common. These make programming easier and let you create custom interfaces.
Voice control is starting to appear. Imagine saying “activate flight mode 2” instead of fumbling for a switch.
Integration with smartphones opens new possibilities. Some systems let you use your phone as a second screen or even as a controller.
Haptic feedback might become standard. The transmitter could vibrate to warn you about problems or confirm commands.
But the core concept stays the same. You move controls. The transmitter sends signals. Your aircraft responds. It’s elegant, reliable, and fun.
Wrapping Up
RC transmitters might seem mysterious at first. But once you understand the basics, they make perfect sense.
You’ve got physical controls that measure your inputs. A circuit board converts those inputs into digital signals. An antenna broadcasts those signals to your receiver. The receiver tells your aircraft what to do.
Modern transmitters are packed with features. Telemetry brings data back to you. Mixing creates complex control schemes. Programmability lets you customize everything.
All these systems work together to give you precise, reliable control. From the simplest toy-grade controller to the most advanced competition transmitter, the fundamental principles stay the same.
Now that you know how they work, you can appreciate the engineering every time you fly. You’re not just pushing sticks around. You’re commanding a sophisticated radio system that turns your intentions into flight.
So get out there and enjoy your RC hobby. Your transmitter is ready to send your commands through the air. All you need to do is power up and have fun.
Happy flying!