How to Adjust RC Car Steering Trim?
So you just got your RC car. You’re excited. You charge the battery. You hit the track or the pavement. Then you notice something’s off. Your car doesn’t drive straight. It keeps pulling left or right even when you’re not touching the steering wheel.
Sound familiar?
Don’t panic. This is super common. The fix is simple. You need to adjust your RC car’s steering trim.
Let me walk you through this. By the end of this guide, your RC car will drive straight and handle like a dream.
What Is Steering Trim?
Steering trim is basically a small adjustment to your RC car’s center position. Think of it like the neutral zone on your steering wheel. When you let go of the controller, your car should go straight. Trim helps make that happen.
Your RC car’s steering servo needs to know where “straight” is. Steering trim tells it. Without proper trim, the servo doesn’t know the real center point. So it pulls the wheels left or right even when you’re not doing anything.
It’s like the alignment on a real car. A real car needs wheel alignment so it drives straight. Your RC car needs steering trim for the same reason.
Why Does Your RC Car Need Trim Adjustment?
Many things can throw off your RC car’s steering:
New cars need adjustment. Straight from the box, your RC car might not be perfectly centered. Factory settings work for most people, but not everyone.
Parts get loose. The servo horn can slip. The steering linkage can bend. Over time, small changes add up. Your trim needs tweaking.
Servo drift happens. Servos aren’t perfect. They can shift slightly over time. This is normal wear and tear.
You might crash. If you hit something hard, parts can bend. A bent tie rod or steering knuckle can make your car pull to one side.
Weather affects servos. Heat and cold change how servos work. A servo might center differently in hot weather than cold weather.
Different tracks demand adjustments. Carpet pulls different than pavement. Dirt surfaces work different than concrete. You might need to adjust trim for each surface.
Basic RC Car Steering Components
Before you start adjusting, let’s talk about what you’re actually adjusting.
The servo is the motor that moves your steering. It receives signals from your transmitter and moves the steering arm back and forth.
The servo horn connects the servo to the steering linkage. It’s the arm sticking out from the servo.
The tie rod (or steering linkage) connects the servo horn to the steering knuckles. When the servo horn moves, the tie rod moves the wheels.
The steering knuckles are the parts that hold your wheels. They turn left and right when the tie rod pulls them.
Your transmitter is the controller in your hands. It sends steering commands to the receiver in your car.
The receiver sits in your car and takes signals from the transmitter. It tells the servo where to go.
The steering trim adjustment lives in your transmitter or in your receiver’s programming. It tells the servo where the center point actually is.
Where Is the Steering Trim Control?
This depends on your transmitter type. Let’s cover the main options.
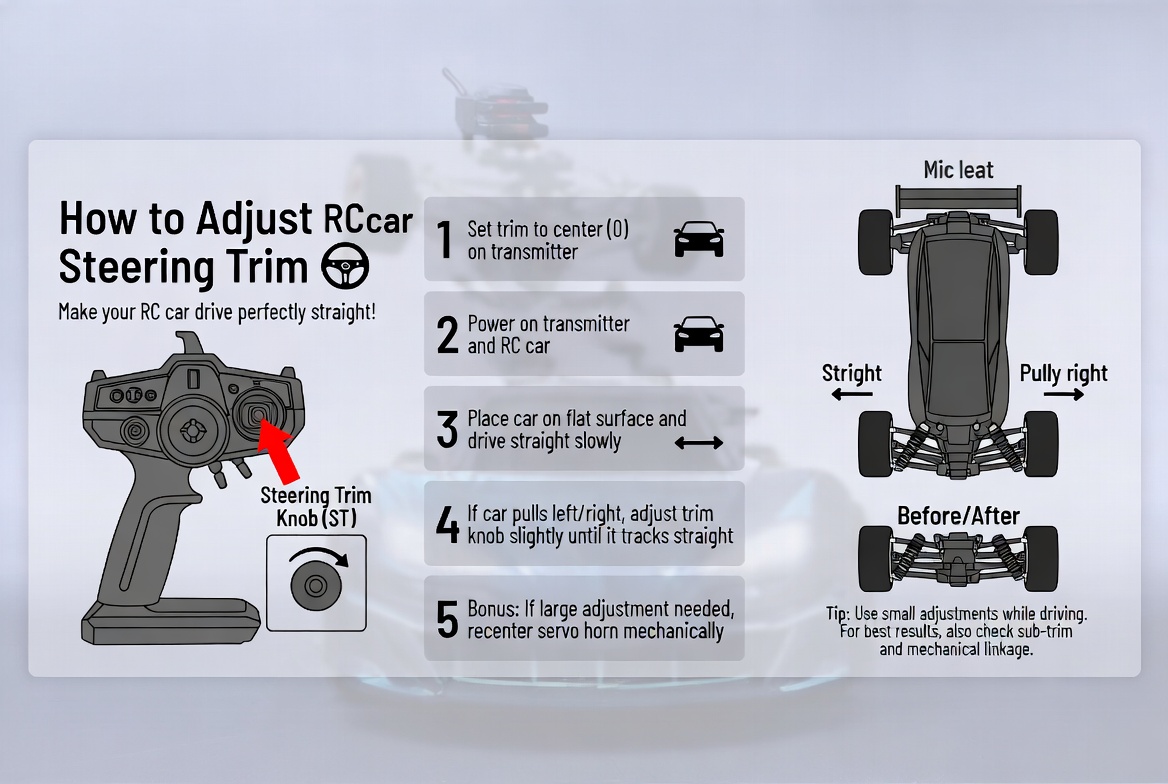
On most transmitters, it’s a dial or slider. Look for a knob or sliding lever on the left side of your controller. It might say “ST” or “TRIM” next to it. That’s your steering trim adjustment.
Some transmitters have menu controls. You access trim through a menu screen. You use buttons to navigate and adjust the value.
Digital transmitters might use software. You can connect your transmitter to a computer. Then you adjust trim settings on the screen.
Older transmitters might have trim buttons. You press up or down buttons to adjust. This takes longer but works fine.
Most beginner RC cars use simple dial controls. That’s the easiest type to work with.
How to Check If Your Steering Needs Trim Adjustment
Before you start turning knobs, check if you really need to adjust anything.
Put your car on a flat surface. Use a smooth, flat parking lot or driveway. Grass and uneven ground mess up your test.
Center your transmitter’s steering stick. Move your left stick (or right stick on some transmitters) so it sits in the middle position. Let go of it. The stick should snap back to center by itself.
Don’t touch the steering at all. Just push your car forward gently by hand. Give it a little push and watch which way it goes.
Does it go straight? If your car goes straight, your trim is fine. Stop here.
Does it pull left or right? If it pulls, you need to adjust trim. Notice which direction it pulls. That’s important information.
Try the reverse test. Push your car backward and see which way it goes. Sometimes it’s different than forward, which tells you something is bent.
Do a powered test on a smooth surface. Start your car and drive forward in a straight line. Let the steering sit in the middle. Does the car follow a straight line? If it doesn’t, note which direction it goes.
This test tells you exactly which way to turn your trim dial.
How to Adjust Steering Trim: Step-by-Step
Now let’s do this. Here’s the process.
Step 1: Get your tools ready
You probably don’t need tools. Trim adjustments use dials or buttons. Most people adjust with their fingers. If your trim uses a small dial, you might want a screwdriver to get better grip. But that’s optional.
Step 2: Keep your car running
Start your RC car and let it sit on the ground. You can also hold it, but sitting on the ground is better. You want to watch what happens as you make adjustments.
Step 3: Identify which direction to turn
Let’s say your car pulls right. This means the steering servo is slightly turned right from its neutral position. To fix this, you need to turn the servo back toward left. This means you turn the trim dial left (counterclockwise).
If your car pulls left, you turn the trim dial right (clockwise).
This is the key principle: turn the dial in the opposite direction that your car is pulling.
Step 4: Make small adjustments
Turn your trim dial or buttons slowly. Small changes matter. Turn just a little bit. Maybe turn the dial one-eighth of a turn. Then test your car.
Step 5: Test after each adjustment
Push your car forward. Does it drive straighter? Is the pull getting better? If the pull is less, you’re going the right direction. Keep going.
If the pull gets worse, you’re turning the wrong way. Turn the dial the other direction.
Step 6: Keep adjusting until it’s perfect
Keep making small adjustments. Test your car. Adjust again. Do this over and over. After about five to ten adjustments, your car should drive pretty straight.
Step 7: Do a final test
Drive your car in a straight line. Let go of the steering. Watch for about ten feet. The car should go straight without pulling.
If it still pulls a tiny bit, make one more small adjustment. That’s fine. Perfection isn’t always possible, but you can get really close.
Advanced Trim Adjustment Techniques
Want to get even better results? Try these tricks.
Neutral position check. Most transmitters have a neutral trim indicator. Look for a small bar or light on your transmitter. This shows when trim is at perfect center. Aim to get that indicator right in the middle. That’s a good starting point.
Temperature matters. If it’s really hot, servos work different. Cold weather also changes things. Adjust your trim when the weather is similar to when you’ll be racing. A servo adjusted on a hot day might not work right in cool weather.
Multiple surface testing. Different surfaces pull different. Pavement might be straight but carpet might not be. Test on the surface you’ll actually use.
Do left and right turns. After you’ve got straight driving down, drive around a cone or traffic marker. Turn left and right. Your steering should feel balanced. If left turns are tighter than right turns, something’s still off.
Check your servo horn position. Sometimes the issue isn’t trim. Sometimes the servo horn is installed wrong. Look at the servo horn. It should sit straight (not tilted) when you’re at center. If it’s tilted, loosen the servo horn screw and reinstall it straight.
Inspect tie rod length. If both sides of your car seem off, maybe your tie rod is bent or too long/short. A bent tie rod throws off everything. Check it for damage.
Use the center mark. Many transmitters have a small notch or line on the trim dial showing center. Line up your trim pointer to this mark. This usually gets you pretty close without even testing.
Common Mistakes People Make
Let’s talk about what goes wrong.
Turning the trim too much. People get impatient. They turn the dial way too far. Then the steering is off the other way. Make small adjustments. Patience wins here.
Not testing between adjustments. You must test after each change. How else do you know if you’re improving? Blind adjusting wastes time.
Adjusting while the car is in the air. Gravity affects how your car handles. Always test with the car on the ground.
Ignoring bent parts. Sometimes the problem isn’t trim. It’s a bent steering knuckle or tie rod. Trim can’t fix that. Look for bent metal. If something looks bent, replace it.
Not checking tire pressure. Low tire pressure on one side can make your car pull. Check your tires. Make sure they’re at the right pressure.
Forgetting to re-center after crashing. After a hard crash, always check your trim. The servo horn might have shifted. Trim probably needs adjustment.
Using trim to fix alignment issues. Trim only handles servo centering. If your wheels are misaligned, trim won’t help. You need wheel alignment adjustment instead.
Adjusting the wrong channel. Some transmitters have trim for multiple things (steering, throttle, etc.). Make sure you’re adjusting steering, not throttle or something else.
Different RC Car Types and Their Trim Systems
Different RC cars have different trim controls. Let’s break this down.
Toy-grade RC cars have basic trim. It’s usually just a dial on the transmitter. Easy to adjust. Good for beginners.
Hobby-grade on-road cars have more precise trim control. They might have digital trim adjustment. You might access it through menus. More complicated but more precise.
Off-road RC cars often need more trim adjustment. Uneven ground requires constant tweaking. You want a transmitter with easy trim access.
Drift cars need very sensitive trim. Small adjustments matter a lot. Digital trim control is better for drift cars.
Rock crawlers pull hard in different directions depending on terrain. You might adjust trim constantly. Easy dial access is great for crawlers.
Check your specific RC car’s manual. It tells you where the trim is and how to adjust it. Different brands do things slightly different.
Trim Adjustment for Different Driving Conditions
Your car might need different trim for different situations.
Smooth pavement. This is easiest. Set your trim and forget it. Pavement is consistent.
Carpet or smooth concrete. Similar to pavement. Set it and go.
Grass. Uneven ground means your car leans different ways. Sometimes grass pulls one direction, dirt pulls another. You might need to adjust trim when you switch surfaces.
Gravel. Small rocks cause the car to bounce. This can make trim feel off even if it’s actually set right. Go to a smooth gravel area for testing.
Wet surfaces. Water changes how tires grip. Your car might handle different when wet. You can adjust trim for wet driving.
Indoor tracks. Carpeted indoor tracks are very consistent. You can dial in trim perfectly here.
Outdoor tracks. Wind, temperature, and humidity all change how your car behaves. You might need to adjust trim between runs.
When to Adjust Trim vs. When to Check Other Things
Trim isn’t always the answer. Sometimes something else is wrong.
Check wheel alignment first. If your car pulls really hard, it might be wheel alignment, not trim. Look at your front wheels. They should point straight ahead. If they’re angled in or out, that needs fixing first.
Look for bent parts. A bent suspension arm, steering knuckle, or tie rod causes pulling that trim can’t fix. Inspect parts after crashes.
Check tire pressure. Tires at different pressures cause pulling. Check both front tires. They should be the same pressure.
Inspect tire wear. Worn or damaged tires can pull. Look at tire condition. Replace if needed.
Clean the servo. Dirt in the servo can cause it to not center properly. If trim adjustment doesn’t work, try cleaning the servo.
Check the receiver. If your receiver is getting loose radio signal, it might not center the servo correctly. Make sure your receiver antenna is properly positioned.
Look for loose parts. Loose steering components vibrate and feel like pulling. Tighten all bolts and screws on the steering linkage.
Maintaining Your Steering System
Keep your steering working right with basic maintenance.
Keep it clean. Dirt in the servo causes problems. Clean your RC car after running it. Blow out the servo with compressed air.
Keep bolts tight. The servo horn bolt, tie rod bolts, and steering knuckle bolts need to stay tight. Check them before each run.
Watch for wear. The tie rod is usually plastic. It wears over time. If it gets loose play in it, replace it.
Protect the servo. Don’t let the servo get wet. Keep it covered or in a dry compartment.
Calibrate your transmitter regularly. Some transmitters need calibration. Read your transmitter manual and calibrate it every month or two.
Replace dead batteries. A transmitter with a dying battery might not send steering signals correctly. Use fresh batteries.
Troubleshooting Trim Problems
What if your trim adjustment isn’t working?
The trim dial moves but nothing happens. Your transmitter might not be binding with your car. Turn off both and start over. Turn on your transmitter first. Then turn on your car. This is the right order.
The trim seems reversed. Turning right makes it pull left. You might have steering reversed in your settings. Check your transmitter manual for reverse options.
One adjustment helps but the opposite adjustment makes it worse. This is actually normal. The trim system isn’t perfectly linear. It’s okay. Get it as close as you can.
The car still pulls after many adjustments. You’ve probably hit the trim limits. This means something else is wrong. Check alignment, look for bent parts, and inspect the servo.
The trim keeps slipping back. Your transmitter might have lost settings. Some transmitters reset if batteries die. Check your transmitter battery.
Tips for Getting Perfect Trim
Want the best possible trim setting?
Use a measuring tape. Mark a straight line on your driveway with chalk. Drive your car along the line. Does it stay on the line? This is the best test.
Drive in both directions. Test driving forward and backward. A car should pull the same direction both ways if trim is off.
Try multiple transmitters. Some transmitters adjust more smoothly than others. You might find one works better for you.
Get the servo horn absolutely straight. Before adjusting trim, make sure your servo horn sits perfectly straight. Use a square or level tool to check.
Let the servo warm up. Servos change slightly as they warm up. Run your car for a minute, then adjust trim. Don’t adjust immediately from cold start.
Mark your center position. Put a small mark on your transmitter at the trim center. This helps you remember where center is.
Trim Adjustment for Specific RC Car Classes
Drift cars need ultra-precise trim. Drift cars need trim set to absolute center. Any pulling throws off your drift. Spend extra time getting it perfect.
Crawlers need flexible trim. Rock crawlers deal with crazy terrain. You might move the trim dial while driving to compensate for tilting. That’s normal. Don’t worry about perfect straight-line trim.
Off-road buggies need balanced trim. Buggies deal with ruts and bumps. You want a center that handles bumpy ground well. Test on rough terrain.
On-road touring cars need competitive trim. Racing cars need perfect trim. This might take an hour to dial in. It’s worth it for racing.
Basher cars don’t need perfect trim. If you’re just having fun and crashing, don’t obsess over trim. Get it close enough and go have fun.
FAQ About RC Car Steering Trim
Q: How often should I adjust trim? A: Usually once when you first set up your car. Then adjust anytime you crash or change surfaces.
Q: Can trim adjustment fix a bent steering knuckle? A: No. Bent parts need replacement. Trim only adjusts servo centering.
Q: Is there a universal best trim setting? A: No. Every car, surface, and transmitter is different. You need to find your own setting.
Q: Will adjusting trim wear out my servo faster? A: No. Gentle adjustments don’t hurt the servo.
Q: Can I adjust trim while driving? A: Yes. Many racers adjust trim mid-race. But it takes practice.
Q: What if my trim only goes halfway? A: Some transmitters have limited trim range. This might mean your servo is installed off-center. Check installation.
Q: Does temperature really affect trim? A: Yes. Servos change slightly with temperature. Significant temperature changes might need retrim.
Q: Can I adjust trim on a running car without holding it? A: Yes, but watch where it goes. Don’t let it run into anything.
Final Thoughts
Adjusting RC car steering trim isn’t hard. It’s one of the easiest maintenance tasks. The hardest part is being patient. Make small adjustments. Test each one. Don’t rush.
Your car will thank you. A properly trimmed car handles better. It feels more responsive. It drives straighter. And isn’t that why you got it?
Start with the basic trim adjustment I described. Get your car going pretty straight. Then if you want, try the advanced techniques.
Before you know it, you’ll have a car that drives like a dream. You’ll be adjusting trim without thinking about it. And you’ll probably be helping other people do the same.
Have fun out there. And remember: take it slow, test after each change, and enjoy the process. Your RC car steering trim adjustment journey starts now.