How to Waterproof Your RC Boat?
So you’ve got your first RC boat, and you’re excited to take it out on the water. But there’s a problem—you’re worried about water damage. Your remote control boat cost you some money, and the last thing you want is for it to break down because water got inside. The good news? Waterproofing your remote control boat isn’t rocket science. With the right steps and a little patience, you can protect your boat from water damage and keep it running strong for years to come.
Why Waterproofing Your RC Boat Really Matters
Let’s be real—water is the enemy of electronics. Your radio control boat has a battery, a motor, a receiver, and wiring. All of these things can get damaged the moment water touches them. When water gets inside your boat’s electronics, it can cause:
- Short circuits that fry your components
- Rust and corrosion that eat away at metal parts
- Battery failure that leaves your boat dead in the water
- Motor burnout that stops your boat cold
The cost of replacing these parts adds up fast. A new receiver might run you fifty bucks. A new motor could be double that. A fresh battery pack? Another significant chunk of change. But here’s the thing—spending a few hours waterproofing your boat upfront saves you hundreds in repairs later.
Think about it this way: would you rather spend an afternoon sealing your boat, or would you rather spend a weekend taking apart a soggy RC boat and trying to salvage what’s left? The choice is pretty clear.
Understanding Water Damage in Remote Control Boats
Before we jump into how to waterproof your boat, let’s talk about how water actually damages RC boats. When your radio control boat is in the water, that water is looking for any gap, any crack, any opening to get inside. Here’s what happens:
Electrical Short Circuits Water is conductive. When it touches your battery, motor wires, or circuit board, it completes a circuit that shouldn’t be completed. This sends electricity through places it shouldn’t go, and boom—your electronics are fried.
Corrosion and Rust Even if your boat doesn’t experience an immediate short circuit, water sitting on metal components causes oxidation. This rust eats away at contacts and connections, making your boat unreliable.
Component Swelling Electronics absorb moisture like a sponge. When water gets into your receiver or motor, the components swell up and stop working. Sometimes they never work again, even after drying out.
Salt Water Damage If you’re using your RC boat in salt water, you’ve got a double problem. Salt accelerates corrosion and makes the water even more conductive. Salt water damage is often permanent.
Now that you know why waterproofing matters, let’s get into the actual steps to protect your boat.
Step One: Seal Your Radio Control Boat’s Hull
The hull is the main body of your boat. This is your first line of defense against water getting inside. Most beginner RC boat hulls have small holes and imperfections that you can’t even see. Water finds its way through these gaps.
Start With a Visual Inspection Grab your boat and look at the entire hull carefully. Run your fingers over the surface. Look for cracks, seams, and gaps. Pay special attention to where different pieces of the hull connect together. These joints are common problem areas. Check around any holes drilled for wires or screws.
Use Waterproof Epoxy Putty Epoxy putty is like clay for fixing holes. You knead it in your hands until it’s warm and soft, then you push it into any gaps or cracks you find. It hardens rock solid and creates a waterproof seal. This stuff is cheap and works great for filling small holes.
Apply Waterproof Sealant Along Seams The seams where hull pieces connect are major leak points. Use a waterproof sealant—silicone caulk works well—and run it along every seam on the inside and outside of your hull. Don’t be stingy. Better to use too much than too little. Let it dry completely before you take your boat out.
Consider a Protective Coating For extra protection, you can apply a waterproof coating to the entire hull. Epoxy resin or polyurethane coating creates a hard, waterproof layer over your hull. This is especially helpful if your hull has lots of small imperfections or if you’re planning to use your boat heavily.
Step Two: Protect the Electronics Compartment
This is the big one. Your electronics compartment is where your battery, motor, receiver, and all your wiring live. If water gets in here, you’re done. This is the part that needs the most attention.
Use a Waterproof Electronics Box The best option is to put your electronics inside a waterproof enclosure or dry box. You can buy marine-grade plastic boxes that are designed for this purpose. They’re affordable and incredibly effective. The box sits inside your boat’s hull and keeps everything dry.
Seal Every Opening If you go the electronics box route, you need to seal every opening. Your wires need to run out of the box to reach the motor and throttle. Use waterproof cable glands or grommets to seal these openings. A cable gland is basically a fancy washer that compresses around your wire and creates a waterproof seal.
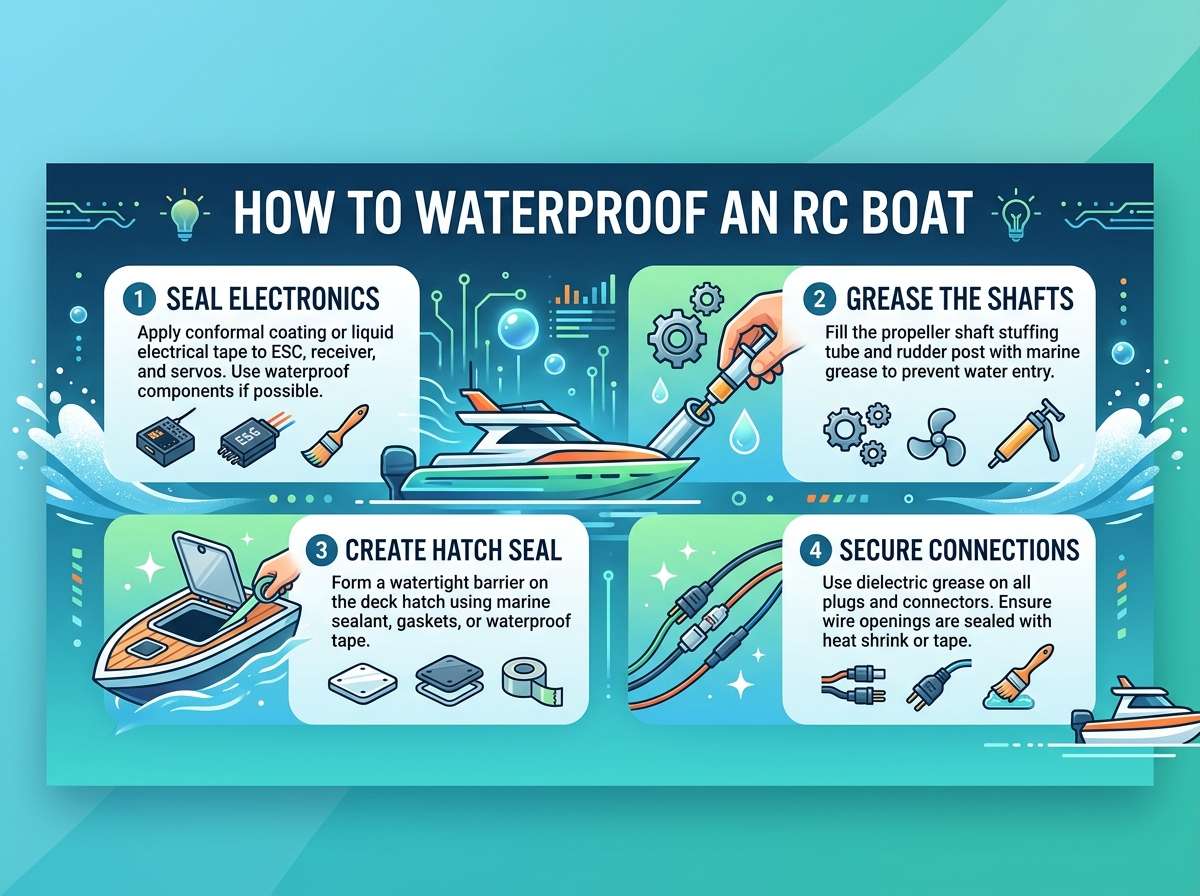
Apply Conformal Coating to Your Receiver Your receiver is the device that picks up signals from your remote control. It’s small but super important. You can spray a thin waterproof coating called conformal coating on your receiver board. This coating is transparent and doesn’t interfere with the electronics. It just creates a protective barrier that keeps moisture out.
Wrap Your Battery Your battery is another vulnerable component. Wrap it in a waterproof bag or use battery-specific waterproof packaging. Make sure it’s completely sealed. Even better, put it inside your waterproof electronics box with everything else.
Insulate All Wire Connections Every place where wires connect is a potential leak point. Use heat shrink tubing to seal up all your connections. Heat shrink tubing is plastic tubing that you slide over a connection, then you apply heat (with a heat gun or even a lighter—careful though) and it shrinks down tight, creating a waterproof seal.
Step Three: Waterproof the Motor Assembly
Your motor is what makes your boat go. It’s also one of the most water-vulnerable components because it’s often exposed to water spray and potential splashing.
Choose a Brushless Motor When Possible Brushless motors are more water-resistant than brushed motors because they don’t have exposed brushes that can get wet. If you’re buying a new motor for your RC boat, go with brushless. You won’t regret it.
Seal the Motor Can The motor can is the metal tube that houses all the internal motor components. You can seal the gaps where wires exit the motor using waterproof epoxy or silicone sealant.
Use a Motor Shroud A motor shroud is a protective cover that goes around your motor. It shields it from direct water contact. You can buy motor shrouds designed for RC boats, or you can even make one from plastic sheets and epoxy. The goal is to protect the motor from splashing and wave impact.
Apply Waterproof Grease Inside your motor, there are bearings that need to stay lubricated. Use waterproof grease instead of regular oil. Waterproof grease repels water while keeping everything running smooth.
Step Four: Seal Cable Penetrations
Cables and wires have to go somewhere. They exit your waterproof enclosure and connect to your motor, servo, and other components. Every single point where a cable exits is a potential water entry point.
Use Heat Shrink Tubing Heat shrink tubing is your best friend for sealing cables. Slide it over the cable and the hole it comes out of, apply heat, and it shrinks down tight. This creates a waterproof seal that looks professional and works great.
Apply Silicone Sealant Around Cables In addition to heat shrink tubing, you can also run silicone sealant around where cables penetrate your hull. Think of it like caulking a bathtub. This creates a double layer of protection.
Bundle Cables Properly Keep your cables organized and bundled together. Use cable ties to group them neatly. This makes it easier to seal them and less likely that you’ll miss a spot.
Check Every Connection Point Before you take your boat out, trace every cable from your electronics compartment to where it connects. Put your finger on every connection point and make sure it’s sealed. If water can get in there, it will.
Step Five: Test Your Waterproofing Job
Before you take your RC boat out on the water for the first time after waterproofing, you need to test it. A quick water test in your bathtub or a bucket can save you from disaster out on the lake.
The Bathtub Test Fill a bathtub with water. Don’t add salt or anything. Just regular water. Place your boat in the water and let it sit for five minutes. Don’t turn it on yet. Just watch it. Does water seem to be getting inside? Are there any streams of water coming out of seams? If yes, pull it out and fix those spots.
The Shallow Water Run Test Once your boat passes the sitting test, try it in very shallow water. Get it started and let it run in just a few inches of water. Watch for any water spraying in through gaps or holes. Run it for just a minute or two.
The Longer Test If your boat makes it through the short runs, try a longer session. Get it out on the water and run it for ten minutes. Keep your eyes open for any problems. If everything looks good, you’re ready for regular use.
Listen and Watch When your boat is running, listen for any sounds that seem off. Watch the hull for any water streaming in. Trust your instincts. If something seems wrong, stop and investigate.
Step Six: Maintain Your Waterproofing Over Time
Waterproofing isn’t a one-time deal. You need to maintain it if you want your boat to stay protected.
Dry Your Boat After Each Use This is the single most important maintenance step. After every time you use your boat, you need to dry it completely. Use a soft cloth to wipe down the outside of the hull. If water got inside your electronics compartment, you need to open it up, dry everything out, and reseal it.
Inspect for Damage Regularly Every month or so, do a full visual inspection of your boat. Look for new cracks or damage to the seals you put in. Check that your epoxy hasn’t cracked or peeled. Look at your heat shrink tubing to make sure it’s still intact.
Replace Seals as Needed Waterproof sealants don’t last forever. Silicone caulk might last a season. Epoxy might last longer. But eventually, everything needs to be replaced. If you notice cracks in your seals or if water is starting to get inside, it’s time to re-seal.
Keep the Compartment Dry If you notice any moisture inside your electronics compartment, take action immediately. You can use desiccant packets (the little packets that come in supplement bottles) inside your compartment to absorb any moisture. Replace these packets regularly.
Use a Drying Agent After a heavy use session, you can open your electronics compartment and place a silica gel desiccant packet inside overnight. This pulls out any moisture that might have gotten in. In the morning, seal it back up.
Choosing Materials for Your Waterproofing Project
Let’s talk about the specific products you should buy for your waterproofing project. You don’t need to spend a fortune, but using the right materials makes a huge difference.
Waterproof Sealants
- Silicone caulk: Cheap and effective. Works great on seams.
- Waterproof epoxy: Stronger and more durable than silicone. Better for serious repairs.
- Polyurethane sealant: The toughest option. More expensive but lasts longest.
Protective Coatings
- Conformal coating: For protecting circuit boards. Comes in a spray can.
- Epoxy resin: For coating the entire hull. Creates a hard protective layer.
- Polyurethane coating: Flexible and durable. Good for high-traffic areas.
Enclosures
- Waterproof electronics box: The most important purchase. Get a good one.
- Cable glands: Inexpensive and essential for sealing cable penetrations.
- Heat shrink tubing: Get assorted sizes. You’ll use more than you think.
Tools You’ll Need
- Utility knife for trimming seals
- Heat gun for activating heat shrink tubing
- Small brushes for applying coatings
- Measuring tape
- Sandpaper for prep work
- Gloves and safety glasses
Common Mistakes People Make When Waterproofing RC Boats
Let’s talk about what not to do. Learning from other people’s mistakes can save you time and money.
Mistake One: Rushing the Job Waterproofing takes time. If you rush through it, you’ll miss spots. Take your time. Do it right the first time so you don’t have to do it again.
Mistake Two: Not Sealing Everything People focus on the big holes and forget about the small ones. That tiny gap you think isn’t important? Water will find it. Seal everything.
Mistake Three: Using the Wrong Materials Not all sealants are waterproof. Some are just water-resistant. Read the labels carefully. You want products specifically labeled as waterproof.
Mistake Four: Not Testing Before Heavy Use Don’t take your newly waterproofed boat out for a long session immediately. Test it first in shallow water or a bathtub.
Mistake Five: Skipping Maintenance You waterproofed your boat once, so you think you’re done. But seals degrade over time. You need to inspect and maintain regularly.
Mistake Six: Ignoring the Electronics Compartment The hull is just the first defense. Your electronics compartment needs just as much attention. Don’t skimp here.
Mistake Seven: Getting Water Inside and Not Drying It Out If water gets inside, you need to dry everything immediately. Don’t just close it back up and hope for the best. Moisture will cause corrosion.
When to Call in a Professional
Sometimes the job is too big or too complicated to handle yourself. Here are situations where getting help makes sense:
- Your boat already has water damage and you’re not sure how to fix it
- You’re not confident in your DIY skills
- Your boat is a high-end model worth thousands of dollars
- You want a warranty on the waterproofing work
- You’re dealing with salt water and want professional protection
Professionals can do a more thorough job and they have access to industrial-grade materials that work better than consumer products. It costs more, but sometimes it’s worth it.
The Bottom Line on RC Boat Waterproofing
Waterproofing your remote control boat isn’t difficult. It just takes attention to detail and patience. The steps are straightforward: seal your hull, protect your electronics compartment, waterproof your motor, seal cable penetrations, and test everything before you use it.
The investment you make upfront—both in time and materials—pays off big time. A waterproofed boat lasts longer, runs more reliably, and saves you money on repairs. You’ll also have way more fun with your boat because you won’t be worried about it breaking down every time you hit the water.
Start with the basics. Seal your hull seams. Put your electronics in a waterproof box. Seal your cables. That’s enough to protect your boat for basic recreational use. As you get more experienced, you can add extra layers of protection.
Remember, water damage is preventable. You have the power to keep your radio control boat running strong for years. All you need is the right materials, some patience, and a willingness to do the work. Your boat—and your wallet—will thank you.
Quick Reference Checklist for Waterproofing Your RC Boat
Here’s a simple checklist you can use when waterproofing your boat:
- [ ] Inspect entire hull for cracks and gaps
- [ ] Fill holes with waterproof epoxy putty
- [ ] Seal all hull seams with waterproof sealant
- [ ] Apply protective coating to hull
- [ ] Select and prepare waterproof electronics enclosure
- [ ] Install cable glands for all wire penetrations
- [ ] Apply conformal coating to receiver
- [ ] Wrap and seal battery
- [ ] Insulate all wire connections with heat shrink tubing
- [ ] Seal motor can and apply waterproof grease
- [ ] Install motor shroud if needed
- [ ] Apply silicone sealant around cable penetrations
- [ ] Conduct bathtub test
- [ ] Run in shallow water test
- [ ] Dry boat completely after test
- [ ] Establish maintenance routine
Final Thoughts
Your RC boat is meant to be enjoyed. Take it out, run it fast, and have fun. Just make sure you’ve taken the time to waterproof it first. A few hours of work now means months or years of trouble-free operation later. That’s a deal worth taking.
Now get out there and waterproof that boat. Your future self—the one that doesn’t have to buy a new receiver—will be grateful.

Peterson is an RC hobby enthusiast and product reviewer with a passion for remote-controlled cars, trucks, boats, drones, and accessories. He enjoys testing the latest RC products, comparing features, and sharing practical buying guides to help beginners and experienced hobbyists make informed decisions. Through RCThing.com, Peterson provides honest reviews, maintenance tips, and expert advice to help readers get the most from their RC adventures.