How to Make an RC Track?
If you’ve ever watched a remote-controlled car zoom around a track, you probably thought it looked amazing. The good news? You can build your own RC track right in your backyard, garage, or local park. You don’t need to be a construction expert or spend thousands of dollars. This guide walks you through everything you need to know to create an awesome track for your RC vehicle.
Why Build Your Own RC Track?
Building a track gives you so much freedom. You get to design the layout exactly how you want it. You can create jumps, curves, and straightaways that match your skill level. When you build it yourself, you save money compared to buying a pre-made track. Plus, the whole process is fun and rewarding.
A homemade remote-controlled car track becomes the perfect place to practice driving skills, test your vehicle’s performance, and have fun with friends. You can change the track design whenever you get bored. That’s something you can’t do with tracks you pay to use.
Gather Your Materials and Tools
Before you start building your racing circuit, gather everything you need. Running back and forth to the store gets annoying fast.
Materials you’ll need:
- Plywood sheets or MDF board for the base
- Wooden stakes or concrete blocks for boundaries
- Landscape fabric or roofing felt
- Dirt, sand, or mulch for the running surface
- Foam blocks or PVC pipes for ramps and jumps
- Wood screws and nails
- Paint or chalk for marking lines
- Optional: astroturf, carpet, or rubber material for different track surfaces
Tools to have handy:
- Shovel for digging and spreading materials
- Tape measure for accurate measurements
- Saw for cutting wood pieces
- Screwdriver or power drill
- Level to keep everything flat
- Rake for smoothing surfaces
- Work gloves and safety glasses
Don’t feel like you need expensive equipment. A lot of people start with basic tools they already have at home.
Pick Your Location
Location makes a huge difference in your track-building experience. You need flat or slightly sloped ground. Stay away from areas where water collects after rain. Wet tracks become muddy and unusable.
Consider the size you want. A small beginner track might be only 20 feet by 15 feet. A more ambitious design could stretch to 50 feet or more. Think about how much space you actually have available.
Make sure the location gets enough sunlight if you plan to drive during the day. Sunny spots dry out faster after rain. Also, check if you need permission from property owners or local authorities. Some areas have rules about recreational structures in backyards.
Look for spots with good drainage. The best outdoor track locations have a slight slope that helps water run off. Avoid low-lying areas or spots near downspouts.
Plan Your Track Design
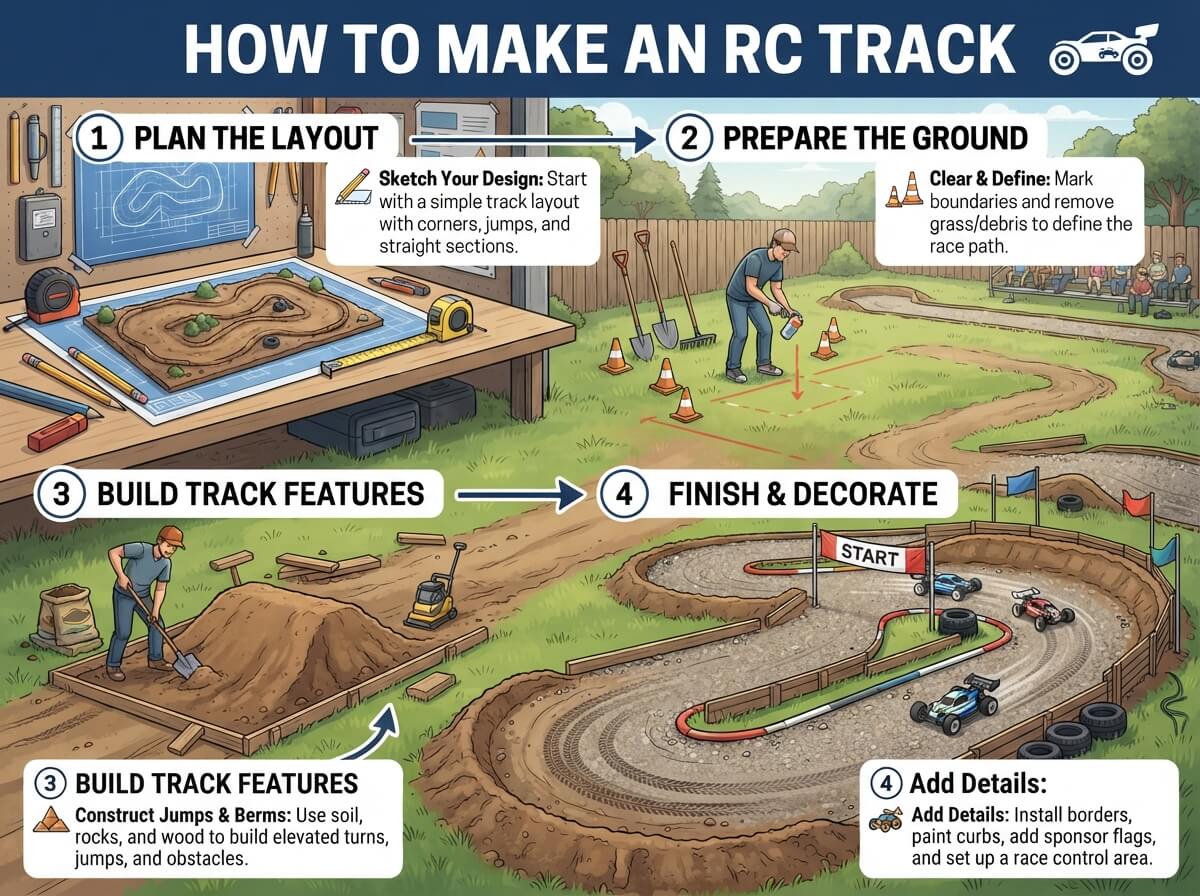
Sketch your track layout on paper before you start building. This saves time and mistakes. Think about what kind of driving you want to do. Do you want speed? Sharp turns? Obstacles? Jumps?
A simple oval track works great for beginners. You just need two long straightaways connected by curved sections. This design lets you practice smooth driving and speed control.
An intermediate track might include a chicane (a series of alternating left and right turns), a jump section, and some tight corners. This layout helps you develop better handling skills.
Advanced layouts get creative. Think about adding banked turns that lean inward, multiple jumps of different heights, a loop-the-loop section, or even a tunnel made from PVC pipe.
Sketch your track with curves, jumps, and straightaways. Mark where the turns will be and how tight they should be. Note the length of each section. This planning step prevents frustration later.
Prepare the Base Surface
The foundation of your track determines how well your RC vehicle performs. Start by clearing the area of rocks, sticks, and debris. You want a clean surface to work with.
Compact the soil by walking over it or using a tamper. A solid base keeps your track from developing ruts and holes. If your ground is really uneven, level it as much as possible.
Lay down landscape fabric or roofing felt. This layer stops weeds from growing through your track. It also helps keep the track material in place.
Spread your chosen track surface material over the fabric. Packed dirt works fine and costs almost nothing. Sand creates a smooth surface that’s great for speed. Mulch offers good grip for turns. Many people use a combination of materials for different sections.
Rake and smooth out the surface until it looks even. Remove any lumps or low spots. A smooth track means your RC car runs better and faster.
Build the Track Boundaries
You need walls or barriers to keep your vehicle from flying off the track. These don’t need to be fancy or expensive.
Wooden stakes work well for outdoor tracks. Drive them into the ground along the inside and outside of your track. Space them about 12 inches apart. They should stick up about 3 to 4 inches above the surface.
Concrete blocks are another solid choice. Stack them along the sides of your track. This creates a visible barrier that works great.
For a smoother look, attach wooden boards or plastic edging to your stakes. This creates a finished barrier that looks more professional.
The height of your walls matters. For a beginner track, 2 inches is enough. For tracks with bigger jumps or ramps, go taller—up to 4 or 5 inches—to prevent your car from launching out of control.
Curve your barriers where your track makes turns. Gentle curves let the car follow the line smoothly. Sharp corners require shorter barriers or angled walls.
Create Jumps and Ramps
Jumps make RC driving way more exciting. They’re easier to build than most people think.
Start simple with a basic ramp. Use plywood or foam blocks to create a slope. The ramp should go up at an angle of 20 to 30 degrees. Not too steep or your car won’t make it.
For a table-top jump, build two ramps facing each other with a flat section in the middle. Your car goes up the first ramp, crosses the table, and lands on the second ramp.
Step jumps involve multiple smaller jumps in a row. Each jump is slightly higher than the last. These help you build confidence before tackling bigger features.
Make sure all your jumps are stable. Secure everything with screws or nails. A wobbly jump can wreck your car or ruin your driving experience.
Paint your ramps a bright color so they’re easy to see. Test each jump slowly first. Gradually increase your speed once you’re comfortable.
Add Turns and Chicanes
Turns test your driving skill more than anything else. A well-designed turn keeps your car on the track while challenging your control.
Banked turns are my favorite. Tilt the track surface up on the outside of the turn. This helps your car grip better and go faster through corners. A 15 to 20-degree bank works well for most tracks.
For a chicane, create two quick turns in opposite directions. Mark them with cones or paint. This section forces you to change direction rapidly. It’s perfect for practicing precise steering.
Make tight corners only on lower-speed sections. Your car needs space to brake before hitting a sharp turn. Position chicanes and tight corners at the end of straightaways where your car can slow down.
Use paint or chalk to mark racing lines through each turn. The racing line shows the fastest path around corners. It helps you learn the best way to drive each section.
Choose Your Track Surface Material
The surface you pick affects your car’s speed and grip. Different materials work better for different driving styles.
Packed dirt is budget-friendly and easy to maintain. It drains well and works for most RC vehicles. Rake it smooth regularly to keep it in good condition.
Sand provides a smooth, fast surface. It works great for speed runs. However, it gets messy and tracks into your car. You’ll need to clean your vehicle after each session.
Mulch offers good grip for turning. Your car slows down on mulch compared to dirt or sand. This makes it perfect for practicing control.
Astroturf or carpet creates an indoor-like experience outdoors. It’s the fastest option but costs more. It also requires more maintenance since it can tear.
Mix materials for different sections. Use sand on straightaways for speed. Switch to mulch on turn sections for better grip. This combination creates an interesting and challenging track.
Maintain Your Track Regularly
A track needs regular care to stay in good shape. Maintenance keeps everything safe and fun.
Rake your track after every few driving sessions. This smoothes out ruts and keeps the surface level. Remove any debris like sticks or rocks that could damage your car.
Water your track during dry spells. A slightly damp surface holds together better than a dusty one. Avoid soaking it—just keep it moist.
Check your barriers and walls regularly. Fix any damage right away. A broken wall creates a safety hazard and ruins the driving experience.
Fill in any holes or low spots that develop. These can cause your car to lose control or flip over.
Clear weeds that grow along the edges. They don’t hurt anything but they make your track look neglected.
After heavy rain, let your track dry completely before driving. Wet surfaces are slippery and can damage your car’s electronics.
Get Creative With Features
Once you have the basics down, add special features to keep things interesting.
Build a loop-the-loop using PVC pipe or foam. Start small with a gentle slope up, then around. These are tough to master but incredibly satisfying when you nail them.
Create a tunnel by covering part of your track with plywood or PVC. Your car disappears inside for a moment, then emerges on the other side. Kids love this feature.
Set up obstacle courses with cones and small barriers. Drive through them to practice precision steering. Time yourself to see if you can beat your best time.
Add different surface types in different sections. Switch between dirt, sand, carpet, and astroturf. This gives you a chance to experience how your car handles different materials.
Build a figure-eight track where two oval sections cross each other. This creates interesting intersection points and challenging angles.
Safety Tips for Your Track
Keep yourself and your car safe while enjoying your track.
Always wear safety glasses when driving. Dirt and debris can kick up, especially on windy days.
Start slow and build your speed gradually. A crash at high speed damages your car way more than a low-speed accident.
Keep spectators at a safe distance from the track. An out-of-control car can hurt someone standing too close.
Check your RC vehicle before each session. Make sure the battery is charged, the wheels spin freely, and nothing is loose.
Keep water and tools away from your car to prevent electronic damage. Moisture ruins batteries and circuit boards.
Never run your car in heavy rain. Water destroys the electronics inside.
Customize Your Track Over Time
Your track can change and grow as you get better. That’s one of the best things about building your own.
Add new features whenever you get bored. Modify jump heights or add more turns. Redesign the entire layout if you want something different.
Experiment with different surface materials. See what works best for your driving style.
Host friendly competitions with other RC enthusiasts. Having an audience makes driving more exciting and pushes you to improve.
Take photos of your track from different angles. It’s fun to watch how it evolves over time.
Troubleshooting Common Track Problems
Sometimes things don’t work perfectly. Here are solutions to common issues.
If your car keeps tipping over on turns, the banks are too steep. Reduce the angle gradually until you find the right balance.
When your track gets too muddy, improve drainage. Add more mulch or sand. Make sure water can run off easily.
If jumps feel unstable, reinforce them with extra screws and bracing. Use pressure-treated wood for durability.
When your track develops ruts, rake it out and add fresh material. Compact it firmly.
If your straightaway isn’t smooth enough, check for rocks and roots. Remove them and re-rake the surface.
Final Thoughts
Building an RC track is a fun project that pays off every time you drive. You get exactly what you designed, not what some manufacturer decided to sell. The process teaches you problem-solving skills while creating something awesome.
Start simple. Your first track doesn’t need to be perfect or complicated. A basic oval with smooth turns works great. Add features as you gain confidence and skill.
Don’t worry about making mistakes. That’s how you learn what works and what doesn’t. Adjust things as you go. Your track will get better with each session.
Most importantly, have fun with it. The whole point of an RC track is enjoying your hobby. Build something that makes you excited to drive. Get your friends involved. Share your track. Make it a gathering place for RC enthusiasts.
Your homemade remote-controlled racing circuit will give you years of enjoyment. So grab your shovel, sketch out your design, and get building. Your best RC track experience is waiting for you.