How to Set RC Car Ride Height?
So you want to get your RC car dialed in and running like a champ. One of the most important things you can tweak is the ride height. It sounds like a fancy term, but it’s really simple. Ride height is just how high your RC car sits off the ground when it’s resting on all four wheels.
Get it right, and your car handles better, corners faster, and stays more stable. Get it wrong, and your car rolls over, scrapes the ground, or bounces all over the place. That’s why this setup step matters so much — even for beginners.
Let’s break it all down in plain, simple terms.
What Is RC Car Ride Height?
Ride height is the distance between the bottom of your car’s chassis and the flat ground beneath it. You measure it when the car is sitting still on all four tires, with no one pushing down on it.
Think of it like the gap under your car. Too much gap, and the car sits high and wobbly. Too little gap, and it drags on the dirt and slows down.
Most RC cars come with a factory ride height setting. But that default setup is often just a starting point. To get the best performance out of your car, you need to set the ride height yourself based on how and where you plan to drive it.
Why Ride Height Matters So Much
You might be thinking — does a few millimeters really make a difference? Yes, it really does.
Here’s why:
Handling and cornering — A car with the right ride height corners better. It doesn’t lean too much to one side or lift its inner wheels during turns.
Center of gravity — Lower ride height means a lower center of gravity. That makes the car more stable at high speeds and less likely to tip over.
Ground clearance — Higher ride height gives your car more ground clearance. That helps when you’re driving over rocks, roots, or rough terrain.
Suspension travel — The right ride height lets your shocks and suspension do their job properly. Too low, and your suspension runs out of travel. Too high, and your car bounces around.
Speed and traction — When the ride height is balanced, your tires stay in contact with the ground better. That means more traction and better speed off the line.
So yes, those few millimeters matter a lot.
Tools You’ll Need
Before you start, gather a few simple tools. You don’t need a full garage setup. Here’s what you’ll want:
- Ride height gauge — A dedicated RC setup tool that measures the gap under the chassis. Some are simple plastic rulers made for RC cars. You can also use a digital caliper.
- Hex drivers — Usually 1.5mm, 2mm, or 2.5mm depending on your car. You’ll use these to adjust the spring collars or turnbuckles.
- Flat surface — A tile floor, a setup board, or any truly flat surface works great. This is important because an uneven surface will give you false readings.
- Setup board (optional) — A foam or rubber board designed for RC setup helps a lot. It keeps the car still and level.
- Shock spring collars — These are the clips or rings around your shock absorbers. Turning them up or down changes the ride height.
That’s really all you need to get started.
Front vs. Rear Ride Height — What’s the Difference?
Your RC car has a front ride height and a rear ride height. They don’t always have to match. In fact, most tuned RC cars run a slight difference between the two.
Front ride height affects steering response, nose dive under braking, and how the front end grips during corners.
Rear ride height affects traction, squat during acceleration, and overall stability at speed.
As a general rule for most surface racing setups:
- The rear should be slightly higher than the front
- A typical difference is about 1 to 3mm
This helps the car push forward and bite into the ground when you accelerate. It also reduces oversteer in most conditions.
For off-road driving, you usually want more ground clearance all around. So both front and rear ride heights tend to be higher than what you’d run on a flat track.
How to Measure RC Car Ride Height
This is the most important step. You have to measure correctly or your adjustments won’t mean anything.
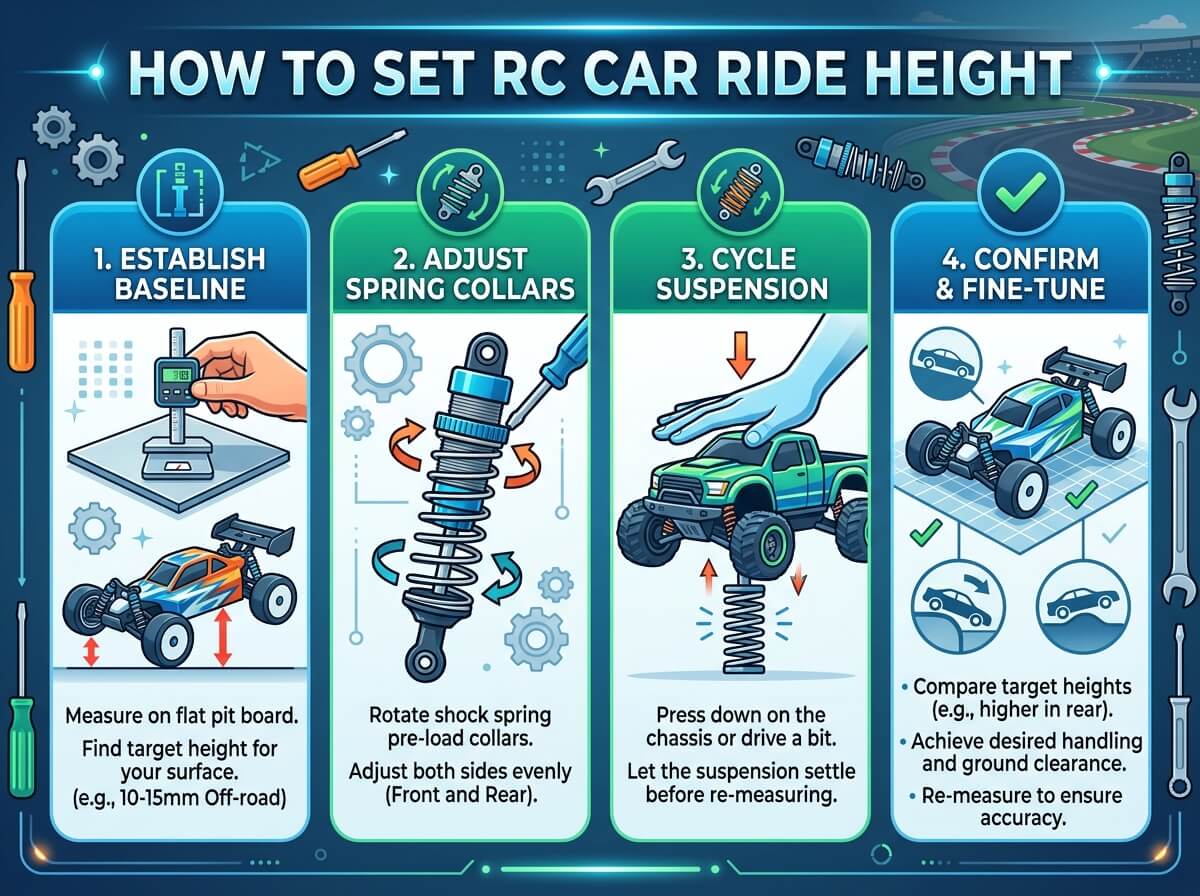
Step 1 — Place your car on a flat surface
Use your setup board or a tile floor. Make sure all four wheels are touching the ground evenly. Don’t press down on the car. Let it sit naturally.
Step 2 — Let the suspension settle
Push the car forward and backward a few times. This helps the suspension find its natural resting position. Don’t skip this. If the suspension is stuck from shipping or sitting in a box, your measurement won’t be accurate.
Step 3 — Measure at the correct point
Place your ride height gauge flat on the ground next to the car. Slide it under the lowest flat part of the chassis — usually near the center of the car. The number on the gauge where the chassis touches is your ride height.
Some people measure at the front and rear of the chassis separately. That’s even better because it shows you if the car is sitting level or not.
Step 4 — Write it down
Seriously, write it down. Keeping a setup sheet helps you compare settings over time. When you find a setup that works, you’ll want to remember it.
How to Adjust Ride Height on an RC Car
Now for the fun part. Let’s actually change the ride height.
The most common way to adjust ride height on an RC car is by changing the spring preload. That means turning the spring collar on your shock absorbers up or down.
Here’s how to do it:
Adjusting Spring Collars
Most RC cars have a collar or clip that sits at the bottom of the shock spring. When you thread this collar up (tighten it), you push the spring up, which raises the ride height. When you thread it down (loosen it), the spring drops lower and so does the car.
To raise ride height:
- Turn the spring collar upward (toward the body of the shock)
- This compresses the spring more and pushes the car up
To lower ride height:
- Turn the spring collar downward (away from the shock body)
- This gives the spring more room and lets the car sit lower
Make small adjustments. Half a turn at a time. Then measure again. Do this for each corner of the car.
Using Turnbuckles on Some Cars
Some RC cars — especially 1/10 scale touring cars and buggies — use turnbuckles in the suspension links. Adjusting the length of these links can also change ride height. But this method also changes camber and toe angles, so it’s a bit more advanced. For beginners, stick with the spring collars first.
Changing Springs
If your spring collars are maxed out and you still can’t get the right height, you might need stiffer or softer springs. Stiffer springs hold the car up higher. Softer springs let it sit lower. This is a more involved change, but it’s worth knowing about.
Recommended Ride Height by RC Car Type
Different types of RC cars need different ride heights. Here’s a quick guide:
1/10 Scale On-Road Touring Car
These cars race on smooth tracks. They need very low ride heights for maximum stability.
- Typical front ride height: 3mm to 5mm
- Typical rear ride height: 4mm to 6mm
Low and tight is the goal here. The smoother the track, the lower you can go.
1/10 Scale Off-Road Buggy
Buggies run on dirt tracks with bumps, jumps, and loose surfaces. They need more clearance.
- Typical front ride height: 8mm to 12mm
- Typical rear ride height: 10mm to 14mm
More clearance helps the buggy absorb rough terrain without scraping the chassis.
1/10 Scale Short Course Truck
Short course trucks are a bit bigger and heavier. They run on tracks similar to buggies.
- Typical front ride height: 10mm to 15mm
- Typical rear ride height: 12mm to 16mm
Rock Crawler
Crawlers need a lot of ground clearance to get over big obstacles.
- Typical ride height: 25mm to 40mm or even more
Crawlers are the exception to the “lower is better” rule. Higher is better here.
These are just starting points. Every track and driving style is different. Dial it in based on your own experience.
How to Check If Your Ride Height Is Even
Once you’ve set the front and rear heights, you want to make sure the left side and right side match too.
Here’s how:
- Measure the ride height on the left front corner
- Measure the ride height on the right front corner
- They should be the same number — or within 0.5mm of each other
If one side is higher than the other, the car will pull to that side during cornering. Adjust the spring collar on the lower side until it matches.
Do the same for the rear corners.
This side-to-side balance is called chassis roll or side-to-side balance. It’s a small detail, but it makes a real difference in how the car tracks straight and handles in turns.
Common Ride Height Problems and How to Fix Them
Problem: Car rolls over in corners Fix: Lower the ride height to drop the center of gravity. Start by dropping 1mm at a time.
Problem: Car scrapes the ground on bumps Fix: Raise the ride height. Add 1–2mm to both front and rear.
Problem: Car feels loose and unstable at speed Fix: Try lowering the rear ride height slightly. This helps plant the rear end.
Problem: Car understeers (doesn’t want to turn) Fix: Try raising the front ride height slightly. This takes a little pressure off the front tires and lets them turn more freely.
Problem: Car oversteers (rear slides out too much) Fix: Raise the rear ride height a little. This reduces traction on the rear end and balances the car.
Problem: Ride height changes after a few laps This can happen when springs are old or worn. Check your spring collars to see if they’ve loosened. You can add a small dab of thread-lock fluid to hold them in place — but make sure it’s the removable kind so you can still adjust later.
Tips for Getting the Best Results
Here are some extra tips to make your ride height setup go smoother:
Always measure on a flat surface. This is so important. Even a slight tilt in the surface will throw off your measurements by a millimeter or two.
Let the car settle before measuring. Push it back and forth a few times. The suspension needs to find its natural resting position.
Make small changes. Big jumps in ride height can make the car feel completely different. Go slow. One millimeter at a time is the right approach.
Test after every change. Set the height, drive a few laps, come back and check if the height has shifted. Some setups need a few laps to settle in.
Keep a setup sheet. Write down every change you make. Note the ride height, the track conditions, and how the car felt. This helps you learn faster and build a bank of good setups.
Match front and rear carefully. Ride height is not just about one end of the car. Both ends work together. If you change the front, it usually affects how the rear feels too.
Use quality tools. A cheap plastic ruler works, but a proper RC ride height gauge is much easier to use and more accurate. A digital caliper is even better for getting exact numbers.
How Ride Height Relates to Other Setup Adjustments
Ride height doesn’t work alone. It connects to other suspension settings. Here’s a quick look at how they relate:
Camber — When you change ride height, your camber angle can change too. After adjusting ride height, always check your camber and correct it if needed.
Droop — Droop is how far your suspension hangs down when the car is lifted off the ground. Ride height affects the droop setting. Lower ride height usually means less droop.
Shock oil weight — Stiffer shock oil combined with a lower ride height gives a very planted feel. Softer shock oil with higher ride height gives a more floaty, smooth ride over bumps.
Anti-roll bars (sway bars) — Sway bars limit body roll. If your car rolls too much even after lowering the ride height, adding or tightening a sway bar can help.
All of these settings connect. Ride height is usually the first thing you set. Then you build the rest of the setup from there.
Setting Ride Height for Different Track Conditions
The track surface changes everything. Here’s how to think about it:
Smooth, tight indoor carpet track — Go low. Less ride height helps traction on clean surfaces. You don’t need extra clearance when there are no bumps.
Rough outdoor dirt track — Go a bit higher. The extra clearance keeps your chassis from dragging on rough patches. It also gives your suspension more room to work through big bumps.
Track with jumps — Medium height works best. Too low and you’ll bottom out on landings. Too high and the car feels wobbly in the air.
Wet or slippery conditions — Keep the ride height moderate and focus on other settings like tires and shock oil. Ride height alone won’t fix grip on a wet track.
The best drivers adjust their ride height for every track they visit. It’s a quick job once you know how to do it. That’s why keeping a setup sheet and a good set of tools in your pit bag is so useful.
Final Thoughts
Setting the ride height on your RC car is one of the best things you can do to improve performance. It doesn’t cost any money. It just takes a little time and patience.
Start simple. Set the front and rear heights based on the type of car you have. Make sure both sides are even. Drive a few laps. Come back and see how the car feels. Adjust from there.
With practice, you’ll develop a feel for what works. You’ll start to notice when the car is sitting too high or too low just by the way it handles. That’s when tuning becomes really fun.
Don’t be afraid to experiment. RC car setup is all about testing, learning, and fine-tuning. Every tweak teaches you something new about how your car works.
Now grab your hex driver, find a flat surface, and start dialing in that ride height. Your lap times will thank you.
Related topics to explore: RC car suspension setup, shock absorber tuning, camber and toe settings, spring rate selection, RC car chassis flex, droop screw adjustment.