How to Waterproof RC Boat Electronics?
If you’re new to RC boating, you might be wondering why waterproofing electronics matters so much. Here’s the simple truth: water and electricity don’t mix. When water gets into your boat’s electronic components, your remote control boat can short circuit, malfunction, or stop working altogether. The good news? Waterproofing your RC boat electronics isn’t as hard as you think.
This guide breaks down everything you need to know about protecting your RC boat’s electronics from water damage. We’ll cover the best methods, materials, and practices to keep your boat running smooth in any water condition.
Why Water Damage Happens to RC Boats
Your RC boat is basically a tiny vehicle filled with electrical parts. These parts include motors, servos, receivers, batteries, and wiring. Each of these components needs electricity to work. When water enters the boat, it creates a path for electricity to flow where it shouldn’t. This causes shorts, burnt components, and complete system failures.
Water damage doesn’t always happen in obvious ways. You might take your boat out on a calm lake and think everything is fine. But if tiny water droplets get inside your housing, they can build up over time. Humidity inside sealed spaces causes condensation. Salt water is especially dangerous because it conducts electricity even better than fresh water.
Even a tiny splash during launching or landing can introduce water into your electronics. A small leak that goes unnoticed for a few minutes can destroy expensive components. This is why serious RC boat enthusiasts spend time waterproofing before they ever hit the water.
Understanding Your RC Boat’s Electronics
Before you start waterproofing, you need to know what you’re protecting. Every RC boat has basic electronic components.
Your battery stores and provides power. Batteries need protection from water exposure. A wet battery can corrode internally and lose all function. The connections where the battery plugs in are especially vulnerable.
Your receiver picks up signals from your transmitter (remote control). This small circuit board sits in your boat and controls everything. It’s one of the most sensitive components on your boat. When the receiver gets wet, it stops receiving signals from your remote.
Your servos are small motors with gears inside. They move the rudder, throttle, and other moving parts. Servos contain tiny mechanical parts that seize up and rust when exposed to water.
Your electronic speed controller (ESC) manages power to the main motor. It sits between your battery and motor. Water damage to the ESC will stop your motor from working. You might hear nothing but silence when you try to go forward.
Your motor spins to push your boat. The motor shaft and bearings need protection from water. Even brushless motors, which are more waterproof than brushed motors, can fail if water gets into the bearing races.
Your wiring and connectors carry electricity throughout the boat. Any loose connection or corroded wire creates resistance and heat. This can start fires or cause complete electrical failure.
All these parts work together. One failed component means your whole boat stops working.
The Basics of Waterproofing Your RC Boat
Waterproofing works through a few simple ideas. First, you want to create barriers between water and electronics. Second, you want to manage moisture and condensation. Third, you want to use materials that resist water and don’t rust.
The main waterproofing approach is called “wet well design.” You create sealed compartments where your electronics live. You keep the water out as much as possible. If some water does get in, it sits in a low area where you can drain it easily.
The second approach is total encapsulation. You cover all components with waterproof coatings. These coatings block water and moisture from reaching the metal and circuits. This method works great for items you can’t seal in a compartment.
The third approach uses combination methods. You seal some parts and coat others. You use gaskets and barriers for sensitive items. You space things out so water doesn’t pool near electronics.
Smart RC boat builders use all three methods together. This layered approach gives you the best protection.
Choosing the Right Waterproofing Materials
Different materials work for different jobs. Let’s talk about the best options for RC boat electronics.
Silicone Sealant is your first-line defense. Silicone is flexible, waterproof, and doesn’t harden and crack like other sealants. You can use it to seal gaps between parts. Avoid latex or acrylic caulk, which aren’t waterproof. Buy 100% pure silicone sealant from any hardware store. It costs just a few dollars and lasts a long time.
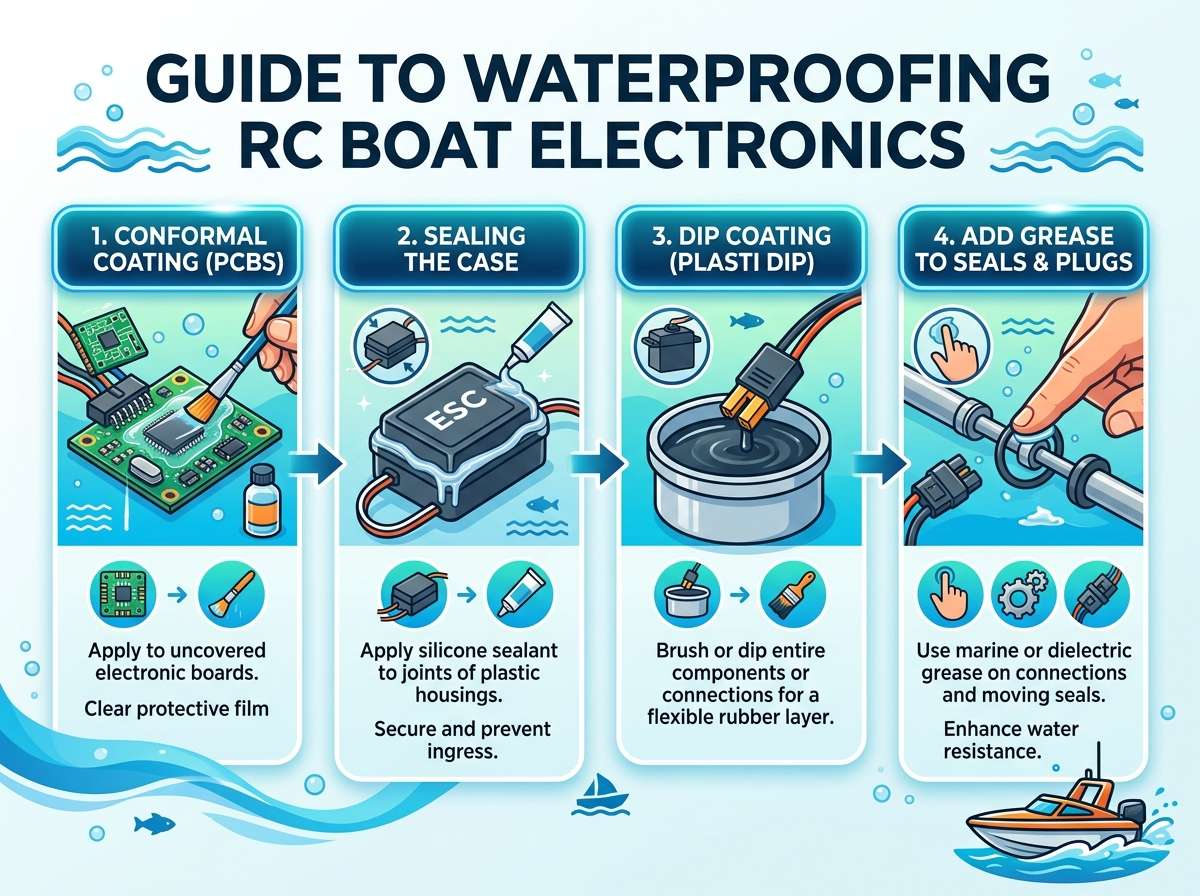
Waterproof Conformal Coatings are thin plastic layers you brush or spray onto circuit boards and components. These coatings let electricity flow through your components but keep water out. Acrylic, urethane, and silicone-based conformal coatings all work well. They’re thinner than regular paint and don’t interfere with electronic function. Buy these online from hobby stores.
Waterproof Grease and Lubricants protect moving parts and connectors. Waterproof grease seals out moisture while letting metal parts move freely. Use silicone-based waterproof grease, not regular grease. Regular grease washes away in water and doesn’t protect well.
Gasket Materials create watertight seals between parts. Rubber gaskets compress when you bolt pieces together, blocking water. Foam gaskets work for low-pressure applications. Silicone rubber gaskets handle higher pressures and temperature changes. Buy gasket material from hobby shops or online retailers.
Heat-Shrink Tubing protects wires and connections. When you apply heat, the tubing shrinks tight around the wire. Choose waterproof heat-shrink tubing. Regular tubing doesn’t seal water out. Get waterproof tubing from electronics supply stores.
Waterproof Batteries and Connectors make a big difference. Some battery packs come with waterproof housings. Some connectors have rubber covers that seal water out. Invest in quality connectors designed for wet environments.
Desiccant Packs absorb moisture inside sealed compartments. These silica gel packs soak up water vapor. Replace them between boating sessions. You can find desiccant packs in hobby stores or online.
Epoxy Putty and Adhesives work for repairs and sealing. Two-part epoxy mixes into putty that you shape and mold. Once it hardens, it creates a waterproof seal. Use epoxy rated for use with electronics.
Spray-On Protective Coatings give you fast, even coverage. You spray waterproof coating directly onto parts. It dries to a thin, protective layer. Spray-on coatings cost more than brush-on types but work faster.
Step-by-Step Guide to Waterproofing Your RC Boat Electronics
Let’s walk through the actual process. This method works for most RC boat designs.
Step 1: Inspect and Clean Everything
Before you seal anything, clean all components thoroughly. Use a soft, dry brush to remove dust and dirt. Don’t use water yet. You want to start with clean, dry parts.
Look for any cracks, damage, or old sealant. Remove old caulk that’s dry or peeling. Look at all connectors and joints. Note any spots that look wet or corroded. These problem areas need extra attention.
Check that all batteries, motors, and servos are actually working before you seal them. Don’t waterproof broken components. This wastes materials and seals in problems you can’t fix later.
Step 2: Seal the Main Electronics Compartment
The heart of your boat is the electronics compartment. This is where your receiver, batteries, and ESC live. You need to seal this space so water can’t get in.
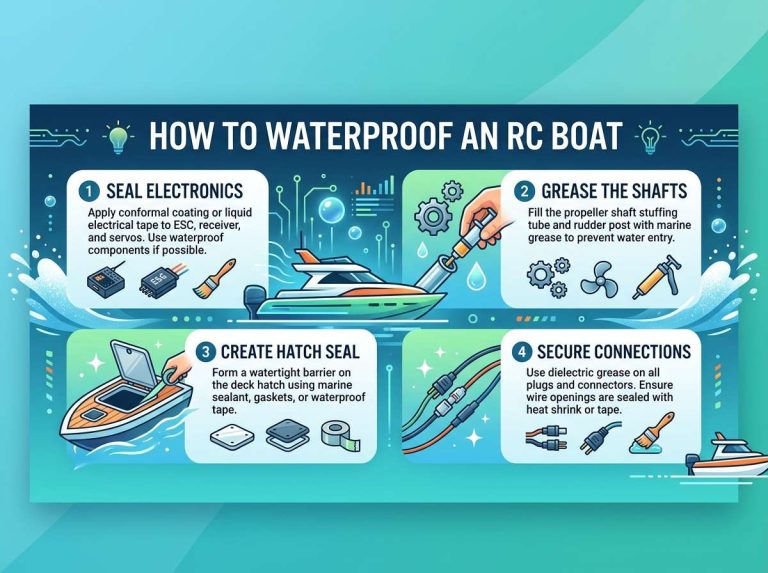
Use silicone sealant around all joints in your electronics box. Apply a bead of silicone where different panels meet. Smooth it out with a wet finger. Let it cure for 24 hours before you use the boat.
Pay extra attention to cable entry points. Wires enter the electronics compartment to connect to the motor and servos. These openings are major leak points. Seal around each cable with silicone. You can also use rubber grommets to protect wires as they enter the compartment.
Step 3: Create a Gasket Seal
Install gasket material between any removable panels and the main body. If you ever need to open your electronics compartment, a gasket creates a waterproof seal when you close it back up.
Cut gasket material to fit your panel edges. Use adhesive-backed gasket material for easiest installation. Simply peel the backing and stick it to the panel edges. When you bolt the panel closed, the gasket compresses and seals water out.
If your boat uses a access hatch, seal that hatch with gasket material too. The hatch is a common leak point because you open and close it many times.
Step 4: Protect Your Battery
Your battery needs special protection. Water on battery terminals causes corrosion and short circuits.
Get a waterproof battery box or bag designed for RC boats. These are sealed plastic containers that hold your battery. The box has waterproof connectors for the battery wires. Your battery sits inside the box, completely protected from splashes and dunking.
If you don’t use a battery box, apply waterproof grease to all battery connections. Coat the terminals and the connector plugs. This greasy layer blocks water while electricity still flows through.
Wrap your battery with waterproof wrap or place it in a waterproof plastic bag. Leave just the connector wires exposed. This gives you multiple layers of protection.
Step 5: Seal Your Connectors
Electronic connectors are the weak link in most RC boats. They have tiny pins and gaps where water sneaks in.
Apply waterproof grease into the connector housing. Don’t just coat the outside. Gently work grease into the connection points. The grease fills the small gaps and blocks water.
For exposed connectors that you connect and disconnect often, use weatherproof connector covers. These rubber or plastic covers slide over the connection to seal it. Remove the cover when you need to use the connector, then replace it.
Seal the connector base where the wires enter the housing. Use silicone sealant or heat-shrink tubing. This stops water from running down the wires and into the connector.
Step 6: Coat Your Circuit Boards
If you have exposed circuit boards or components, apply conformal coating to protect them.
Conformal coating comes in spray cans or liquid form. Spray coating is easier for beginners. Hold the can 6 to 8 inches away and spray a thin, even layer. Don’t spray too thick. You want a fine mist that covers everything.
If you use liquid conformal coating, brush it on with a small brush. Apply thin layers. Let each layer dry before applying the next coat. Two thin coats work better than one thick coat.
Let conformal coating cure completely before using your boat. Check the product instructions for cure time. Most coatings need 24 hours to fully harden.
Step 7: Protect Your Motor and Servo Connections
Your motor and servos connect to the ESC and receiver. These connections sit on the outside of your boat or in semi-sealed areas.
Cover the servo connection points with waterproof heat-shrink tubing. Slide the tubing over the wire connections and heat it with a heat gun or hair dryer. The tubing shrinks tight and seals the connections.
Use waterproof servo extensions if your servo arms extend outside the boat hull. The extensions move with the servo but keep the electrical connection sealed inside the boat.
Apply waterproof grease around the motor shaft where it exits the hull. This is a spinning part that’s hard to seal completely. Grease helps a lot. The spinning motion works the grease in deeper for better protection.
Step 8: Install Drain Points
Even with the best sealing, some water might still get inside. You need a way to drain it safely.
Drill or cut a small drain hole at the lowest point inside your electronics compartment. Make the hole just big enough to fit a small rubber plug or ball valve. The plug stays in place during operation. After boating, remove the plug and let any water drain out.
Some builders install small drain tubes that exit the boat at the stern (back). The tube stays open during operation and drains water overboard. This is more advanced but very effective.
Step 9: Add Desiccant Packs
Place desiccant packs inside sealed compartments. These packs absorb moisture and prevent condensation buildup.
Use moisture-indicating desiccant. These packs turn color when saturated, so you know when to replace them. Place packs where air circulates inside the sealed space. Replace them after every 3 to 5 boating trips.
The cost is minimal. A small pack costs just a dollar or two. The protection they provide is worth the small investment.
Different Boat Types and Special Considerations
Different RC boat designs need different waterproofing approaches.
Speedboats and Racing Boats are built for speed, not comfort. They have small compartments and limited space for electronics. Seal everything tightly and use compact waterproof components. You might not have room for large battery boxes or drain systems.
Tugboats and Work Boats have more space. They move slowly, which means less stress on seals. This gives you more options. You can use gasket seals instead of permanent sealant. You can install larger battery boxes and drain systems.
Scale Model Boats look realistic and have detailed cabins. You need to seal electronics without ruining the appearance. Use clear conformal coatings so they don’t show. Seal components inside the hull where they’re hidden from view.
Sailboats sit still most of the time, but water damage can still happen. They catch rain and splashes. Seal the cabin hatch securely. Install a small drain in the cabin to prevent water buildup.
Submarines and Dive Boats face the biggest challenge. Your boat might submerge completely. This requires the strongest waterproofing possible. Use pressure-tested housings for all electronics. Consider fully potted electronics where components are embedded in waterproof resin.
Maintenance and Care After Waterproofing
Waterproofing isn’t a one-time job. You need to maintain your seals and coatings.
After every boating trip, rinse your boat with fresh water. This removes salt and dirt that corrode seals. Dry the boat completely before storing it.
Check your seals and gaskets regularly. Look for cracks, peeling, or dry rot. Replace gaskets that are damaged. Reapply sealant where it’s cracking or separating.
Inspect your drain holes and remove any plugs. If water drains out, your compartment was working as designed. If no water drains, check for new leaks.
Replace desiccant packs regularly. Don’t wait for them to turn color. Replace them every boating season at minimum.
Look for corrosion on connectors. Clean corrosion with a wire brush and reapply waterproof grease. Corrosion means water is getting in.
Test all components regularly. Make sure your motor spins smoothly. Check that servos move freely. Verify that your receiver picks up signals clearly. Problems in these areas often mean water is getting inside.
Common Mistakes to Avoid
Beginners often make the same waterproofing mistakes. Learning from them saves time and money.
Mistake 1: Using the Wrong Sealant Latex caulk and acrylic sealant aren’t waterproof. They peel and crack underwater. Buy 100% silicone or polyurethane sealant designed for wet environments. Check the package to confirm it’s waterproof.
Mistake 2: Sealing Before Testing Always test components before you seal them. You can’t fix a broken motor once it’s sealed inside a compartment. Verify everything works first.
Mistake 3: Forgetting About Connectors Connectors are the biggest leak points. Don’t forget to seal them. Spend extra time on connector protection. This is where most water damage happens.
Mistake 4: Ignoring Condensation Beginners often think sealing everything stops water. But sealed spaces with temperature changes build up condensation. Use desiccant packs to manage condensation. Install drain holes to release pressure and moisture.
Mistake 5: Skipping Cable Entry Points Cables that come in and out of sealed compartments are huge vulnerability. Don’t skip sealing around these cables. This is where water sneaks in most easily.
Mistake 6: Using Too Much Sealant More sealant doesn’t mean better sealing. Too much sealant becomes messy and hard to remove if you ever need to. Apply thin, even beads. Let it cure fully. One good coat beats three sloppy ones.
Mistake 7: Not Replacing Gaskets Gaskets wear out. They get compressed, dry out, and lose their seal over time. Replace gaskets every year or two. They’re cheap. New gaskets cost less than replacing your electronics.
Mistake 8: Forgetting Drain Holes You need a way for water to get out. Drain holes are just as important as sealing. Install at least one small drain at the lowest point. This prevents water from pooling on your electronics.
Advanced Waterproofing Techniques
Once you master the basics, you can try more advanced methods.
Potting and Encapsulation means completely covering components with waterproof resin. You place electronics in a mold and pour liquid resin around them. The resin hardens into a solid block. The electronics are now completely protected. This is permanent, so only pot components you never need to access.
Metal and Glass Pressure Housings create strong, waterproof vessels. Submarines and serious dive boats use these. They’re expensive but offer maximum protection. You place electronics inside the housing, seal it shut, and it can handle extreme water pressure.
Oil Immersion seals electronics in waterproof mineral oil. The oil carries no electrical charge, so it doesn’t harm electronics. Submerge your whole circuit board in mineral oil inside a sealed container. This method is extreme but effective. It’s mostly used for fully submerged vessels.
Layered Barrier Systems combine multiple waterproofing methods. You seal compartments, apply conformal coating, use gaskets, and add desiccant packs all together. The more layers you have, the stronger your protection.
Testing Your Waterproofing
Before you trust your boat in serious water, test your waterproofing.
The Splash Test is your first level. Fill a bathtub with a few inches of water. Set your boat in the water. Splash it gently. Watch for water leaks or electrical failures. If it passes, move to the next test.
The Float Test puts your boat in deeper water. Place it in a pool or calm lake with shallow water nearby. Operate it for a few minutes. Pull it out and inspect for water inside. Use a light to look into compartments. Use a paper towel to check for moisture on electrical components.
The Drain Test checks your drain system. Fill the boat with water and let it sit for a minute. Remove your drain plug. Water should pour out quickly. If it doesn’t drain, your hole is too small or clogged.
The Full Operation Test means running your boat fully in water for 15 to 30 minutes. Push it to operational limits. Beach it on sand, launch it quickly, make sharp turns. This stresses your seals and reveals weak points.
Don’t jump straight to open water. Test in safe conditions first. If something fails, it’s much easier to fix in a bathtub than in the lake.
Real-World Examples of Effective Waterproofing
Different builders use different approaches based on their boat type.
One hobbyist built a fast speedboat using a rigid plastic hull. He sealed the electronics compartment with silicone sealant and installed a gasket-sealed hatch for access. He used a waterproof battery box and waterproof servo case. He applied conformal coating to the receiver and speed controller. He never had water damage in 50+ boating trips.
Another builder made a detailed scale tugboat. He hid all electronics inside a sealed cabin. He used pressure-tested O-ring seals on the cabin access door. He installed small desiccant packs in the cabin. He used waterproof servo connectors rated for saltwater. The boat survived years of boating with zero water issues.
A submarine builder created a pressure hull from PVC pipe. He sealed the electronics inside the hull with potting compound. He used a small drain valve at the bottom of the hull. Even when fully submerged, the boat worked perfectly. The potted electronics meant he could never open them, but they never failed.
Final Thoughts on Waterproofing
Waterproofing your RC boat electronics isn’t hard. It’s just a series of simple steps: seal compartments, protect connectors, coat exposed parts, manage moisture, and provide drainage.
The time you spend waterproofing upfront saves you money later. Replacing flooded electronics costs a lot more than buying sealant and conformal coating. A destroyed receiver, ESC, and battery costs hundreds of dollars. Waterproofing materials cost maybe thirty dollars.
Start with the basics. Seal your main compartment. Protect your connectors. Apply conformal coating. Add desiccant packs. Test everything before you take it to open water.
Once you’ve waterproofed one boat, you’ll know exactly what to do on the next one. The process becomes faster and easier. You’ll develop your own techniques and preferences.
Most importantly, your RC boat will last longer and run better. You’ll spend more time on the water enjoying your hobby and less time dealing with water damage. That’s worth the effort.
Get started today. Grab some silicone sealant and waterproof grease. Seal up your boat. Your electronics will thank you. Your boat will last years instead of months. And you’ll never have to say goodbye to your favorite RC boat because of water damage.
Happy boating!

Peterson is an RC hobby enthusiast and product reviewer with a passion for remote-controlled cars, trucks, boats, drones, and accessories. He enjoys testing the latest RC products, comparing features, and sharing practical buying guides to help beginners and experienced hobbyists make informed decisions. Through RCThing.com, Peterson provides honest reviews, maintenance tips, and expert advice to help readers get the most from their RC adventures.