How to Build an RC Boat?
Building your own remote control boat is one of the most rewarding hobbies you can start. You get to create something with your own hands, learn new skills, and spend time on the water doing something fun. The best part? You don’t need to be a technical expert to get started. This guide walks you through every step of the boat building process, so you can launch your first radio-controlled vessel with confidence.
Why Build Your Own RC Boat?
Before we dive into the actual construction, let’s talk about why building a scale model boat makes so much sense. When you build your own remote control watercraft, you gain total control over how it looks and performs. Store-bought kits sometimes have limitations, but a custom-built boat lets you make it exactly how you want it. You’ll also save money in the long run. Building an RC boat from scratch costs less than buying a high-end pre-assembled model. Plus, you learn valuable skills along the way. Working with tools, understanding electronics, and solving problems all come naturally when you’re focused on your boat project. The hobby also connects you with a fantastic community. Thousands of boat enthusiasts share tips, designs, and experiences online. You’ll never feel stuck because help is always available from experienced builders.
Types of RC Boats You Can Build
Different types of remote control boats serve different purposes. Before you start construction, think about what kind of boat you want to end up with. Speedboats are fast and fun. These racing boats zoom across the water and give you an adrenaline rush. If speed excites you, a speedboat is your answer. Sailboats move with the wind. They’re slower but incredibly peaceful to watch. Building a scale model sailboat teaches you about aerodynamics and water dynamics. Fishing boats and cargo ships appeal to people who love realistic models. These slower boats deliver satisfaction through detail and accuracy rather than speed. Submarines and underwater boats offer a unique challenge. They dive below the surface, making them completely different to build and operate. Most beginners start with speedboats because they’re forgiving and exciting. As you gain experience, you can try other boat types.
Gather Your Materials
Building an RC boat requires specific parts and materials. Let’s break down everything you need before you start. The hull is your boat’s body. You can carve one from foam, fiberglass, or wood. Foam hulls are easiest for beginners because they’re lightweight and forgiving. You can buy a pre-made hull kit or shape your own using a hot wire foam cutter. The motor powers your boat through the water. Electric motors are best for beginners because they’re reliable and easy to control. Brushless motors offer better performance than brushed motors, but brushed motors work fine when you’re learning. A battery powers the motor. Lithium polymer batteries work best for remote control watercraft. They’re light, powerful, and hold a charge well. Always buy batteries designed for hobby use, not regular consumer batteries. The propeller converts motor power into forward motion. Different propeller shapes and sizes affect how your boat performs. A three-blade propeller is a safe choice for your first build. A receiver picks up signals from your remote controller. A servo motor uses those signals to steer the boat. Together, these parts control direction and speed. The rudder steers the boat. It’s basically a flat piece attached to the back that moves left and right. Aluminum or plastic works well. You’ll need waterproof containers called compartments to hold electronics. These keep your battery, motor, and receiver dry and safe. You can buy ready-made compartments or build them from plastic or aluminum tubes. A remote control transmitter sends signals to your boat. Most hobbyists use two-channel or four-channel transmitters. Two channels control forward/backward and left/right, which is enough to start. Don’t forget glue, tape, and sealant. You’ll want waterproof epoxy, silicone sealant, and electrical tape. These materials keep water out of critical areas.
Tools You’ll Need
Building a remote control boat requires basic tools that most people already have around the house. A soldering iron joins wires and electrical connections. Don’t worry if you’ve never soldered before—it’s easy to learn. You’ll use it to attach wires to your battery, motor, and receiver. A screwdriver set handles various fasteners. Have both Phillips and flathead screwdrivers available. A drill with various bits makes holes for propeller shafts, servo mounts, and compartment placement. A small rotary tool also works great for detail work. Sandpaper in different grits smooths your hull and rough edges. Start with coarse sandpaper and work toward fine grits for a smooth finish. A cutting tool like a knife or saw carves and shapes materials. If you’re working with foam, a hot wire foam cutter makes clean, straight cuts. Calipers measure distances accurately. Precision matters when you’re building electronic components. A multimeter tests electrical connections and batteries. It ensures everything works before you put it in the water. Waterproof sealant tools like caulking guns apply sealant to seams. These prevent water leaks. A work table or bench gives you a safe place to build. Make sure you have good lighting and enough space to spread out your materials.
Step-by-Step Building Process
Now we get to the fun part—actually building your remote control boat. Follow these steps carefully, and you’ll have a working watercraft.
Step 1: Prepare Your Hull
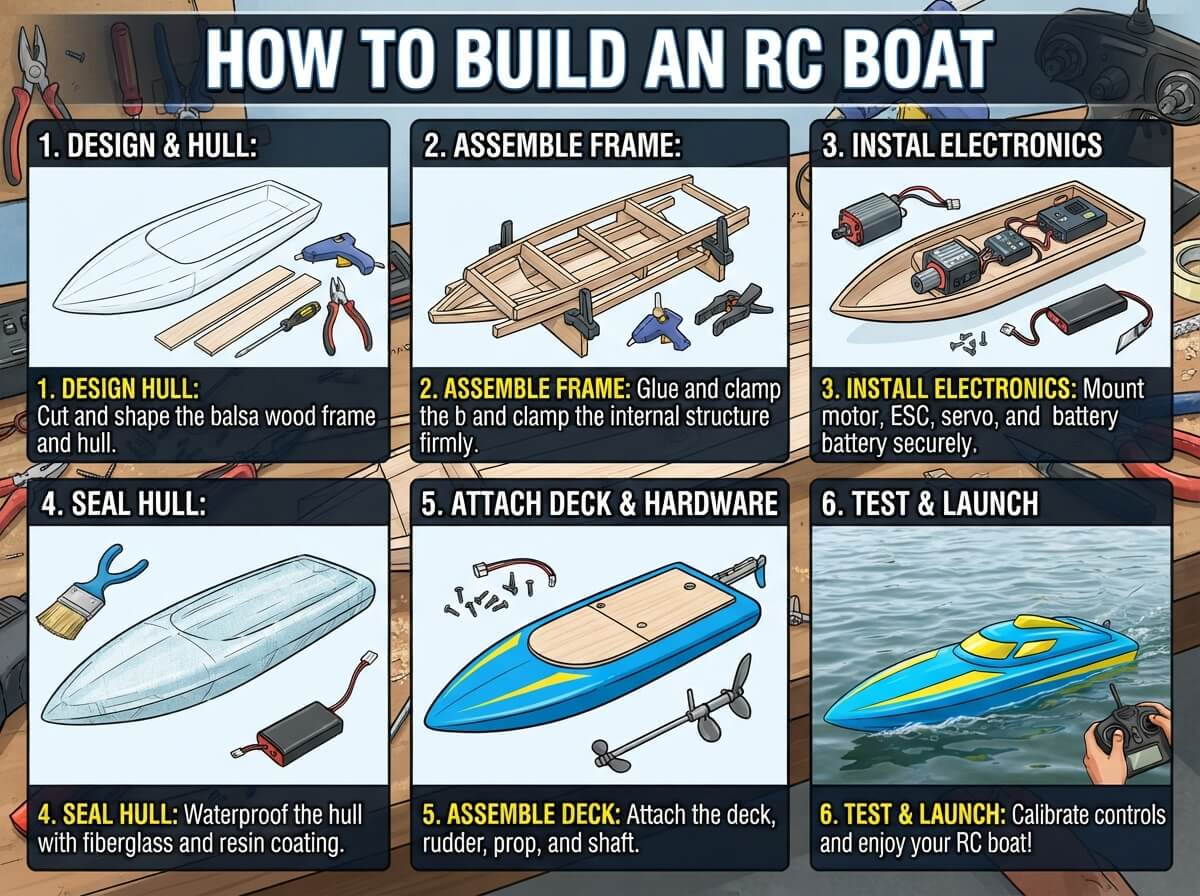
Start by getting your hull ready. If you bought a kit, it might need sanding and shaping. Sand the entire surface with coarse sandpaper to remove any rough spots or mold lines. Once you’ve sanded it smooth, wash it with water to remove dust. Let it dry completely. A clean hull gives you a better surface for glue and sealant to stick. Look for any cracks or damage. Fill small cracks with waterproof epoxy. For larger damage, repair it before moving forward. A damaged hull will leak, and water inside your boat ruins electronics instantly.
Step 2: Install the Propeller Shaft
The propeller shaft runs through your hull and connects to the motor. Mark where the shaft should go based on your motor location. Make sure the shaft sits low enough to push water but high enough to avoid damage. Drill a hole carefully. Use a bit that matches your shaft diameter. Take your time with this hole—mistakes here affect how your boat moves. Insert the shaft and secure it with waterproof bearings. These spinning parts let the shaft rotate smoothly without wobbling. Secure them tightly so nothing shifts during operation.
Step 3: Create Battery and Electronics Compartments
Your battery, motor, and receiver need protected spaces. These compartments keep water away from electronics while keeping weight low in the boat. Cut out a compartment from plastic or aluminum tubing. It should fit your battery length and width with a little extra space for wires. Secure it inside the hull using waterproof epoxy and brackets. Create another compartment for your receiver and servo. This one needs less space but must be completely waterproof. Sealant around every edge prevents water seepage. Make sure you leave room for accessing the battery. You’ll need to charge it and replace it, so don’t seal it inside permanently.
Step 4: Mount the Motor
Attach your motor firmly to the boat using metal brackets. The motor should be centered and aligned with the propeller shaft. Any misalignment causes vibration and reduces performance. Connect the motor to the propeller shaft using a coupling. This flexible connector transfers power while allowing for tiny alignment imperfections. Secure all mounting bolts tightly. Vibration during high-speed operation can loosen bolts, so use thread-locking compound to keep them from coming undone.
Step 5: Install the Steering System
The servo motor controls steering. Mount it inside the hull in a location where it can connect to the rudder. The servo arm should move through a full range without hitting anything. Run a rod or cable from the servo arm to the rudder. This linkage transfers steering commands to the rudder. Make sure the connection is rigid—any play in this connection ruins your steering precision. Test the servo before sealing everything. Move the rudder side to side and make sure it responds smoothly. Adjust the servo arm position if needed.
Step 6: Wire Everything Together
This is where soldering skills matter. Connect your battery to the receiver using waterproof connectors. The receiver powers the servo and controls the motor speed. Solder the motor wires to the speed controller. This electronic component takes signals from the receiver and sends power to the motor. It’s the bridge between control and action. Connect everything in order: battery to receiver, receiver to speed controller, speed controller to motor. Use wire gauges that match your current requirements. Thicker wire handles more power safely. Wrap all solder joints with electrical tape to prevent shorts. Double-check every connection before testing.
Step 7: Seal and Waterproof
Water inside your boat ends the fun immediately. Apply waterproof sealant to every seam, corner, and opening. Use silicone caulk around compartment edges and epoxy for structural joints. Run a bead of sealant along the entire hull-to-deck joint if your boat has a detachable top. Smooth it with a wet finger for better coverage. Let all sealant cure for the time specified on the package. Don’t rush this step. Incomplete curing means water can still get inside.
Step 8: Balance and Weight Distribution
Your boat needs to sit level in the water. An unbalanced boat handles poorly and might even flip. Add weight to the bottom using lead shot or fishing weights if needed. Place heavier components low and centered. Keep the battery low and centered too. This positioning stabilizes your boat. Test the boat’s float level before running the motor. It should sit at the waterline without tilting forward or backward.
Step 9: Painting and Finishing
Once everything works, make your boat look great. Use waterproof paint designed for boats or scale models. Multiple thin coats look better than one thick coat. Add details like windows, decals, and trim. These touches make your boat feel complete and personal. Use waterproof stickers and decals so they survive water exposure. Apply a clear protective coat over everything. This seals your paint job and adds extra water resistance.
Testing Your RC Boat in Water
Your first launch is exciting and nerve-wracking. Follow these steps to test safely. Start in a calm pool or pond. Never test in rivers or ocean waves initially. Calm water lets you learn how the boat handles without fighting currents. Put on your life jacket—seriously. Any electronics can fail, and you might need to retrieve your boat from deeper water. Test the controls from shore first. Move the steering left and right. Run the throttle up and down. Make sure everything responds correctly. Lower your boat into the water slowly. Hold the transmitter and make sure signals reach the boat. Move the controls and watch the boat respond. Run it at low speed first. Let it cruise for a minute while you get comfortable. Gradually increase speed as you gain confidence. Watch for water leaks. Stop immediately if you see water inside the hull. Retrieve your boat, dry it, and find the leak source.
Maintenance and Care
Your remote control boat needs regular care to last for years. Rinse your boat with fresh water after every use, especially if you used salt water. Salt corrodes electronics and metal parts. Let everything dry completely before storing. Moisture causes rust and electrical problems. Check the battery regularly. Don’t leave it in the boat between uses. Charge it only when you plan to use it. Inspect the hull for cracks or damage. Small repairs now prevent big problems later. Replace the propeller if it gets bent or damaged. A damaged propeller reduces performance and wastes battery power. Keep your transmitter in good condition. Replace batteries as needed and avoid dropping it.
Troubleshooting Common Problems
Things go wrong sometimes. Here’s how to fix common issues. If your boat goes in circles, it’s probably not balanced. Try moving weight side to side until it goes straight. If the steering is slow or unresponsive, check the servo connection. Make sure the rod linking the servo to the rudder moves freely. If your boat won’t start, check the battery first. Make sure it’s charged and properly connected. Test the battery with a multimeter. If water gets inside the hull, find the leak by spraying soapy water around seams while the boat is running. Bubbles show where water enters. If the motor runs but the boat doesn’t move, the propeller might be broken or the shaft coupling might be slipping. Inspect these parts.
Upgrading Your Skills
Once you build your first boat successfully, you can try more advanced projects. Build a larger boat with better performance. Bigger hulls can carry more weight and go faster. Try a different boat type like a sailboat or submarine. Each type teaches different skills. Add more channels to your remote control. Four-channel boats let you control speed and steering independently, just like real boats. Build a racing boat and join a local RC club. Competing against other builders adds a new dimension to the hobby. Create a custom hull design. Design your own hull shape and carve it from foam or fiberglass.
Final Thoughts
Building an RC boat is an achievable goal for anyone willing to put in the effort. You don’t need special talents or years of experience. Start with the basics, follow the steps in this guide, and you’ll launch a working boat on your first try. The process teaches you valuable skills that apply to other hobbies and projects. Soldering, tool use, waterproofing, and electronics knowledge all stick with you. Plus, you’ll create something tangible that works and brings joy. The remote control boat community welcomes beginners. Share your project online, ask questions when stuck, and celebrate your success when you launch. Building boats is fun, rewarding, and totally worth your time. Get started today, and join thousands of hobbyists who love this amazing pastime.